Overview Machines General Tab Nayax Core | Operations
This article covers configuring essential parameters for your machine in Nayax Core. It details settings within the General Tab, covering key parameters such as the card reader, communication, payment options, and other device-specific features.
The Machine Management page serves as the central hub for all device operations.
Image Attached- Quickly identify target machines
- Maintain accurate system records
- Enhance your overall operational efficiency
Nayax Core
Image Attached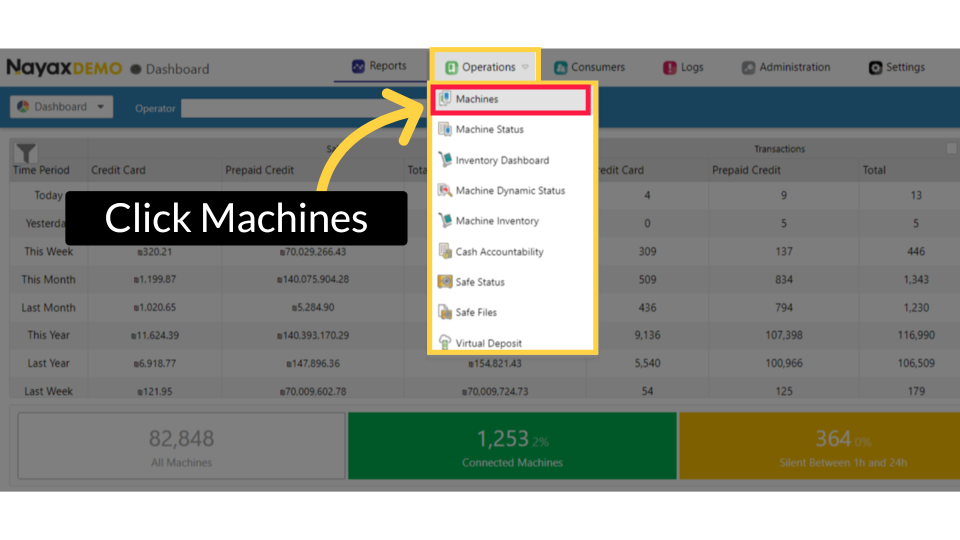
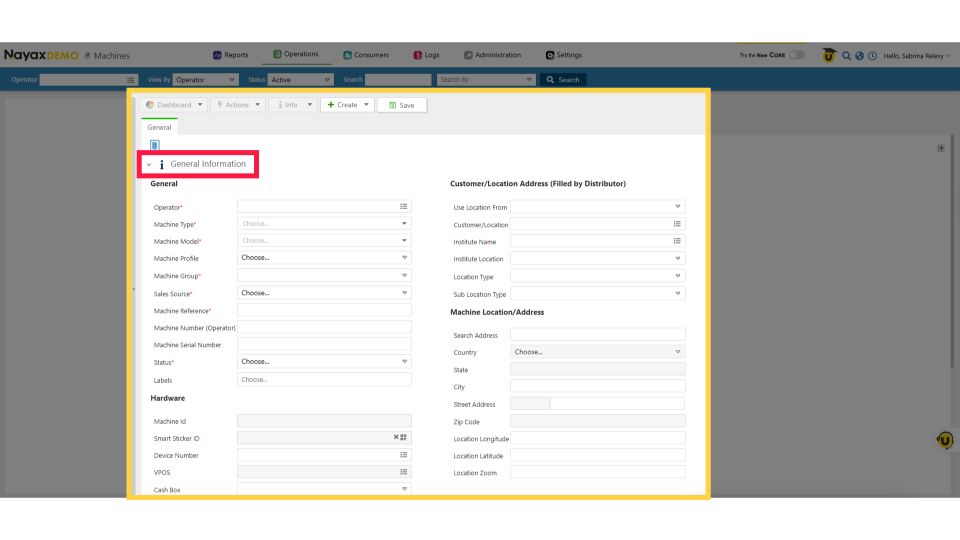
Machines General Page
Image Attached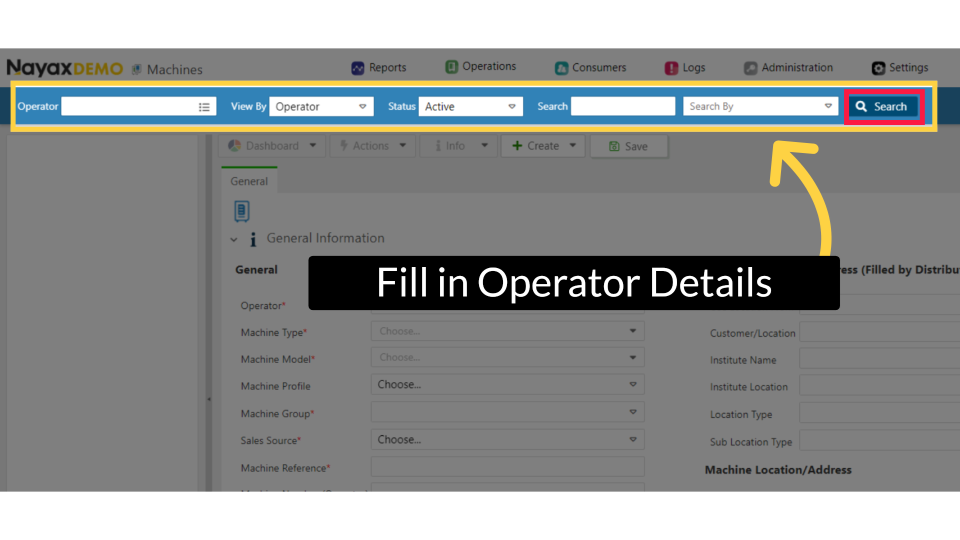
General Tab Overview
Image Attached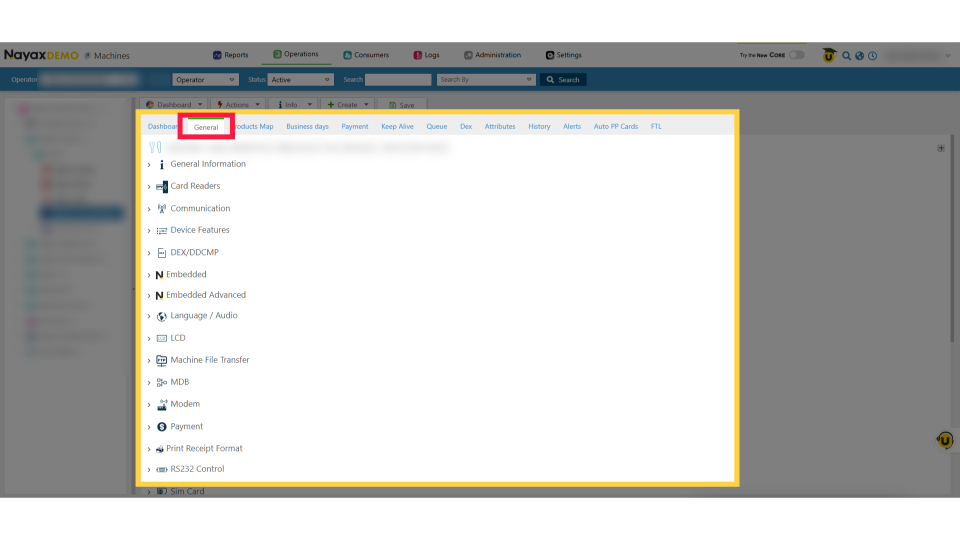
General Tab Section: Company and Machine General Information
Image Attached- View Company Data: See core details about your organization immediately.
- Assess Machine Information: When you select a specific machine, the "General" section updates automatically. We'll walk through these fields from top to bottom.
- Mandatory vs. Optional Fields: Mandatory information is highlighted. We'll focus on these essential fields to ensure accurate, relevant data population.
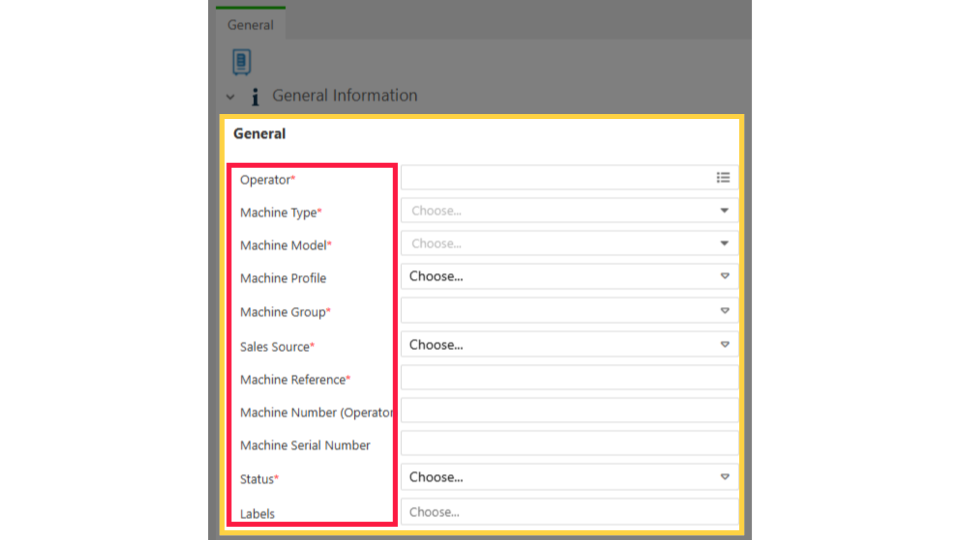
Operator and Machine Section
Image Attached|
Operator
(Required)
|
Displays your company information.
|
|
Machine Type
|
Determines the icon displayed next to your virtual machine in the interface. This selection is purely visual and does not impact device performance.
|
|
Machine Model
(Required)
|
This preset defines the configuration based on your machine's needs. You can change this setting if necessary.
⚠️ Important Note when Changing the Machine Model:
Before configuring a new machine model, you must clear the device of previous settings to ensure correct configuration. Follow these steps precisely:
|
|
Machine Profile
|
An optional field for any custom information you choose to add.
|
|
Machine Group
|
Identifies the group a machine belongs to. This group can determine how campaigns and Monyx functionality are applied.
|
|
Sales Source
(Required)
|
Specifies how your inventory is updated. Options include real-time "Live Transactions" or updates from a separate Vending Management System (VMS) via DEX/DDCMP.
|
|
Machine Reference
(Required)
|
This unique identifier (e.g., "DU-7Xi5snqneA6D") is used by the Nayax website and MOMA App to recognize your machine by name and serial number. You can change this code to a more recognizable name if preferred.
|
|
Machine Number
(Optional but Recommended)
|
It is best practice to enter the serial number of the physical card reader here. This number is visible on the back of the card reader for easy reference by anyone viewing the machine details.
|
|
Machine Serial Number
|
Use this field to record the physical serial number of the vending machine itself, making all relevant serial information easily accessible if needed. |
|
Status
(Required)
|
Controls whether the machine is active or inactive. An active status allows the card reader to accept payments.
|
|
Labels
|
Use this field to create custom labels for organizational purposes. This field is purely cosmetic and has no impact on machine or device performance.
|
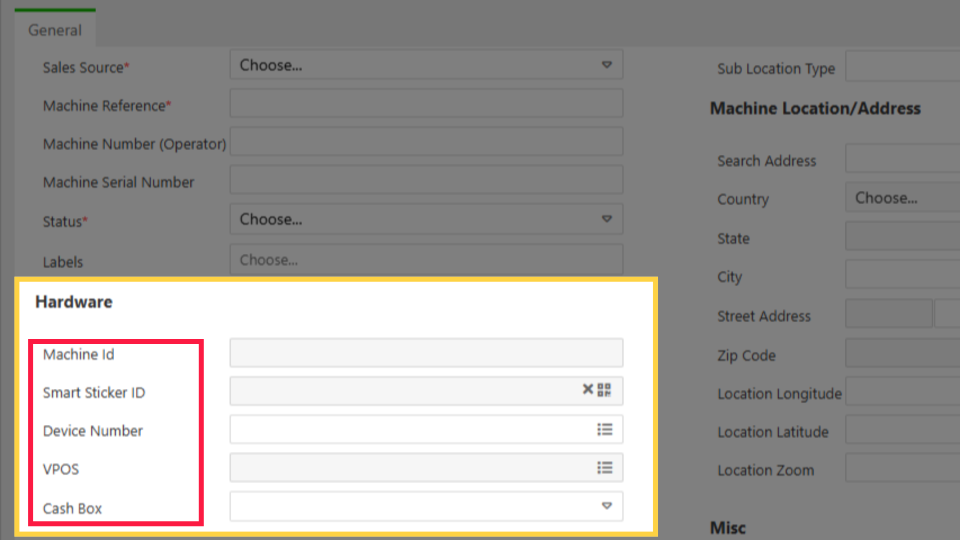
Device Hardware Section
Image AttachedThis section covers critical identifiers for the physical hardware attached to your machine.
|
Machine ID
|
This unique identifier is populated automatically when the machine is created online. It serves as a permanent reference number to identify the specific machine if needed.
|
|
Smart Sticker
(Optional)
|
This number is uploaded using the MOMA app. Refer to our dedicated guide for instructions on how to Upload the Smart Sticker using the MOMA App.
|
|
Device Number
(Required)
|
This mandatory field requires the serial number of the card reader. The format depends on the device type:
|
|
VPOS
|
This field dynamically reflects the type of card reader setup you have:
|
|
Cash Box
|
This field has no relevance to machine or device function and is generally unused when configuring a machine on the Nayax website.
|
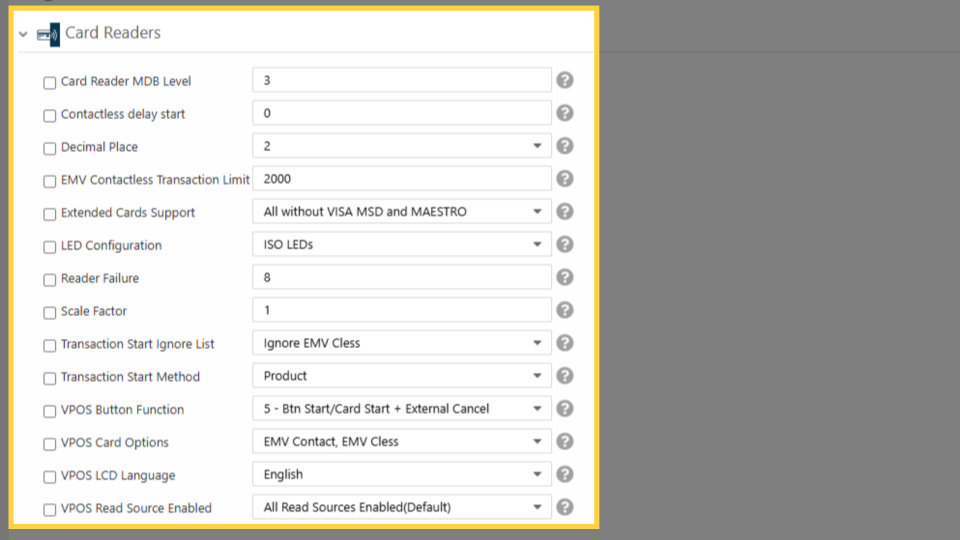
Card Payment Section
Image Attached|
Card Reader MDB Level
|
This field sets the MDB level based on the type of machine your card reader is attached to. There are three MDB levels, and each functions differently depending on the specific machine.
|
|
MDB Level 1
|
Common on most machines (e.g., vending, car wash). The card reader listens to and processes MDB traffic, ensuring it stays in sync with the machine during transactions.
|
|
MDB Level 3
|
Functions with a "master-slave" protocol, similar to Marshall but using the MDB protocol instead of a comm port. In this mode, the machine's internal computer dictates the flow of the transaction.
The item must be selected on the machine before the card reader can take a payment. If you are unsure which level your machine requires, contact the machine's manufacturer for confirmation.
|
|
Contactless Delay Start
|
Sets the time in milliseconds the card reader waits before recognizing an NFC payment. Eg.1000 Ms = 1 second.
This is adjustable to your preference.
|
|
Decimal Place
|
Defines the decimal position for item prices. The most common choice is 2, which ensures accurate transaction processing.
|
|
EMV Contactless Transaction Limit
|
Sets the maximum amount for a contactless payment. This value should be higher than the default credit limit set in Nayax Core.
|
|
Extended Card Support
|
Determines how the card reader recognizes and processes cards, specifically whether the EMV feature is used.
|
|
LED Configuration
|
Defines the visual display shown on the card reader's LED.
|
|
Reader Failure
|
Sets the number of failed attempts before an alert is generated for a card swipe error.
|
|
Scale Factor
|
Scales monetary information transferred between the card reader and the machine. A scale factor of 1 is most common, indicating a 1:1 transfer.
|
|
Transaction Start ignore list
|
Determines which transaction events the card reader should ignore. It is recommended to set this to ignore none to ensure all sales are processed correctly.
|
|
Transaction Start method
|
Defines how a card transaction is initiated.
|
|
VPOS button function
|
(For VPOS units, not VPOS Touch) Defines the function of the start/stop button. This button is often unused as transactions can be initiated by tapping, swiping, or contactless payment.
|
|
VPOS card Options
|
Defines how the card is read, based on either EMV or swipe settings.
|
|
VPOS Version
|
Displays the firmware version of the VPOS or VPOS Touch unit.
|
|
VPOS Read Source Enabled
|
Controls the enabled VPOS read sources. You can view all options by hovering over the question mark icon.
|
|
VPOS SAM Number
|
Displays the SAM (Secure Access Module) number used for various applications.
|
|
VPOS Serial
|
Displays the serial number of the VPOS unit that is sent to the server during transactions.
|
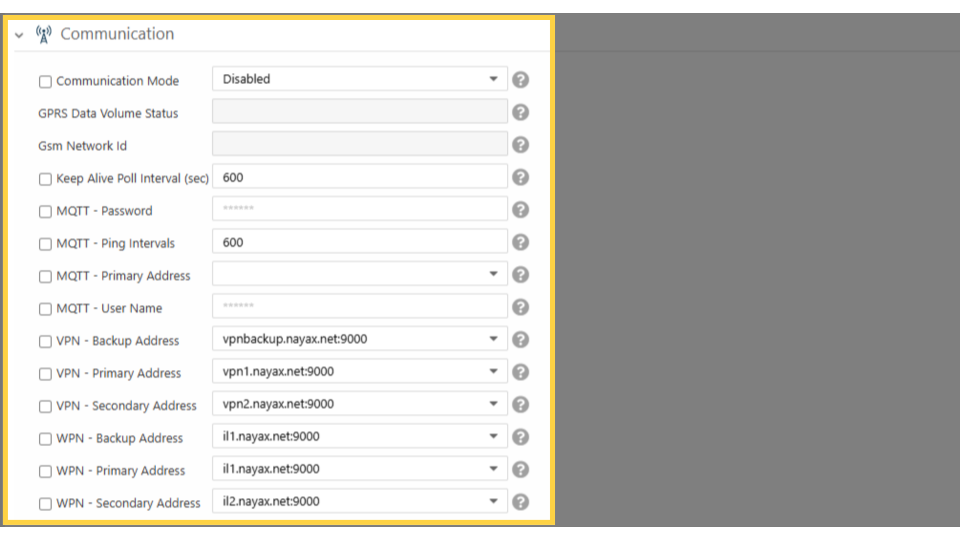
Communication Settings
Image Attached| Communication Mode |
This section covers essential attributes for managing network connectivity and enabling two-way communication for Monyx functionality.
|
|
Keep Alive Poll Interval (Sec)
|
Regulates how often the device communicates with the server, indicated in seconds.
|
|
Mobile Network Name
|
Displays the cellular carrier currently used by the card reader.
|
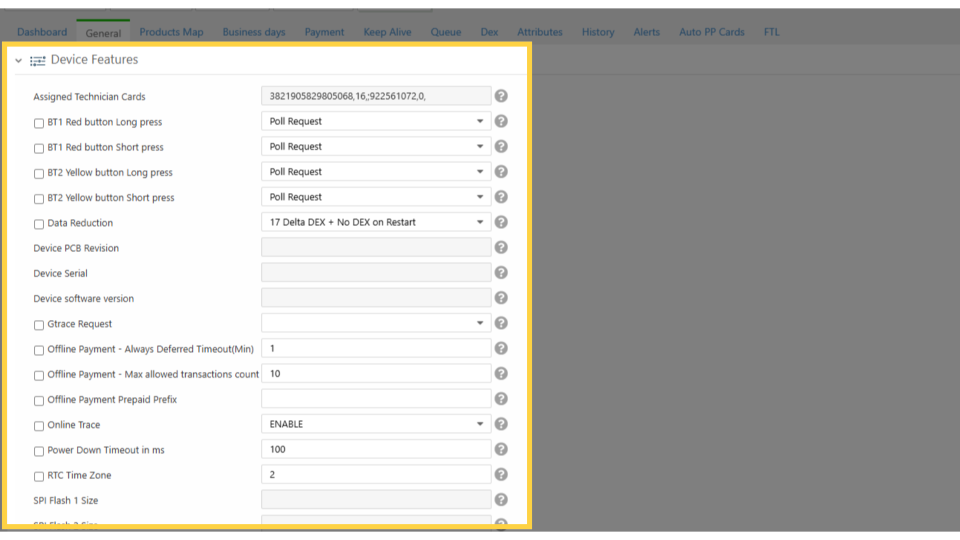
Device Features
Image Attached|
Assigned Technician Cards
|
Manages up to 5 assigned technician cards, including their enabled functions and expiration dates.
|
|
BT1 Red button Long Press
|
Configures a function for a long press of the red button (AMIT devices only; accessible via technician menu on VPOS Touch).
|
|
BT1 Red Button Short Press
|
Configures a function for a short press of the red button (AMIT devices only; accessible via technician menu on VPOS Touch).
|
|
BT2 Yellow Button Long Press
|
Configures a function for a long press of the yellow button (AMIT devices only; accessible via technician menu on VPOS Touch).
|
|
BT2 Yellow Button Short Press
|
Configures a function for a short press of the yellow button (AMIT devices only; accessible via technician menu on VPOS Touch).
|
|
Device Boot Version
|
Displays the specific boot version of the device shown during startup.
|
|
Device Local Time Zone
|
Displays the current time and date information received from the server
|
|
Device Serial
|
Displays the unique Nayax device hardware serial number.
|
|
Device software Version
|
Displays the current firmware version of the card reader.
|
|
Door Open Default State
|
Configures the default state of the door switch and enables door open alerts.
|
|
Gtrace Request
|
Used to request and determine the size of a gtrace data file.
|
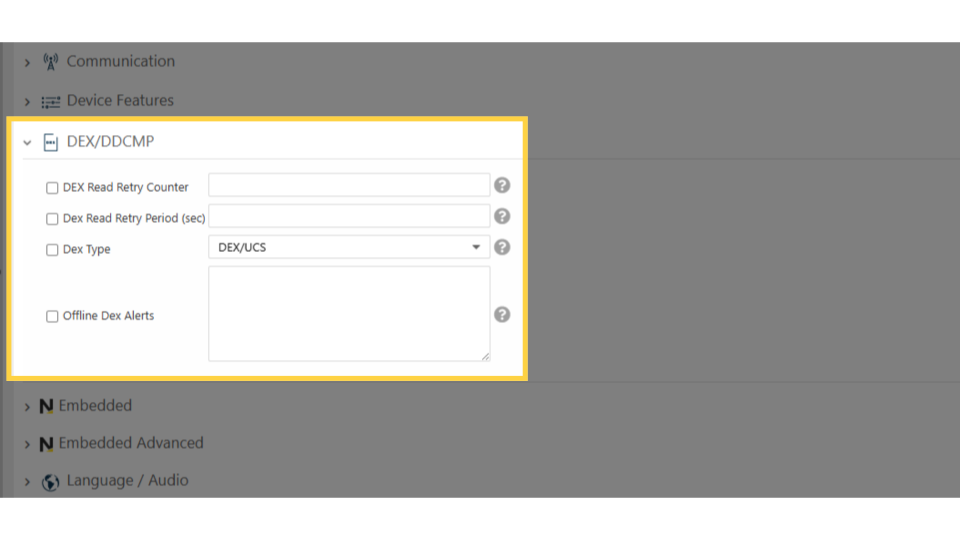
DEX/DDCMP
Image Attached|
DEX Read Retry Counter
|
Indicates the total number of times the card reader will attempt to re-read the DEX button if the initial read fails.
|
|
DEX Read Retry Period (Sec)
|
Defines the time interval, in seconds, between each subsequent DEX read retry attempt.
|
|
DEX Type
|
Specifies the required DEX format for specific machines (default is DEX/UCS, which covers most cases).
|
|
Offline DEX Alerts
|
Enables the user to search for and identify alerts found within the DEX data read by the device.
|
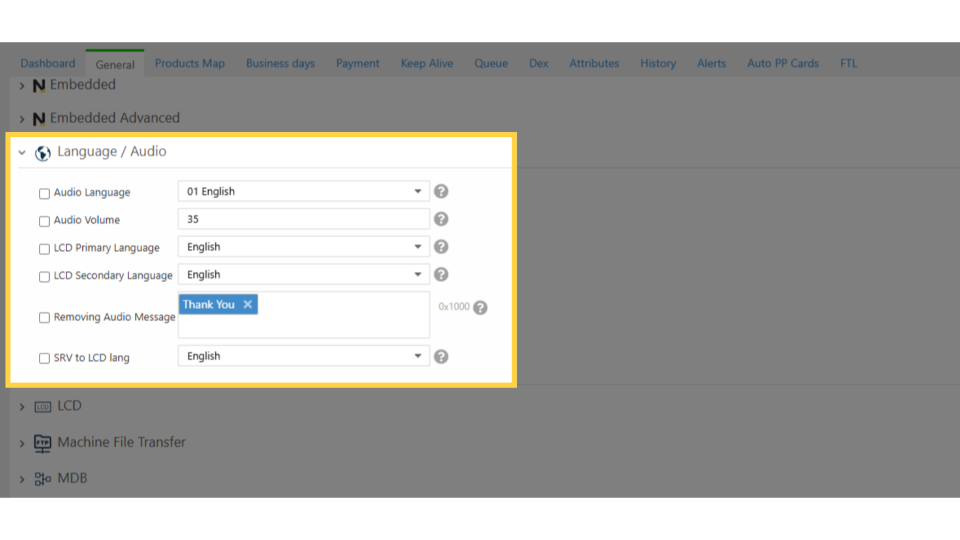
Language/Audio
Image AttachedConfigure the language settings and volume preferences for both audio prompts and the display screen within the Language/Audio tab.
|
Audio Language
|
Determines the language used for the card reader's audio prompts.
|
|
Audio Volume
|
Adjusts the volume level of the card reader's audio output (maximum volume is 85).
|
|
LCD Primary Language
|
Sets the main language displayed on the LCD screen.
|
|
LCD Secondary Language
|
Sets an optional secondary language displayed on the LCD screen.
|
|
Removing Audio Message
|
Allows specific audio message(s) to be removed from the card reader for customization.
|
|
SRV to LCD Lang
|
Determines the language the server uses when sending messages to the LCD display.
|
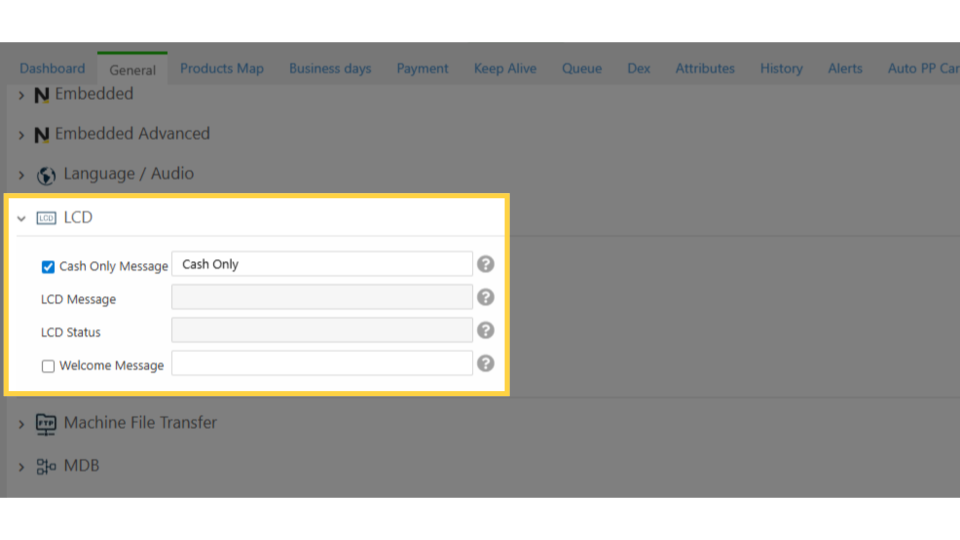
LCD
Image AttachedThis section explains the attributes used to configure messages on the card reader's LCD display. Note that some attributes are specific to the VPOS unit and do not apply to the VPOS Touch, which uses graphics instead of text displays.
|
Cash Only Message
NOTE: This attribute is for VPOS units only. VPOS Touch devices use graphics for their welcome screens.
|
Determines the "cash only" message displayed on the card reader. You can customize the text to suit your needs.
|
|
LCD Message
NOTE: This attribute is for VPOS units only. VPOS Touch devices use graphics for their welcome screens.
|
This attribute is used to indicate the current message being displayed on the card reader's LCD.
|
|
LCD Status
|
This attribute is used to indicate the error message displayed on the LCD. The status is sent with every keep-alive signal and is only shown if the "Cash Only Message" is under 16 characters long.
|
|
Welcome Message
NOTE: This attribute is for VPOS units only. VPOS Touch devices use graphics for their welcome screens.
|
This attribute allows you to change the default welcome message on the VPOS unit. The message is fully customizable.
|
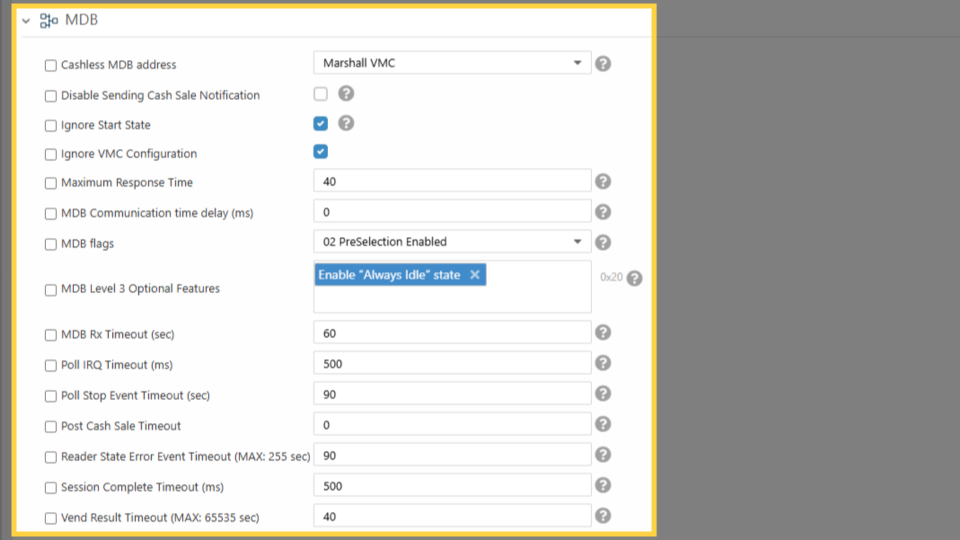
MDB
Image AttachedDefine communication protocols, manage sales visibility, and fine-tune response times for optimal performance in this tab.
|
Cashless MDB Address |
Define the protocol to work with - MDB or other.
|
|
Disable Sending Cash Sale Notification
|
Allow the sales information from a cash sale to be reported in the Nayax platform. If this box is checked that means the cash sale information will not be visible in the sales reporting.
|
|
Maximum Response time
|
Indicate the maximum length of time a reader will require to provide a response to any command from the VMC.
|
|
MDB Flag
|
Determine the 'language' for the card transaction from the card reader to the machine. This can change from machine to machine. Please review information about the machine when making the change in the Nayax platform.
|
|
Poll Stop Event Timeout
|
Define the timeout before reporting to the server that MDB polling has stopped; the device waits the defined amount of time before sending out this alert.
|
|
Post Cash Sale Timeout
|
Set the minimal amount of time between cash sale reports. If a cash sale report is sent, and then another cash sale report is triggered by the machine within the configured time, the 2nd report will not be sent.
|
Modem
Image AttachedEasily track your device's connectivity status and firmware details within the Modem tab. Below is a breakdown of the key attributes you will find.
|
Current Cellular Technology |
Identifies the current Radio Access Technology (RAT) being used. The number in the field corresponds to a specific technology type.
|
|
Modem FW Build number
|
Displays the specific build number of the card reader's firmware upon device power-up and reporting.
|
|
MODEM IMEI
|
Shows the unique International Mobile Equipment Identity (IMEI) number embedded in the card reader once it connects to the cellular network.
|
|
Modem Model
|
Displays the specific modem model used by the card reader after the device successfully communicates with the cellular network.
|
|
Modem Software Version
|
Indicates the software version running on the card reader after it establishes communication with the cellular network.
|

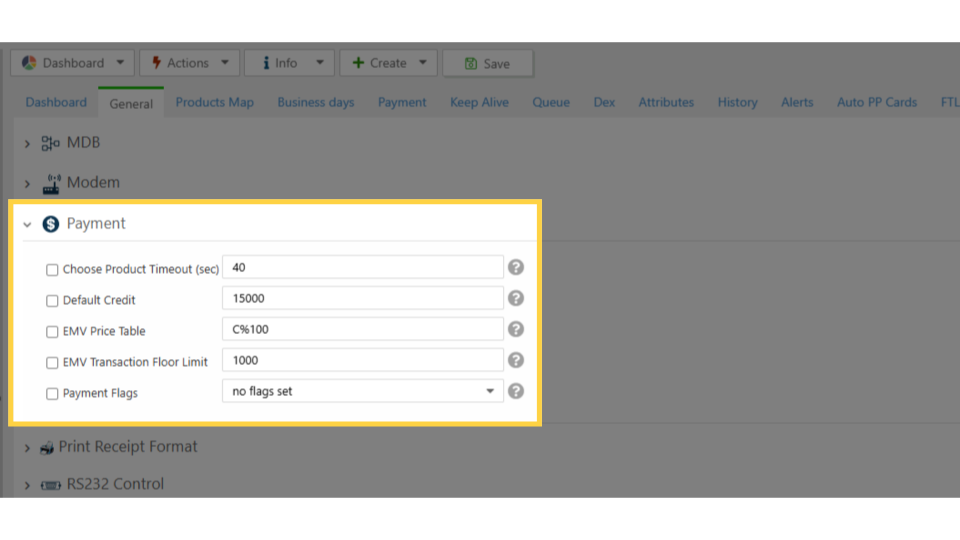
Payment
Image AttachedOptimize how your machine handles transactions and credit authorizations within the Payment tab. Here is a concise breakdown of the key attributes you can configure.
|
Choose Product Timeout (sec) |
Determines the time allowed between a card authorization and the customer's product selection.
|
|
Default Credit
|
Sets the maximum amount the card reader can authorize for a single purchase (decimal point is implied).
|
|
EMV Price Table
|
Enables the use of machine prices and optional extra charges for EMV credit card transactions, overriding server prices.
|
|
EMV Transaction Floor Limit
|
Defines the minimum transaction amount that requires an online authorization before the sale can proceed.
|
|
Payment Flags
|
Controls the transaction flow and interaction between prepaid cards, the card reader, and the server. Each flag setting has a specific function.
|
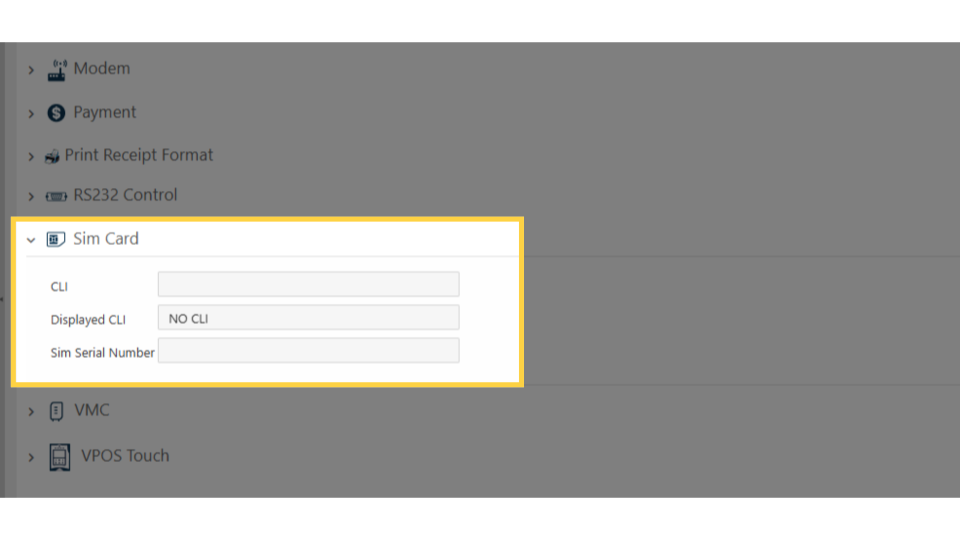
SIM Card
Image AttachedManage and view key identifiers related to your device's cellular connection within the SIM Card tab. Below is a concise breakdown of the relevant attributes.
|
CLI (Calling Line Identification) |
Identifies the cellular number the device uses when communicating with other devices or servers.
|
|
Displayed CLI
|
Used to show the cellular number associated with the device's communication activities.
|
|
SIM Serial Number
|
Displays the unique serial number of the physical SIM card currently in use by the card reader for communication.
|
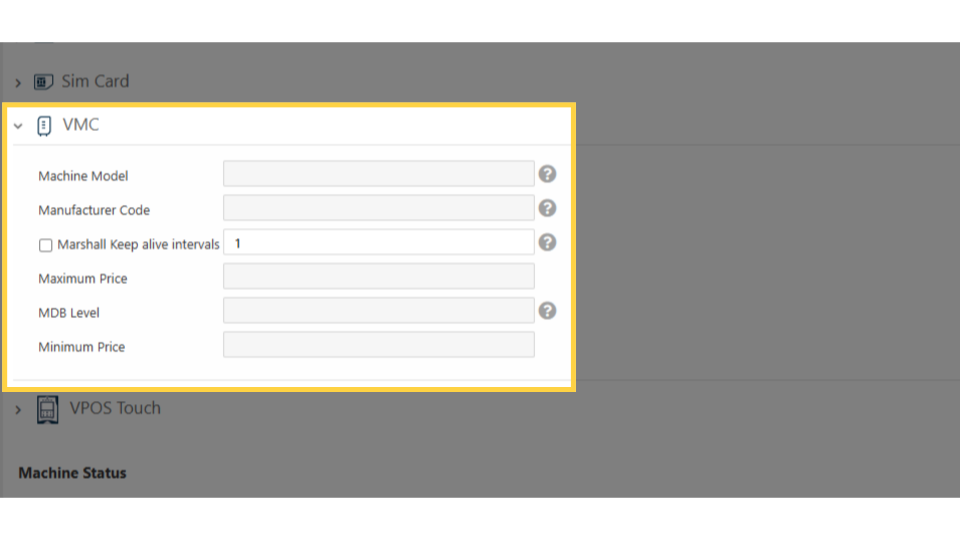
VMC Tab
Image AttachedView critical information about the connected vending machine within the VMC tab. Here is a concise breakdown of the relevant attribute.
|
MDB Level |
Displays the Multi-Drop Bus (MDB) communication level of the machine the card reader is attached to.
|
VPOS Tab
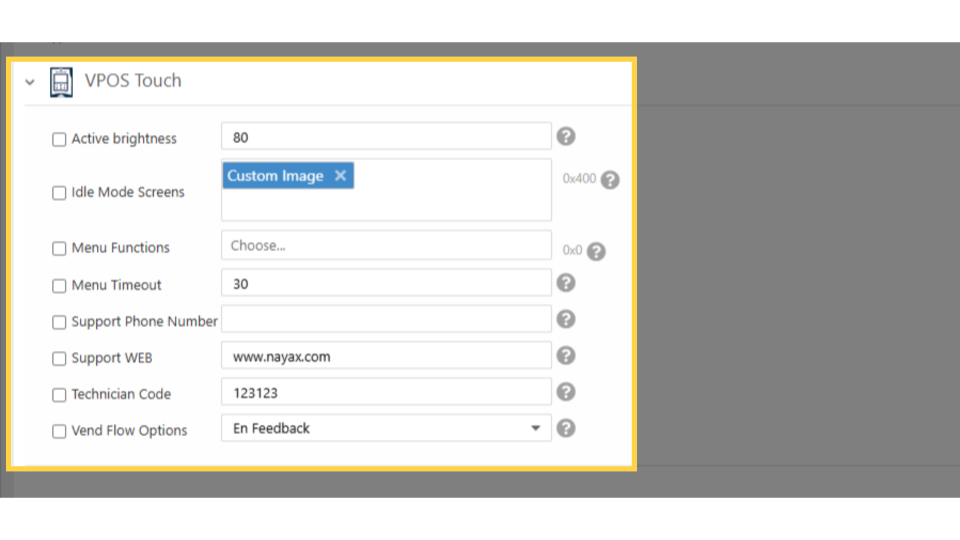
Image AttachedConfigure how your card reader looks and operates during idle periods and transactions within the VPOS tab. This section allows you to customize the user interface, menu options, and overall transaction flow.
|
Active Brightness |
Adjusts the screen brightness of the card reader while a transaction is in progress.
|
|
Idle Mode Screens |
Overrides the default screens displayed when the card reader is not actively being used for a transaction.
|
|
Menu Functions |
Determines which buttons and options are available within the card reader's menu interface.
|
|
Menu Timeout |
Sets the maximum amount of time a user has to interact with the menu before it automatically times out.
|
|
Support Phone Number |
Displays a specific support phone number on the card reader's menu screen for customer assistance.
|
|
Support WEB |
Displays the Nayax website address on the card reader screen.
|
|
Technician Code |
Used to configure and change the access code for technicians servicing the card reader.
|
|
Vend Flow Options |
Determines the specific sequence and flow of events when a card transaction is initiated and completed.
|
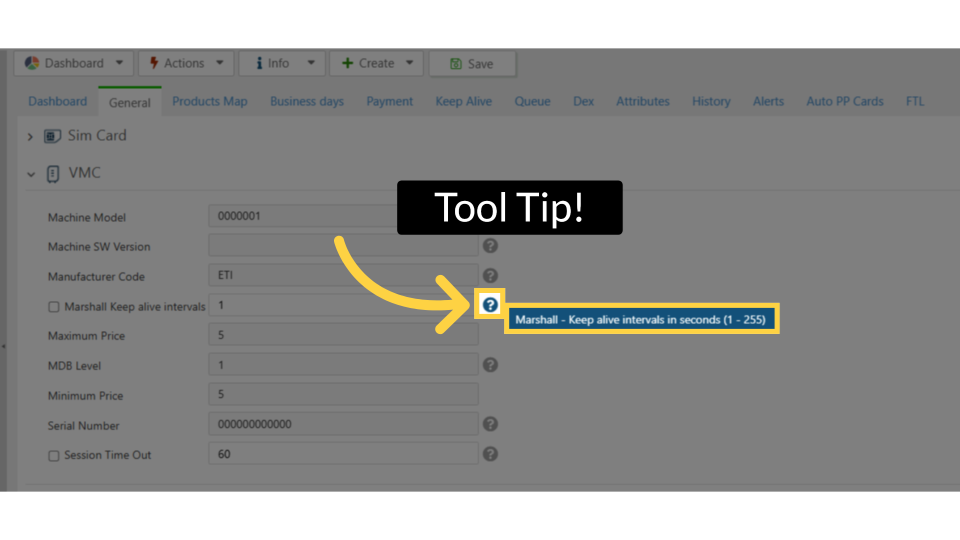
Tool Tips!
Image AttachedClick on the tool tip icon for an explanation and options of the field.
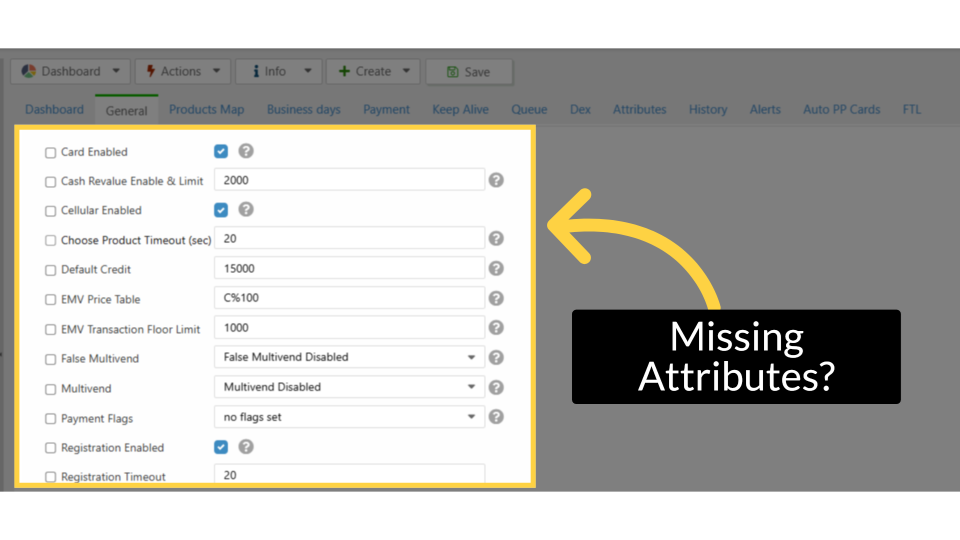
Missing Attributes?
Image AttachedThe attributes displayed may differ from those shown on your machine page due to variations in device configurations and settings. If any attributes are missing from your machine, please refer to the guide on How to Add Attributes to a Machine .
Thank you!
Did you find this article helpful?