How to Create a Prepaid Card | Consumers
Create a new Prepaid card in Nayax Core so a cardholder can start making purchases at your machines. This step-by-step guide covers every field: operator, card type, physical format, UID, status, currency, credit type, and optional settings.
Prerequisites to create a Prepaid Card in Nayax Core
Create a new Prepaid card in Nayax Core so a cardholder can start making purchases at your machines.
This guide covers the complete creation flow: card identity, credit type selection (Money vs. Transaction), credit limits, monthly reload, revalue settings, and cardholder details.
|
Prerequisites You need operator-level access to Nayax Core. Navigate to Consumers > Card Management. You must have a physical card (or its unique identifier) ready. If you need to understand what Prepaid is first, read “What Is Nayax Prepaid?” |
Video Guide
00:00: This tutorial guides you through managing card settings and accessing reports within
00:04: the Nayax Dashboard.
00:06: From the Nayax Classic Core dashboard, click on the Consumers tab, then select
00:10: Card Management from the dropdown.
00:13: The Card management page will open, displaying in the main general section.
00:16: Click on Add New Card as highlighte.
00:19: In the Operator field, enter the name of the operator or sub-actor to whom this card is
00:25: assigned.
00:26: In the Card Type dropdown, select Prepaid Card.
00:29: Select the format that corresponds to your physical card, such as Contactless Card,
00:33: Swipe Card, or QR Code.
00:35: This is determined and supplied by the operator level and is solely for the
00:40: operator's
00:40: records; it does not affect the card's functionality at a machine.
00:45: Type the card’s unique string identifier. For magnetic stripe cards,
00:48: this is a number. For contactless cards,
00:51: it is a hexadecimal string.
00:52: This will identify the cardholder's card to the device and cannot be modified after
00:57: creation.
00:58: Select Active to create a card that works immediately, or Not Active
01:02: if you want to activate it later. An inactive card will not process transactions.
01:08: After setting the card identity, configure how the card’s balance works. The key
01:13: decision is the Credit Type this determines whether the card uses monetary value or
01:17: transaction counts.
01:19: In the Card Currency dropdown, choose the currency in which this card operates, such
01:23: as USD, EUR, or GBP.
01:26: This is the key decision in card creation.
01:28: The Credit Type dropdown has two options: Money, where the card’s balance is a monetary
01:33: amount, allowing purchases up to that balance.
01:36: For example, a card with $50 can buy products totaling $50. Or Transaction:
01:41: the
01:41: balance counts allowed transactions, regardless of price. For instance, a card with 5
01:46: transactions can make 5 purchases, no matter the cost.
01:50: Credit limits control how much money a cardholder can spend, or how many
01:54: transactions they can make, within a given time period.
01:56: The limit fields are the same for both credit types,
01:59: only the unit changes currency vs. count.
02:03: Check the Daily Transaction Limit (or Daily Amount Limit) checkbox and enter the
02:08: maximum amount or number of transactions allowed per day.
02:12: Only one of these can be checked at a time.
02:14: If Credit Type is Money, you’ll see the Daily Amount Limit.
02:17: If Credit Type is Transaction, you’ll see the Daily Transaction Limit.
02:22: For per-day-of-week control, open the Weekday Transaction Limit table by clicking the expand icon.
02:26: Click on the highlighted RED icon to set a different limit for each day of the
02:31: week (Sunday through Saturday).
02:35: Each day shows limit status options. Limit value. No Limit means no cap.
02:39: If active, the cardholder can use the card up to the limit. “ Can’t use" means the
02:43: card is blocked.
02:45: To remove any limit, enter 0 in the field. Limits apply only to time-based
02:50: restrictions and do not override the card’s
02:52: total credit balance.
02:54: Click on the checkbox for Weekly Limit and or Monthly Limit and enter the cap.
02:58: These limits track cumulative usage within the period and reset automatically
03:03: (weekly on the configured start day, monthly on the configured reset day).
03:08: These settings control how the card’s credit replenishes and whether the cardholder
03:12: can add their own funds.
03:14: Enter an amount in the Month Transaction or Monthly Amount Reload field to
03:19: automatically reload the card at the beginning of every month.
03:21: Leave blank or enter 0
03:24: if you don’t want an automatic monthly reload.
03:27: When the checkbox is checked: The Monthly Reload amount is ADDED to the card’s
03:31: current balance.
03:31: If the card has €30 remaining and a reload of €50, the new balance is €80.
03:37: Euros.
03:38: When the checkbox is UNchecked: The card’s balance is RESET to the Monthly Reload
03:42: amount.
03:43: If the card has €30 and a reload is €50, the new balance is €50 (not €80).
03:48: 80 Euros,
03:50: If this card is meant to be single‑use, check the Single-use box. When
03:53: enabled, the card will not be reloaded at the end of the month. The
03:57: cardholder can only use the remaining balance until it runs out.
04:02: The Cash or Credit Card Revalue feature lets cardholders add funds via cash or
04:06: credit cards on supported machines.
04:08: Uncheck boxes to disable top-ups. For more info,
04:11: click the link to the video for the full article on Nayax U.
04:15: The cardholder section and other fields on this page are optional.
04:19: However, we recommend providing as much information as possible when creating a new
04:24: prepaid card, as this will help locate the cardholder in the future.
04:29: Don't forget to save the changes.
04:31: Congratulations,
04:32: you have just created a new prepaid card!
00:00: This guide explains how to create a prepaid card in Nayax and provides step-by-step instructions. This enhancement empowers operators to better manage product availability and cater to specific user needs while maintaining control over prepaid purchases. 00:17: From the dashboard of your Nayax Core management suite - click consumers tab. 00:23: Select card management in the drop down menu. 00:27: Enter the name of the operator or sub-actor you want this card to be located under. 00:32: Choose prepaid card type from the drop-down menu. 00:36: From the drop down menu, choose preferred card type to be issued to cardholder. Nayax have a variety options and for more information please go to Nayax U and search physical card types. 00:49: Insert the Card Unique Identifier. Which is the card string that will help to identify the cardholders card to the device. After creation, this number can not be modified. 01:02: Select active from the dropdown menu if you want to create an active card that will work immediately or an inactive card. 01:10: Define the membership policy. You can define a price for each member type, grade or level. For more information please go to Nayax U and search member type pricing. 01:23: Define the currency this card is working with from the dropdown menu. 01:28: Choose the method in which this card's balance is managed if by transactions or money. Money - sets the amount limit of money to be used by this card. Transactions - sets the card to the total number of transactions that can be performed with this card. 01:46: Set the monthly, weekly, daily, and specific day limitations. To unlimited the card balance enter the number '0' in each mandatory field. 01:58: Sets the amount to be reloaded to the card at the beginning of every month. 02:09: Optional - Credit Accumulation. Tick this box if you wish to add the monthly reload amount to the card's current balance at the end of the month. 02:19: Optional - Ticking the single-use box prevents the card balance to be reloaded at the end of every month. The balance available to the cardholder will be the remaining credit. 02:30: Optional field - Cash or credit card revalue top up Allows this card to be revalued top up with cash or credit card at a vending machine. The machine must support this feature and you need to define it. 02:44: As for all the other fields on this page, it is optional for you to fill in. We recommend you fill in as much information as possible when creating a new prepaid card to help locate the cardholder in the future. 02:58: Don't forget to save the changes. Congratulations, you have just created a new prepaid card! 03:06: This guide covered how to create a pre-paid card in Nayax Core including setting the amount, validity, refill options, low balance alert, maximum balance, and cardholder details.
Click Card Management
Image Attached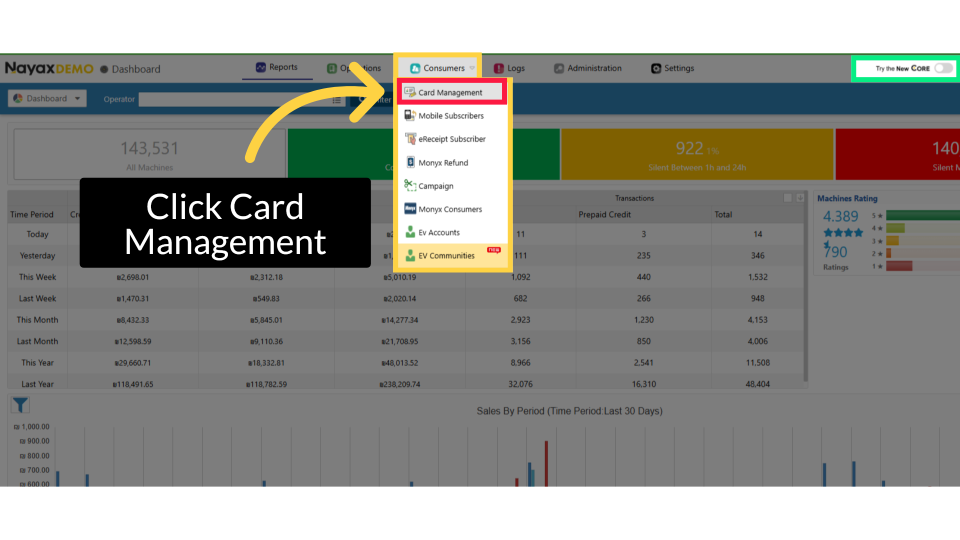
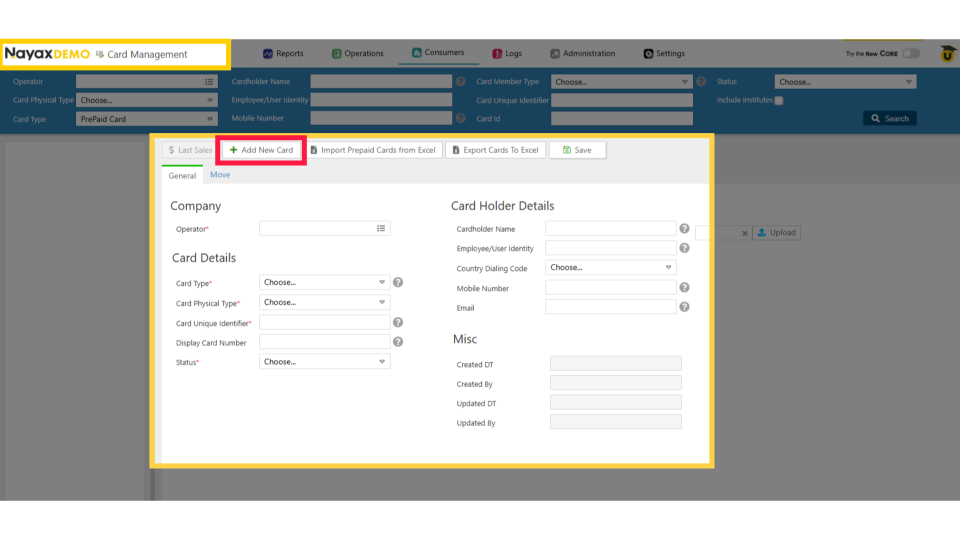
Card Management Page
Image AttachedThe Card management page will open, displaying in the main general section. Click on Add New Card as highlighted.
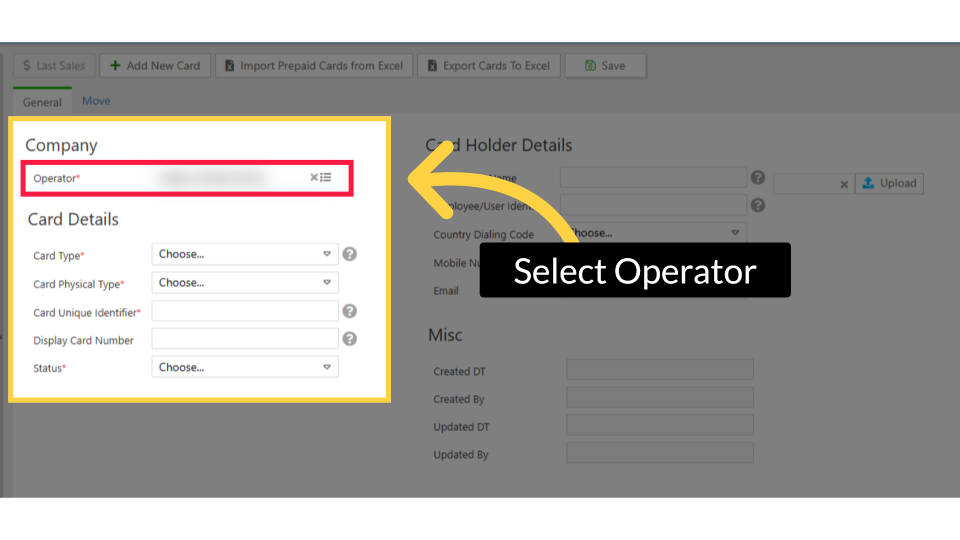
Select Operator
Image AttachedIn the Operator field, enter the name of the operator or sub-actor to whom this card is assigned.
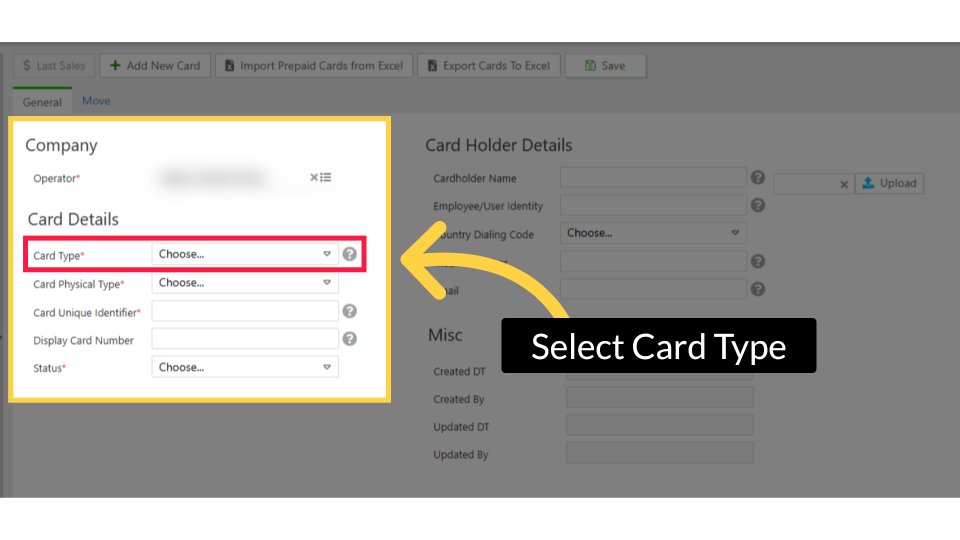
Select Card Type
Image AttachedIn the Card Type dropdown, select Prepaid Card.
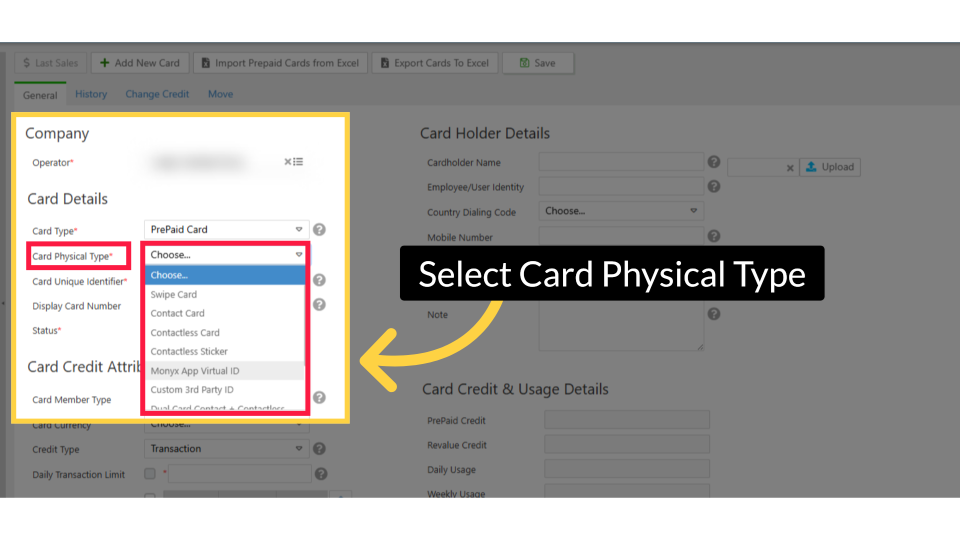
Select Card Physical Type
Image AttachedSelect the format that corresponds to your physical card, such as Contactless Card, Swipe Card, or QR Code. This is determined and supplied by the operator level and is solely for the operator's records; it does not affect the card's functionality at a machine.
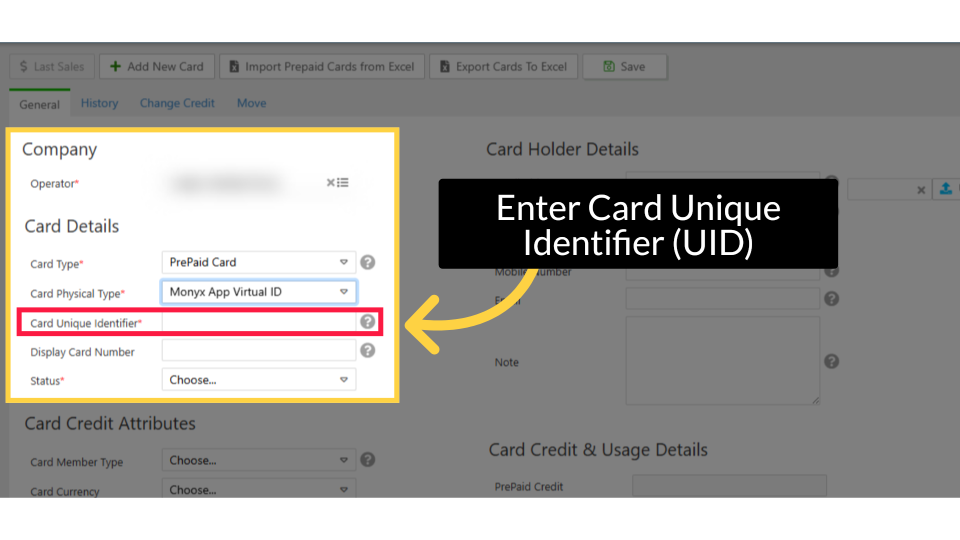
Enter Card Unique Identifier (UID)
Image AttachedType the card’s unique string identifier. For magnetic stripe cards, this is a number. For contactless cards, it is a hexadecimal string. This will identify the cardholder's card to the device and cannot be modified after creation.
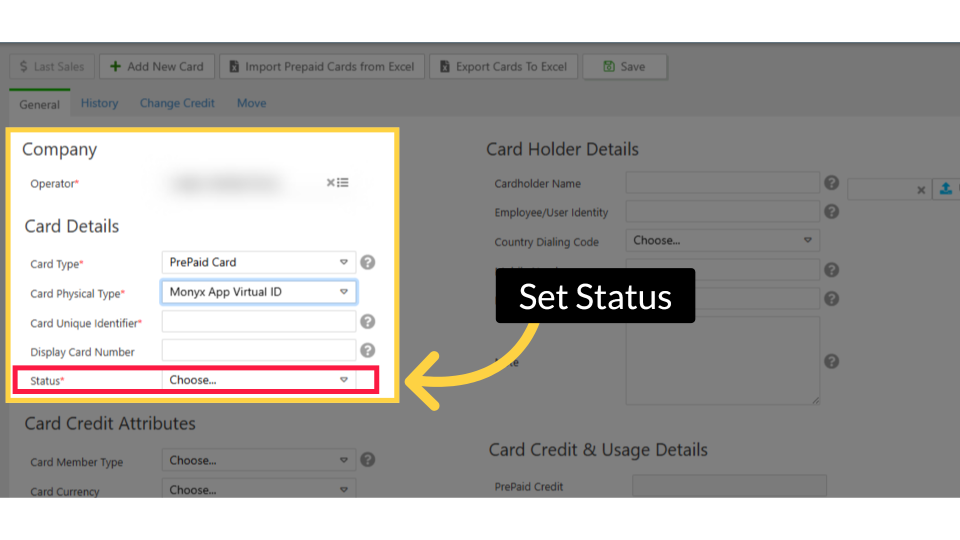
Set Status
Image AttachedSelect Active to create a card that works immediately, or Not Active if you want to activate it later. An inactive card will not process transactions.
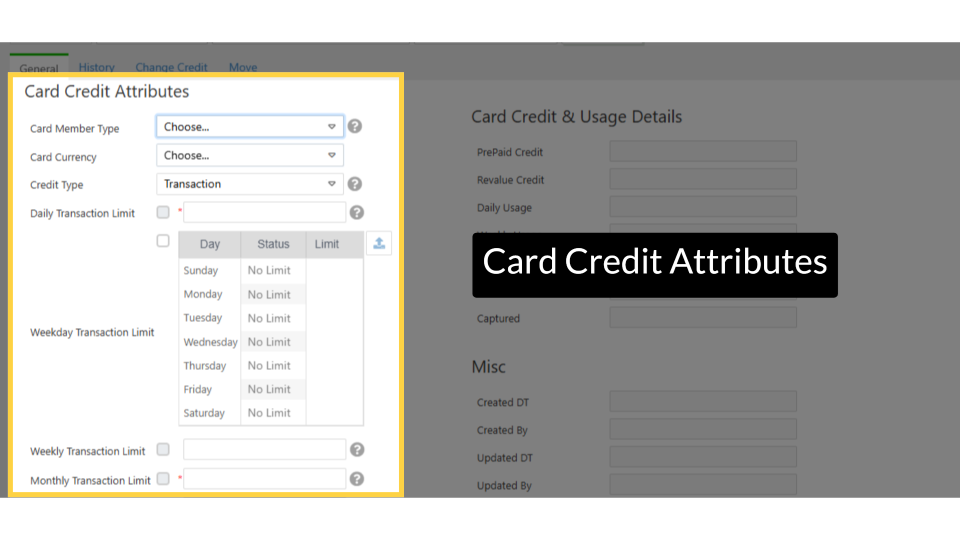
Card Credit Attributes
Image AttachedAfter setting the card identity, configure how the card’s balance works. The key decision is the Credit Type this determines whether the card uses monetary value or transaction counts.
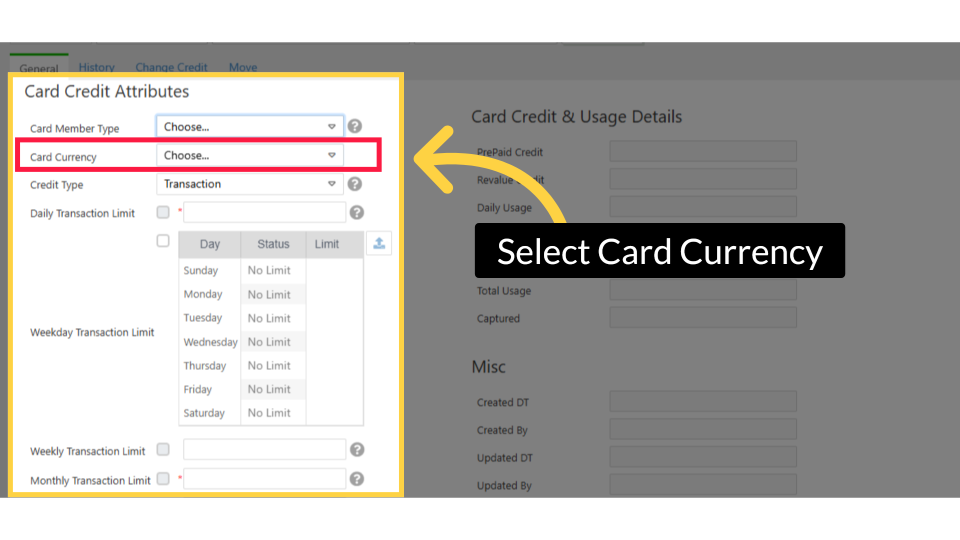
Select Card Currency
Image AttachedIn the Card Currency dropdown, choose the currency in which this card operates, such as USD, EUR, or GBP.
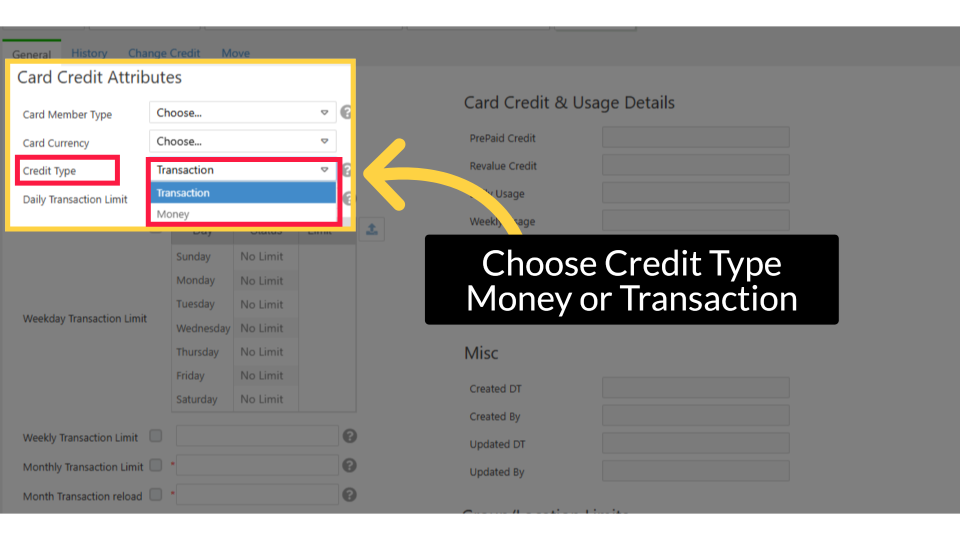
Choose Credit Type - Money or Transaction
Image AttachedThis is the most important decision in card creation.
The Credit Type dropdown has two options:
|
Credit Type |
What It Means |
|
Money |
The card’s balance is a monetary amount. The cardholder can make purchases up to the balance. Example: a card with $50 credit can buy products totaling $50. |
|
Transaction |
The card’s balance is a count of allowed transactions, regardless of product price. Example: a card with 5 transactions can make 5 purchases no matter what each costs. |
|
Which should I choose? Most operators use Money. Use Transaction only for specific use cases like employee meal allowances (e.g., 3 meals per day) or subsidized vending programs where the number of vends matters more than the dollar amount. |
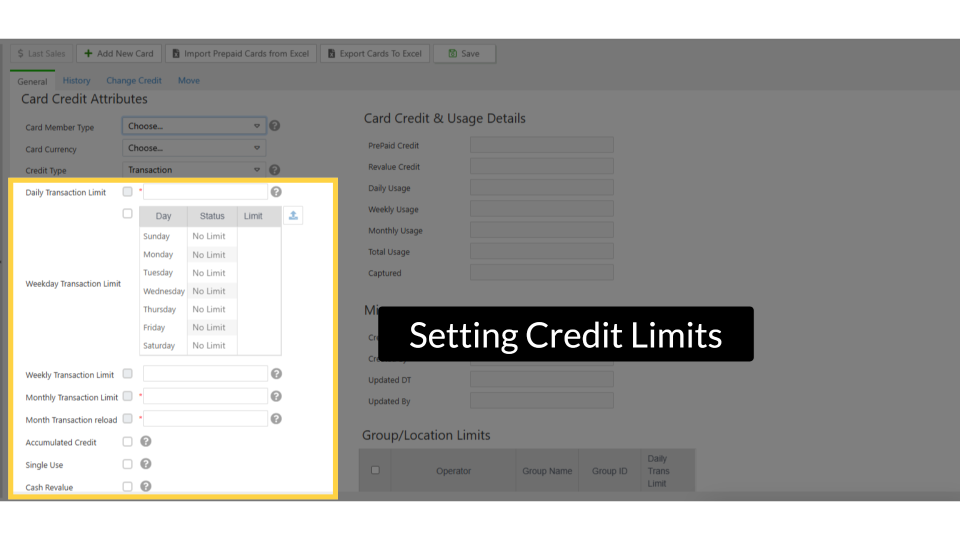
Setting Credit Limits
Image AttachedCredit limits control how much money a cardholder can spend, or how many transactions they can make, within a given time period.
The limit fields are the same for both credit types, only the unit changes currency vs. count.
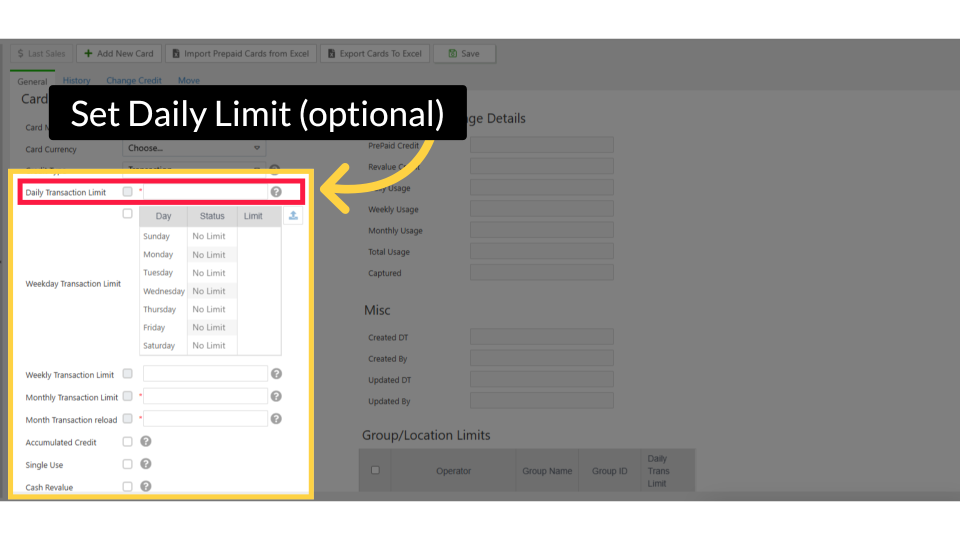
Set Daily Limit (optional)
Image AttachedCheck the Daily Transaction Limit (or Daily Amount Limit) checkbox and enter the maximum amount or number of transactions allowed per day.
Daily Amount Limit vs. Daily Transaction Limit
Image Attached
|
Daily Amount Limit vs. Daily Transaction Limit Only one of these can be checked at a time. If Credit Type is Money, you’ll see Daily Amount Limit. If Credit Type is Transaction, you’ll see Daily Transaction Limit. |

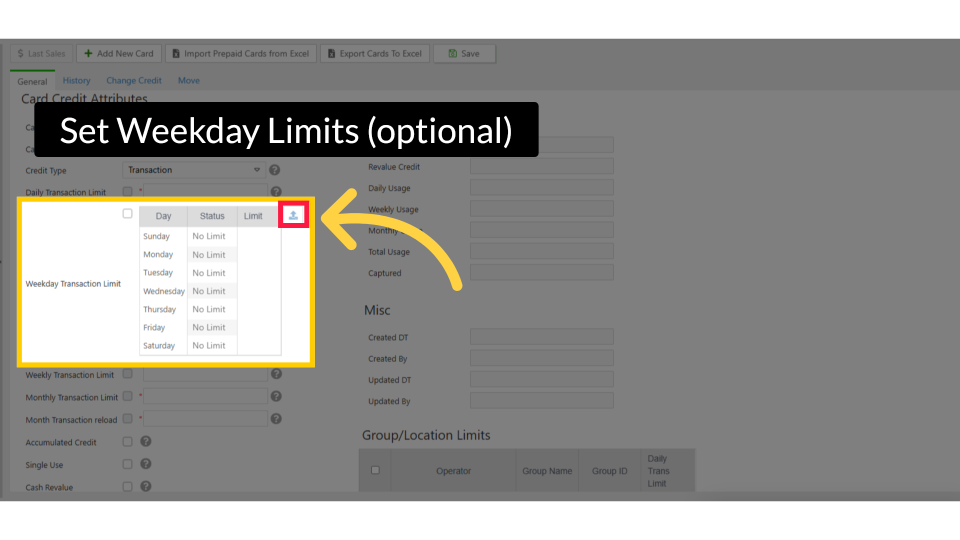
Set Weekday Limits (optional)
Image AttachedFor per-day-of-week control, open the Weekday Transaction Limit table by clicking the expand icon. You can set a different limit for each day of the week (Sunday through Saturday).
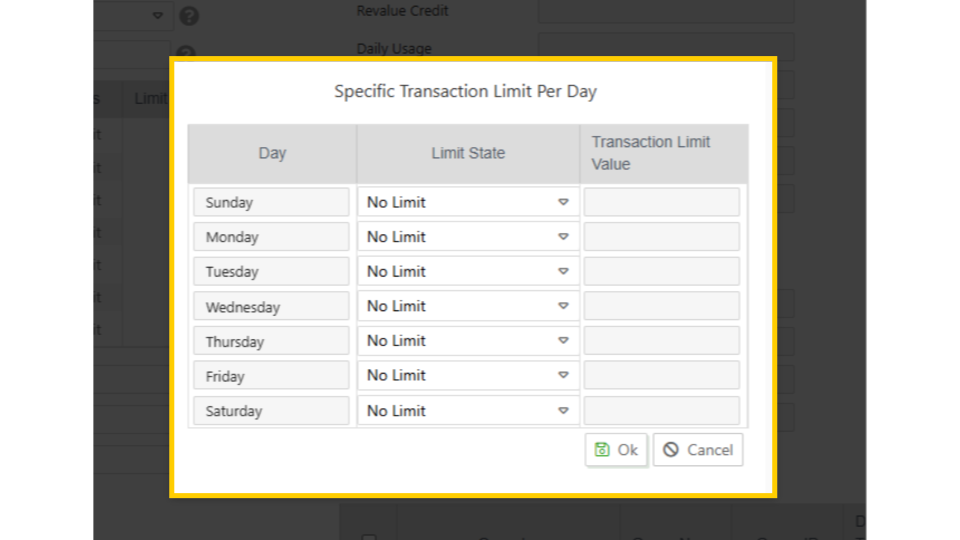
Set Weekly and Monthly Limits (optional)
Image AttachedEach day shows a Status (No Limit, Active, or Can’t Use) and a Limit value.
- No Limit - no cap for that day.
- Active - the cardholder can use the card up to the specified limit on that day.
- Can’t Use - the card is blocked on that day entirely.
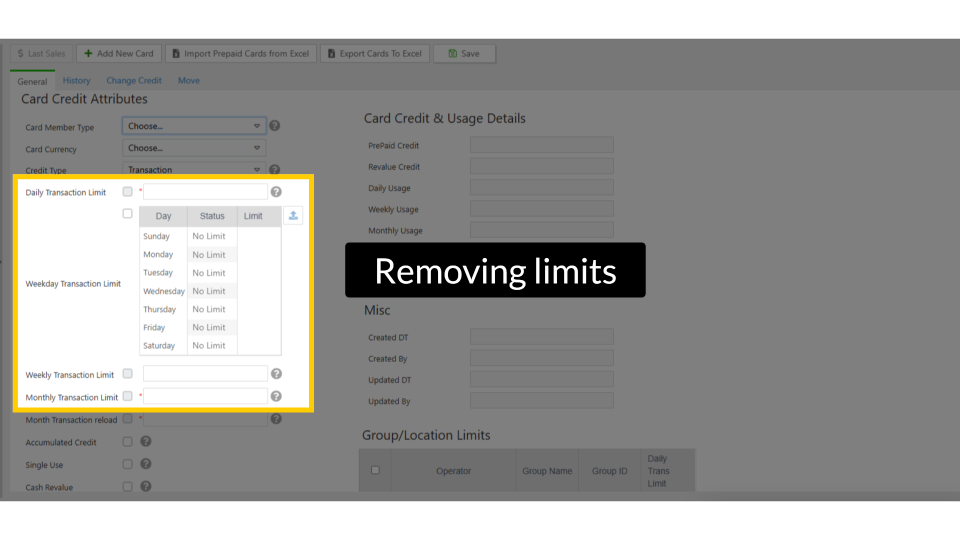
Removing Limits
Image Attached
|
Removing limits To remove any limit, enter 0 in the field. Limits apply only to time-based restrictions and do not override the card’s total credit balance. |
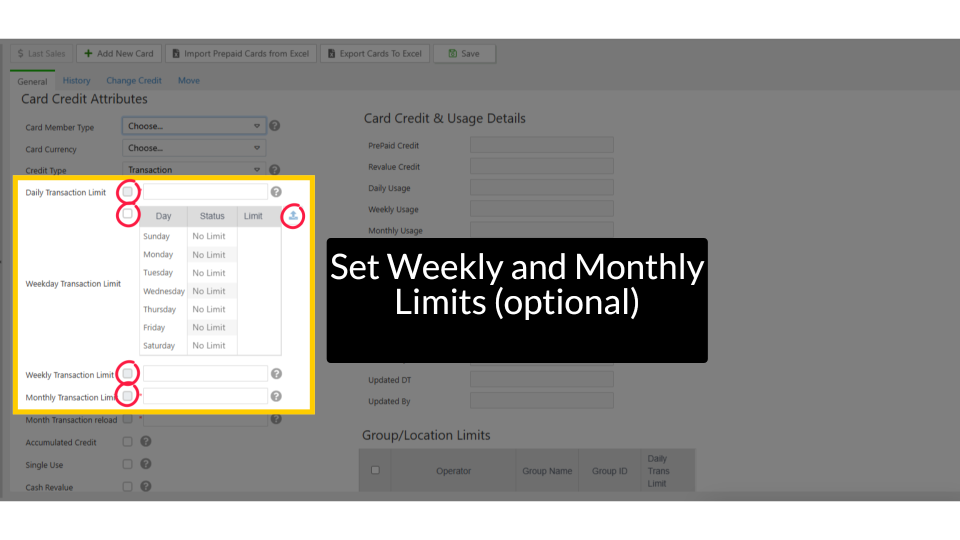
Set Weekly and Monthly Limits (optional)
Image AttachedCheck Weekly Limit and/or Monthly Limit and enter the cap. These limits track cumulative usage within the period and reset automatically (weekly on the configured start day, monthly on the configured reset day).
Monthly Reload & Card Behavior
Image AttachedThese settings control how the card’s credit replenishes and whether the cardholder can add their own funds.
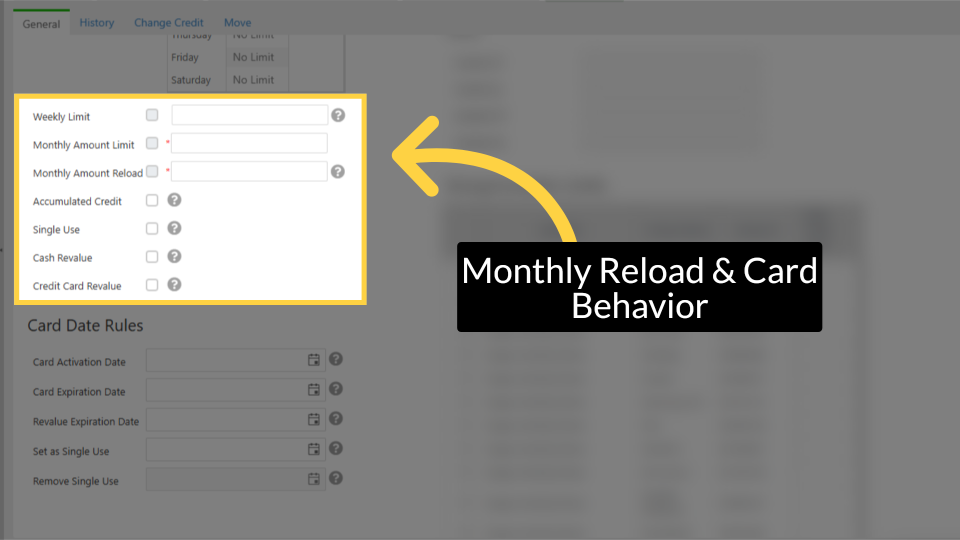
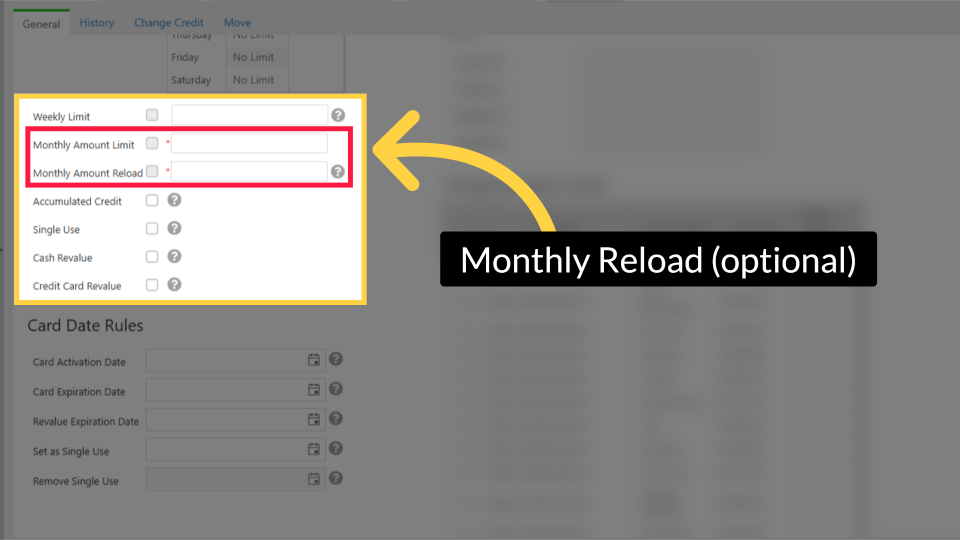
Monthly Reload (optional)
Image AttachedEnter an amount in the Month Transaction Reload (or Monthly Amount Reload) field to automatically reload the card at the beginning of every month. Leave blank or enter 0 if you don’t want automatic monthly reload.
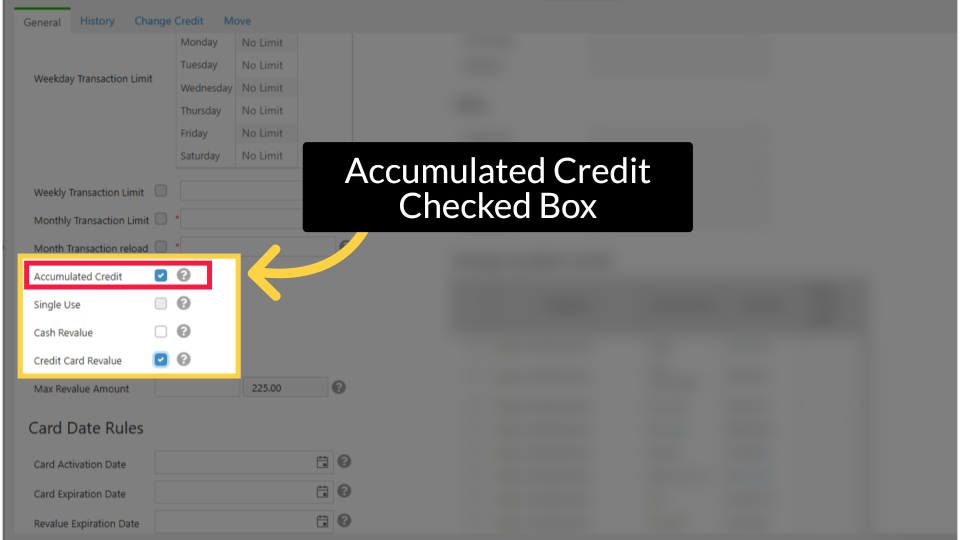
Accumulated Credit Checked Box
Image Attached|
Checkbox |
When Checked ✅ |
When Unchecked ⬜ |
|
Accumulated Credit |
The Monthly Reload amount is ADDED to the card’s current balance. If the card has €30 remaining and reload is €50, the new balance is €80. |
The card’s balance is RESET to the Monthly Reload amount. If the card has €30 and reload is €50, the new balance is €50 (not €80). |
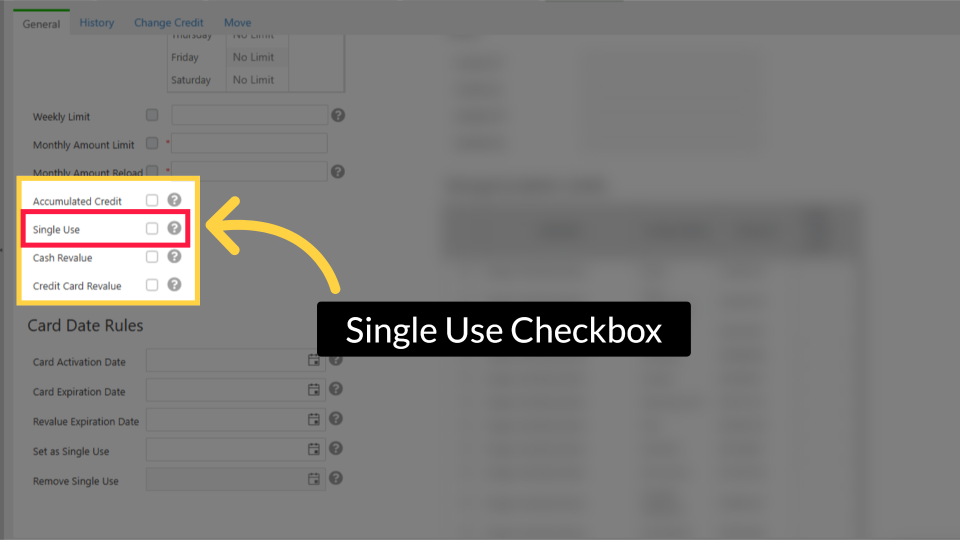
Single Use Checkbox
Image Attached|
Checkbox |
When Checked ✅ |
When Unchecked ⬜ |
|
Single Use |
The card balance will NOT be reloaded at the end of the month. The cardholder uses only the remaining credit until it runs out. |
The card participates in the monthly reload cycle normally. |
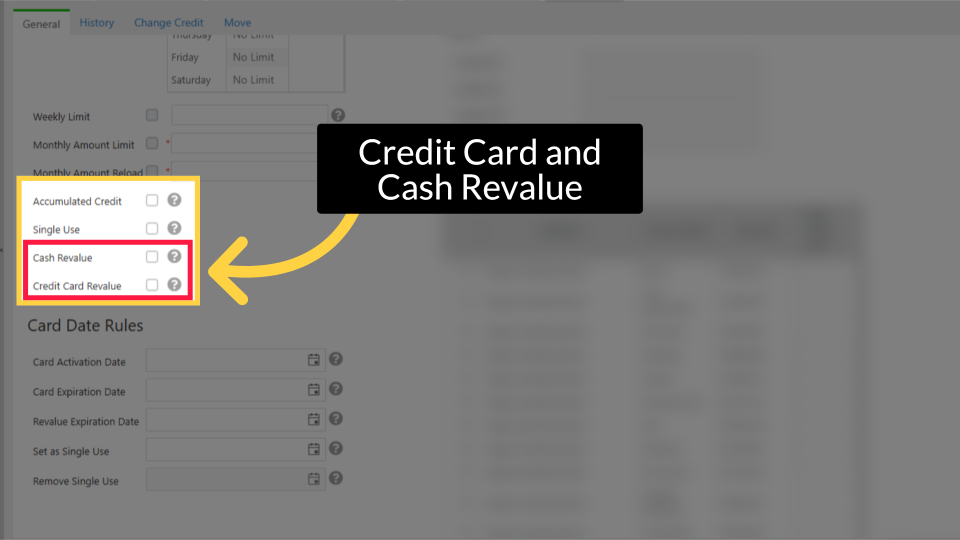
Credit Card and Cash Revalue
Image AttachedThese checkboxes allow cardholders to add their own funds to the card at a vending machine. Both are optional.
|
Checkbox |
When Checked ✅ |
When Unchecked ⬜ |
|
Cash Revalue |
The cardholder can insert cash at the machine to load funds onto the card. The machine must support this feature (bill acceptor required). |
Cash revalue is disabled. The cardholder cannot load funds with cash at the machine. |
|
Credit Card Revalue |
The cardholder can use a credit card at the machine’s payment terminal to load funds onto the Prepaid card. |
Credit card revalue at the machine is disabled. |
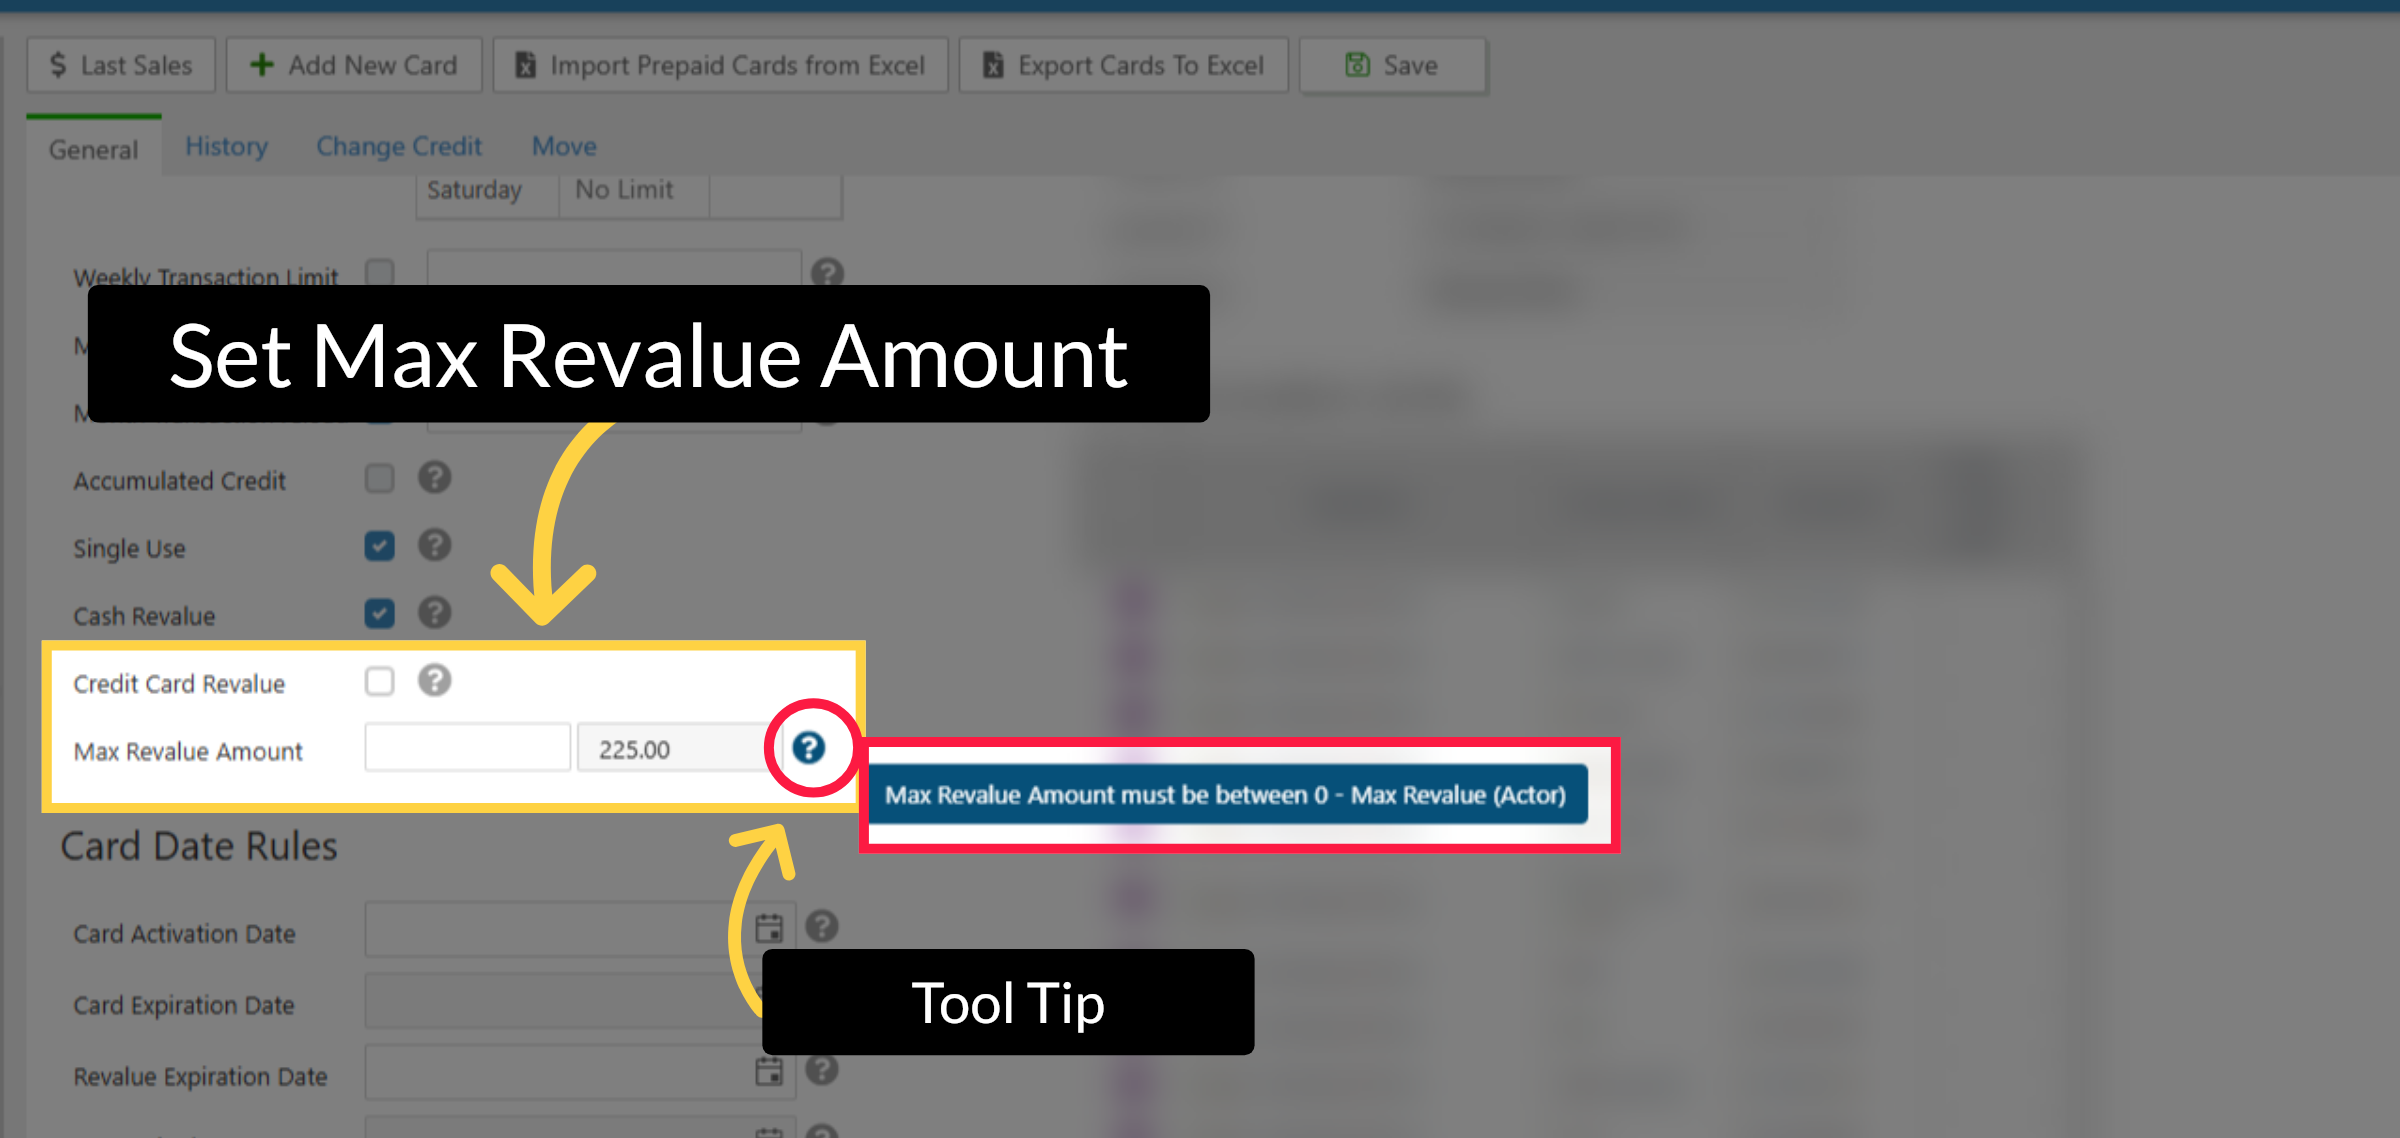
Set Max Revalue Amount
Image AttachedWhen either revalue checkbox is enabled, the Max Revalue Amount field appears. Enter the maximum total revalue credit allowed on this card. You cannot exceed the distributor-defined maximum.
|
Example A card currently holds €200.00. The Max Revalue Amount is set to €225.00. The cardholder can only add €25.00 more. Any revalue attempt above this is rejected. |
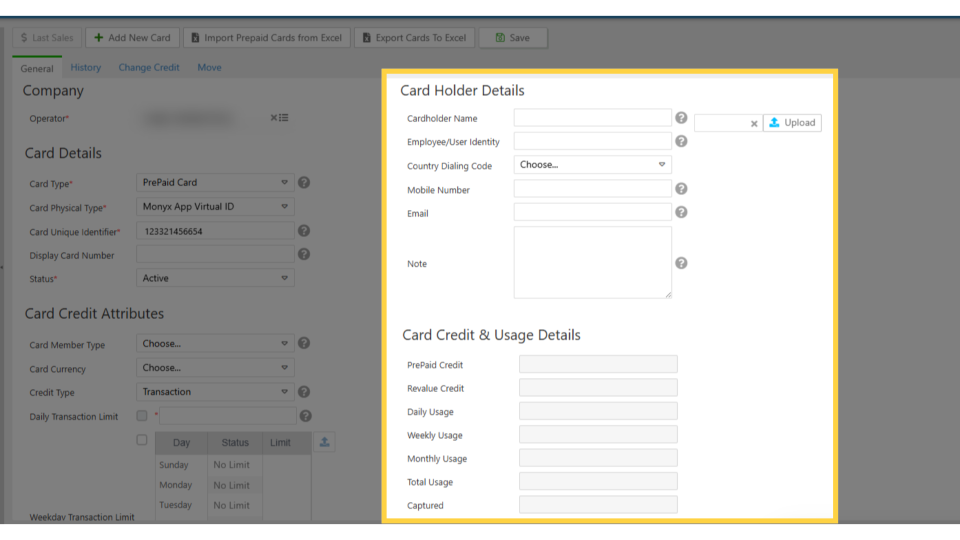
Fill in Cardholder Details (optional but recommended)
Image AttachedOn the right side of the form, fill in the Card Holder Details section:
Cardholder Name, Employee/User Identity, Country Dialing Code, Mobile Number, Email, and Note.
These fields are optional but we recommend providing as much information as possible it makes it much easier to find and manage cards later.
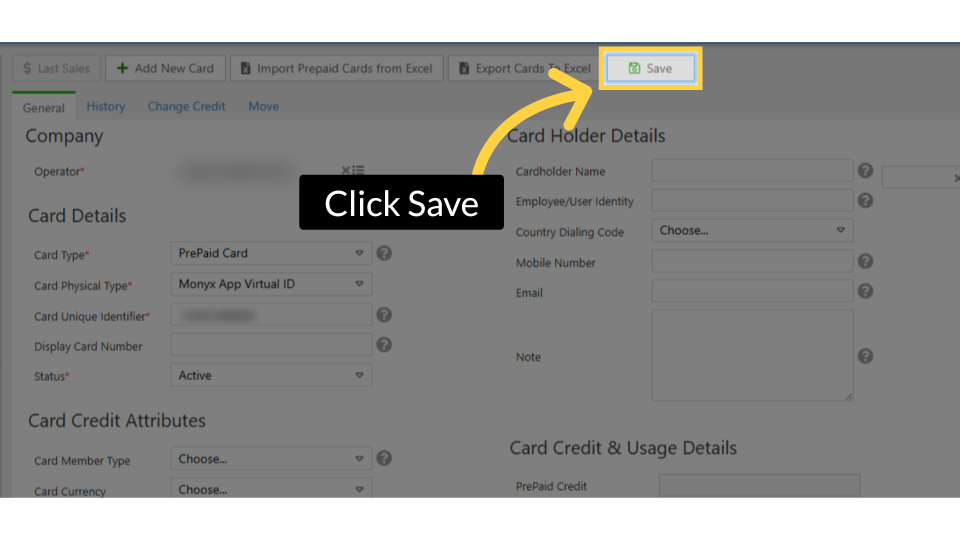
Click Save
Image AttachedDon't forget to save the changes. Congratulations, you have just created a new prepaid card!
Thank you!
Did you find this article helpful?