
How to Create a Discount Campaign | Consumers
Learn how to create a Discount Campaign in Nayax Core. Configure discount type, target audience, eligibility rules, campaign limits, and schedule. Supports single and recurring durations.
How to Create a Discount Campaign
How to Create a Discount Campaign
Audience: Operator
This article explains how to create a Discount Campaign in Nayax Core. Discount Campaigns let you reduce product prices by a fixed amount, by a percentage, or offer a free product to consumers who meet defined conditions. Campaigns can be scoped to specific operators, machine groups, products, and payment methods, and can run as a single time-limited event or on a recurring schedule.
|
IMPORTANT Before You Begin Make sure you have: |
- Access to Nayax Core with operator-level permissions.
- A clear campaign goal - discount type, target audience, and duration.
- An email address to receive daily campaign reports.
- The Campaign feature enabled on your account. If the Campaign tab is not visible under Consumers, contact your local Nayax office to enable it.
- Any Machine Groups you plan to target, created in advance under your operator account.
|
Tips for a Successful Campaign
|
Video Guide
00:00: Learn how to create a Discount Campaign in Nayax Core that offers your consumers
00:04: price reductions, fixed discounts, or even free products
00:07: when they meet the conditions you set.
00:09: On the dashboard of your Nayax Classic Core platform,
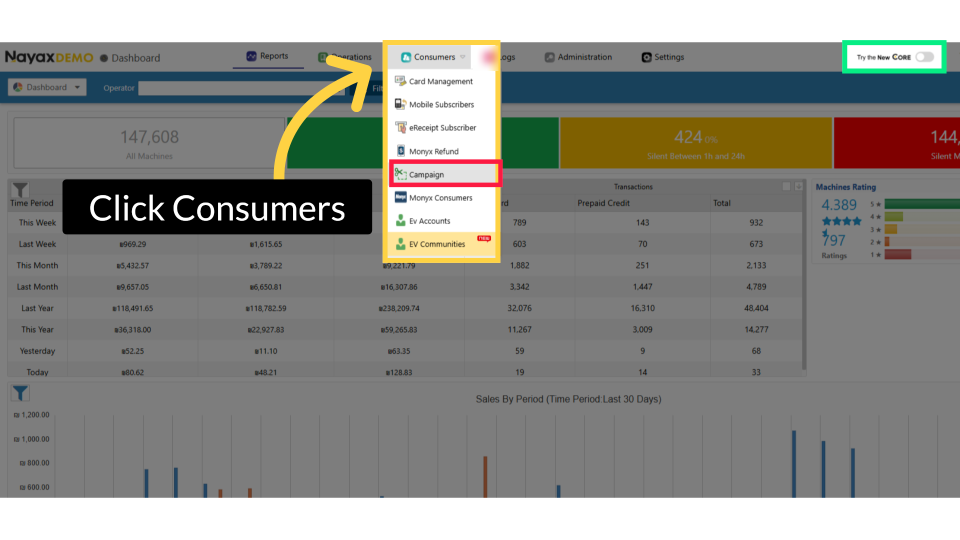
00:12: click the Consumers tab, then select Campaign from the drop-down menu.
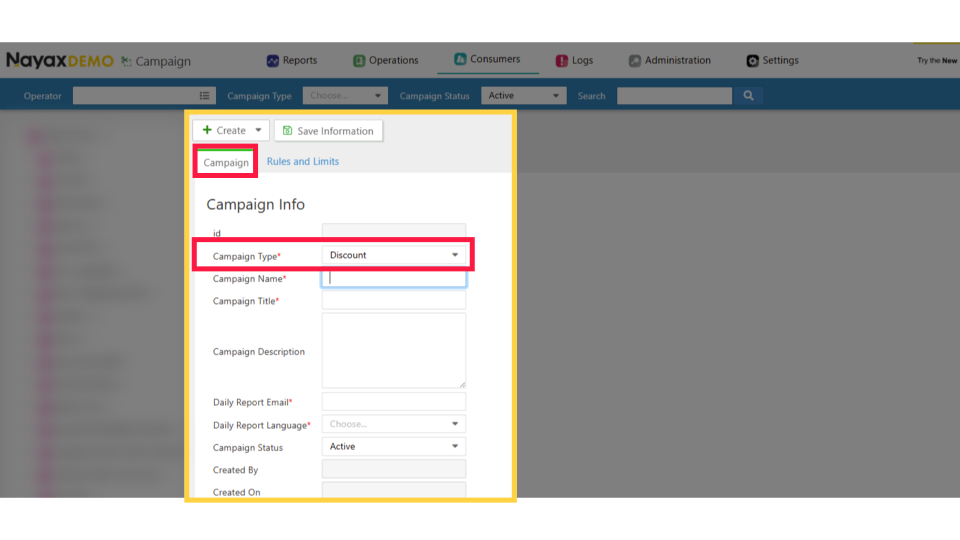
00:17: A Campaign Info window opens.
00:18: This process has two steps:
00:20: start by selecting Discount as the campaign type from the drop‑down menu.
00:24: If a discount option isn’t available, the feature may not be enabled for your
00:29: operator. Contact your Nayax distributor or Administrator.
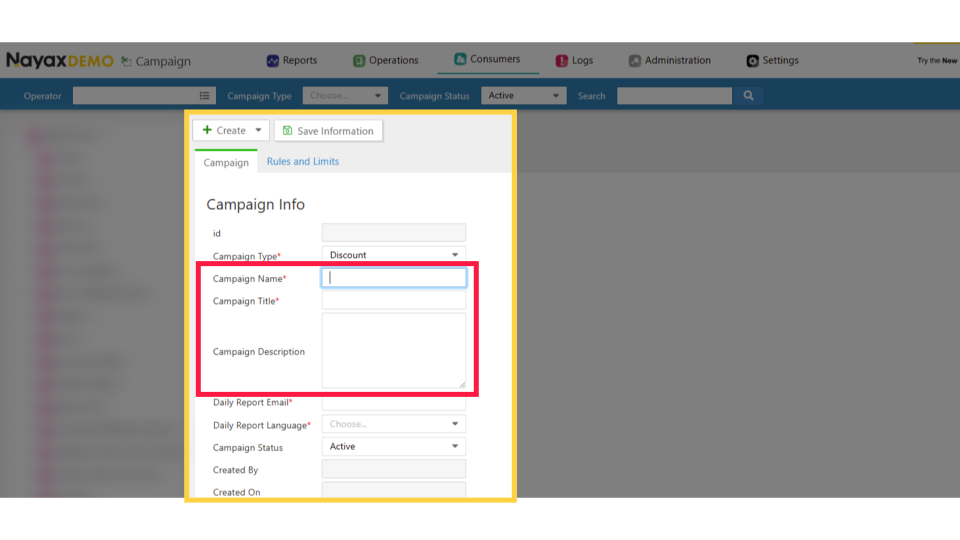
00:33: Enter the campaign name as it will appear in Nayax Core, then enter the campaign title
00:38: as it will appear in the Monyx Wallet.
00:40: Finally, add an internal description for the campaign, visible only to your team.
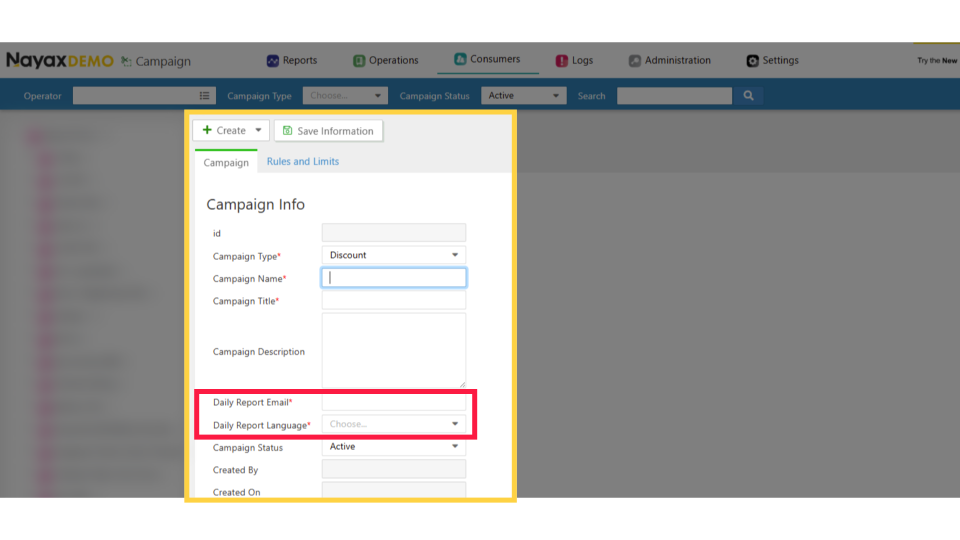
00:46: Enter the email address to receive daily
00:48: automated reports for this punch card campaign,
00:50: then select the report language from the drop‑down menu.
00:54: Select the status the campaign should have immediately after saving. Choose Active
00:59: to launch it right away, or Inactive to save it without launching.
01:03: Click Rules and Limits to continue setting up the campaign.
01:07: Enter your operator name. This links the campaign to the correct account.
01:12: Choose the machine types, for example, vending or amusement, and, if needed, a specific
01:16: machine group to limit the campaign’s scope. Leave either or both fields blank to
01:21: apply the campaign to all machine types and all machines.
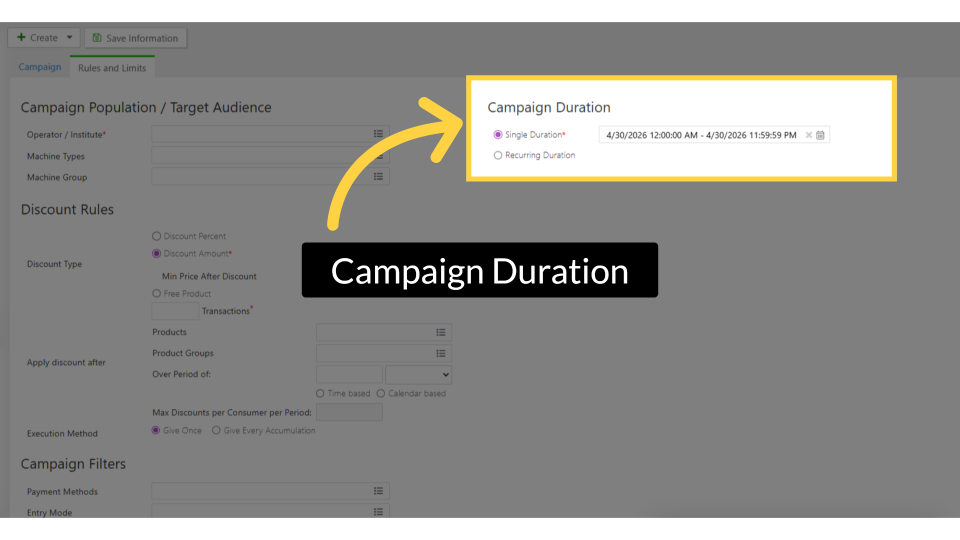
01:24: Set the campaign duration. Single Duration runs once between two dates
01:28: - choose your dates and click Apply. Recurring Duration repeats on a schedule
01:33: - set how often it repeats and when it ends.
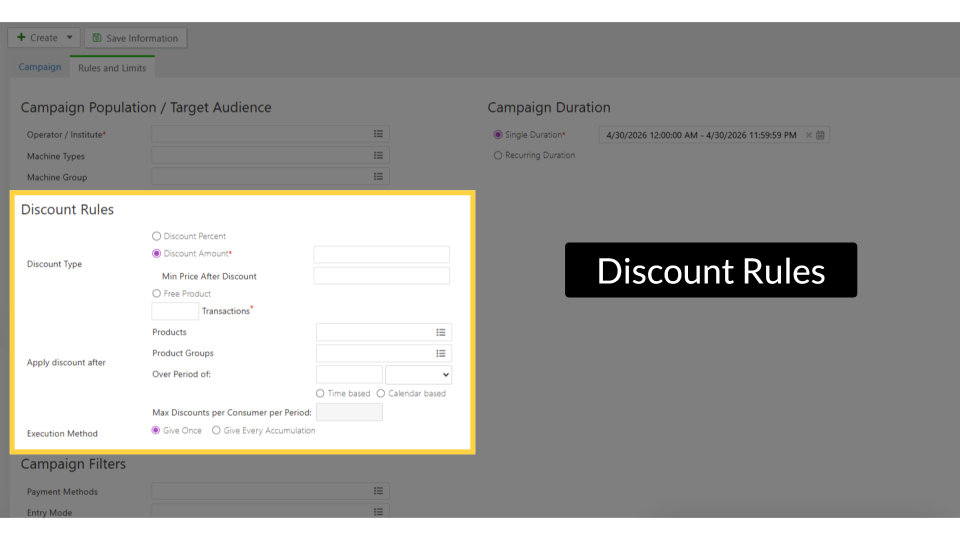
01:35: This section defines how the discount is applied and to which products. Under
01:39: Discount Rules, select one of the following options for Discount Type.
01:43: For more information, click the "Learn More" link to read the full article on Nayax U.
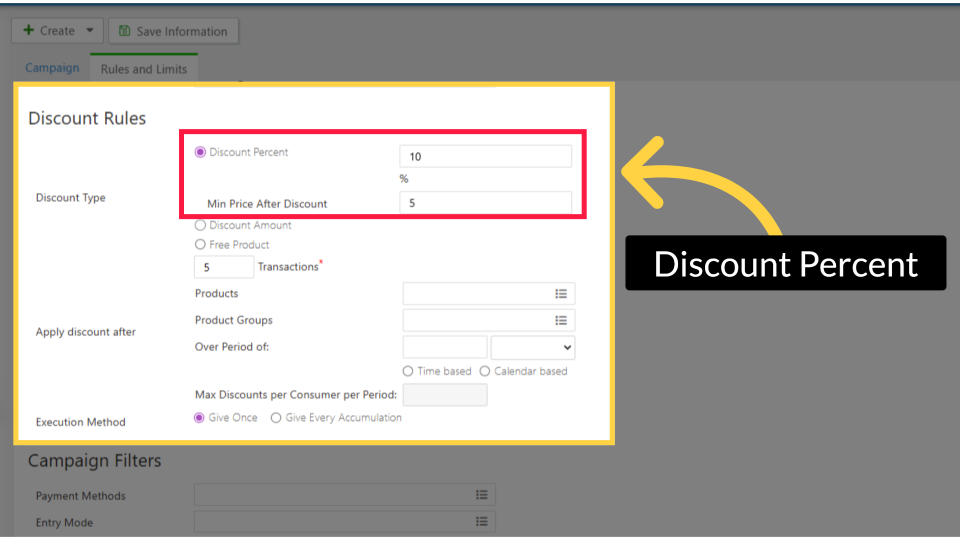
01:48: Reduces the product price by a percentage at the point of sale.
01:51: For example, 10% off a $5.00 product means the consumer pays $4.50.
01:57: fifty cents.
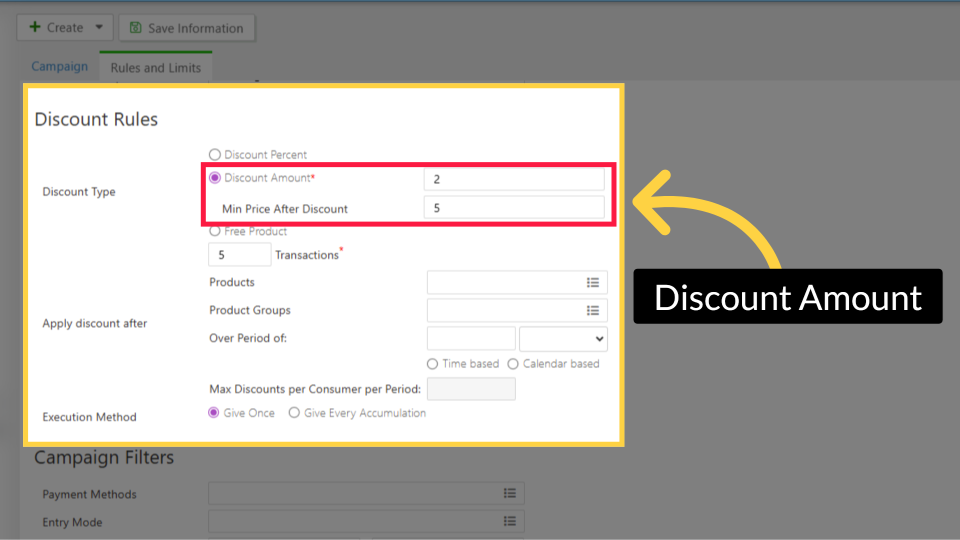
01:58: Reduces the product price by a fixed cash amount at the point of sale.
02:01: For example, $2 off a $5.00 product means the consumer pays $3.00.
02:06: dollars.
02:08: Offers a specific product for free after completing
02:10: a designated number of qualifying transactions. For example, buy 5 transactions and
02:15: receive the next product free.
02:18: In the Products and Product Groups fields, select the specific products or product
02:22: groups this discount applies to. Leave both blank to apply the discount to all
02:26: products.
02:27: Set how long a consumer must be active before the discount applies by choosing a
02:32: period and time unit, and select Time‑based or Calendar‑based tracking. Then set the
02:37: maximum number of times a consumer can receive the discount during that period, or
02:41: leave blank for no limit.
02:43: In Max Discounts per Consumer per
02:46: Period, enter the maximum number of times a single consumer can receive this
02:50: discount within the defined period. Leave blank for no per-consumer limit.
02:55: Choose how the discount is applied:
02:56: Give Once to apply it a single time, or Give Every Accumulation to apply it each
03:01: time the defined conditions are met.
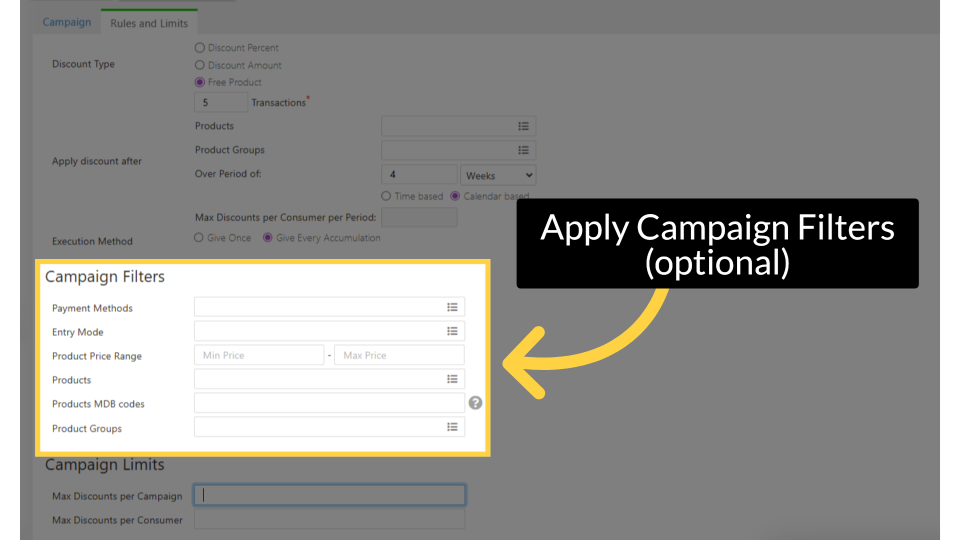
03:04: Campaign filters improve effectiveness by narrowing your target audience and
03:08: customizing messaging with precision. Use the filter fields to limit which
03:12: transactions qualify for the discount.
03:14: This step is optional. For more information,
03:17: click the "Learn More" link to read the full article on Nayax U.
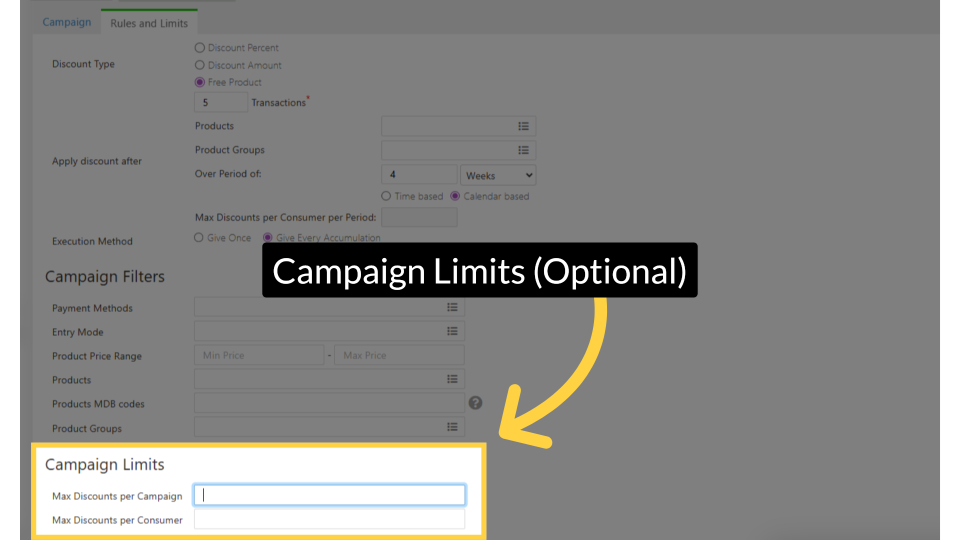
03:22: In the Campaign Limits section, enter values to limit the maximum discount that can be
03:26: given during the campaign. Leave blank if no limit is needed.
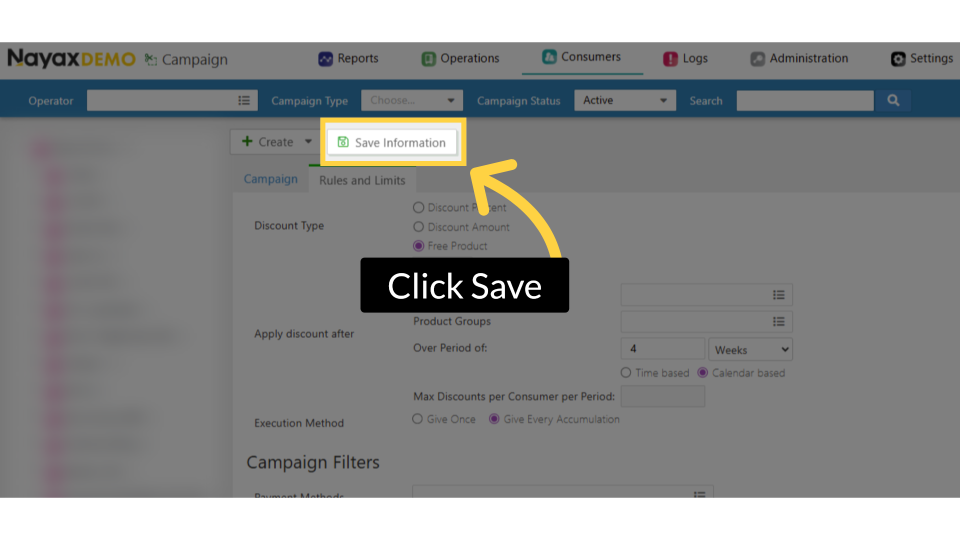
03:31: When all fields are complete and the preview looks correct, click Save Information.
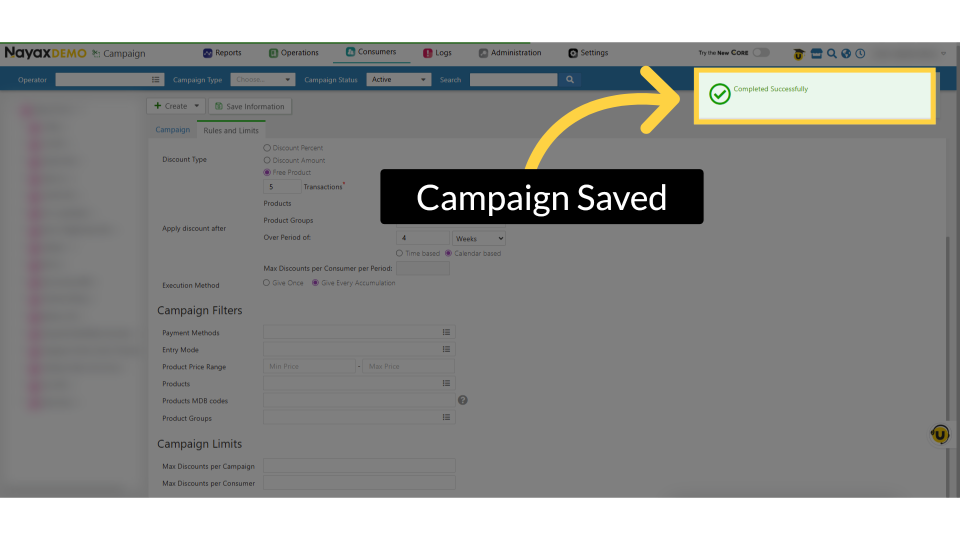
03:36: A completed successfully message will open to confirm your campaign is now created
03:40: and will be active according to the status you selected.
00:06: Access the consumer section 00:09: Select the campaign tab from the drop-down menu. 00:12: Fill in the mandatory fields to start creating your campaign. 00:16: Once done filling out the mandatory Fields click on rules and limits tab. 00:20: Select your preferred campaign duration single or reoccurring duration 00:25: Once you've selected single duration choose the start and end date for your campaign. 00:30: Click apply once you're done deciding on a duration date as indicated in 00:34: red. 00:35: If you decide reoccurring duration fill in the mandatory Fields as 00:39: indicated in red 00:41: Complete the remaining required fields for your campaign including the relevant 00:45: operator Institute within the campaign population target audience 00:49: section. 00:51: Fill in the fields for the discount rule section 00:54: These fields can be filled out, but they are not mandatory. 00:58: The fields under campaign limits are optional and you can choose to fill them 01:02: out if needed. 01:03: After entering all the necessary details for your campaign click save information 01:07: to finalize and create your campaign. 01:10: Once you see the success pop-up after clicking save your campaign has been created 01:14: successfully. 01:16: Thank you for watching.
Click Consumers Tab
Image AttachedOn the dashboard of your Nayax Classic Core platform, click the Consumers tab, then select Campaign from the drop-down menu.
Initiate Campaign Creation
Image AttachedA Campaign Info window opens. This process has two steps: start by selecting Discount as the campaign type from the drop‑down menu.
If a discount option isn’t available, the feature may not be enabled for your operator. Contact your Nayax distributor or Administrator.
Name the Campaign
Image AttachedEnter the campaign name as it will appear in Nayax Core, then enter the campaign title as it will appear in the Monyx Wallet. Finally, add an internal description for the campaign, visible only to your team.
Email Reports
Image AttachedEnter the email address to receive daily automated reports for this punch card campaign, then select the report language from the drop‑down menu.
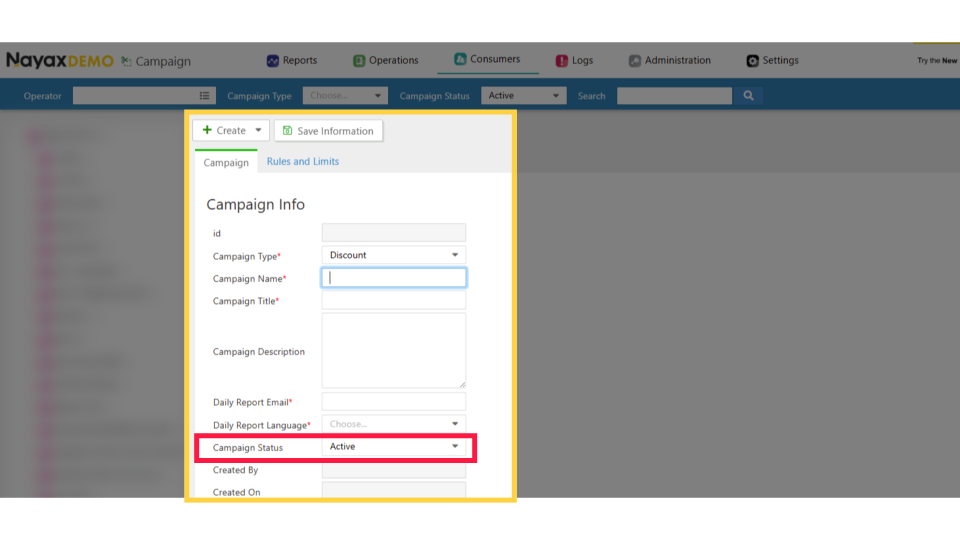
Campaign Status
Image AttachedSelect the status the campaign should have immediately after saving. Choose Active to launch it right away, or Inactive to save it without launching.
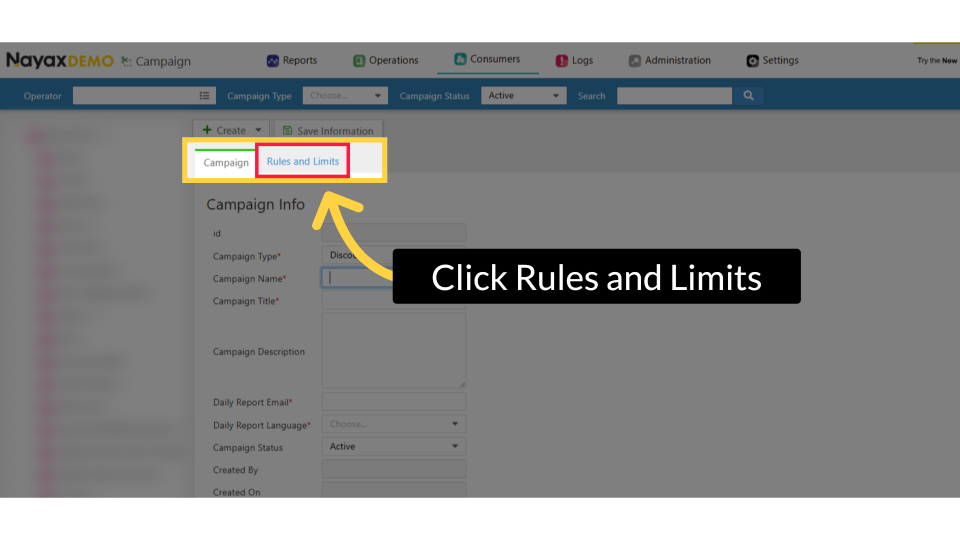
Click Rules and Limits
Image AttachedClick Rules and Limits to continue setting up the campaign.
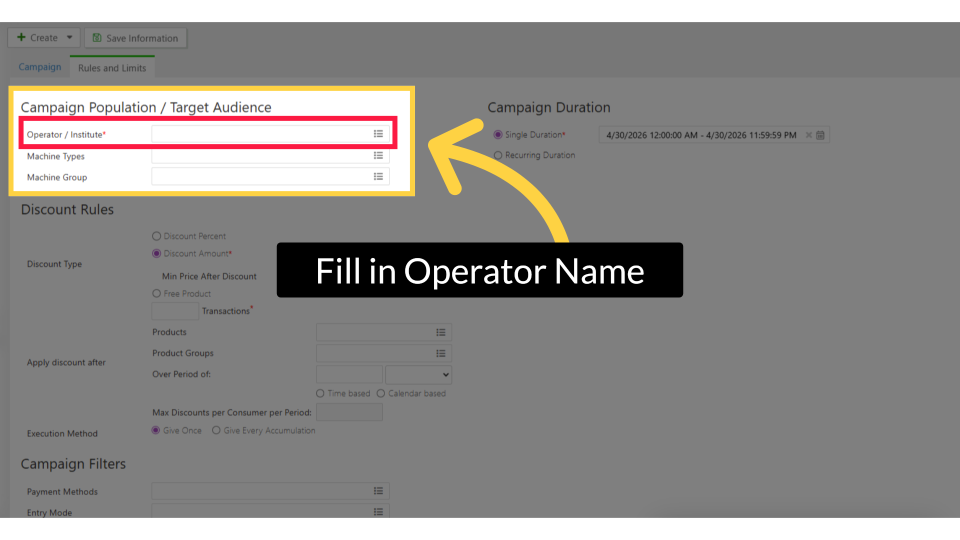
Fill in Operator Name
Image AttachedEnter your operator name. This links the campaign to the correct account.
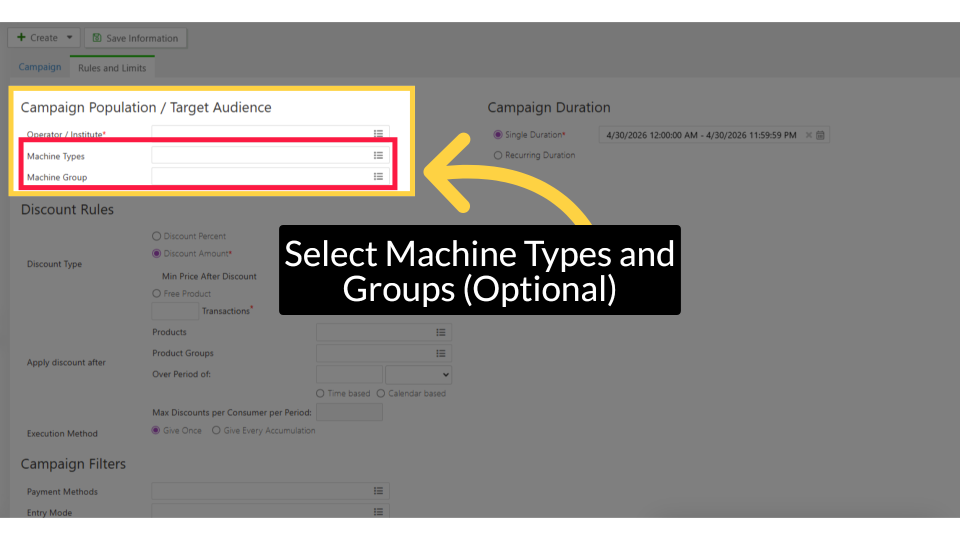
Select Machine Types and Groups (Optional)
Image AttachedChoose the machine types, for example, vending or amusement, and, if needed, a specific machine group to limit the campaign’s scope. Leave either or both fields blank to apply the campaign to all machine types and all machines.
Campaign Duration
Image AttachedIn the Campaign Duration section, select either Single Duration or Recurring Duration.
|
Duration Type |
When to Use |
Required Fields |
|
Single Duration |
A one-time campaign with a fixed start and end. |
Start Date/Time + End Date/Time. Click Apply after setting dates. |
|
Recurring Duration |
A campaign that repeats on a regular schedule until manually stopped or until an end condition is met. |
Start Date/Time + Duration (minutes/hours/days/weeks) + Repeat Every (days/weeks/months/years) + End condition (Never / After N times / By date) |
|
NOTE Single Duration: After selecting your date range from the calendar picker, click Apply to confirm the selection before saving. |
|
NOTE Recurring Duration: The Repeat Every field is mandatory. Set the End condition to Never if the campaign should run indefinitely, After to stop after a set number of repetitions, or By to stop on a specific date. |
Discount Rules
Image AttachedThis section defines how the discount is applied and to which products by selecting the Discount Type
Under Discount Rules, select one of the following options for Discount Type:
|
Discount Type |
How It Works |
Example |
|
Discount Percent |
Reduces the product price by a percentage at point of sale. |
10% off a $5.00 product - consumer pays $4.50 |
|
Discount Amount |
Reduces the product price by a fixed cash amount at point of sale. |
$2 off a $5.00 product - consumer pays $3.00 |
|
Free Product |
Offers a specific product for free when a set number of qualifying transactions have been completed. |
Buy 5 transactions, get the next product free |
Discount Percent
Image AttachedReduces the product price by a percentage at the point of sale.
For example, 10% off a $5.00 product means the consumer pays $4.50.
Discount Amount
Image AttachedReduces the product price by a fixed cash amount at the point of sale.
For example, $2 off a $5.00 product means the consumer pays $3.00.
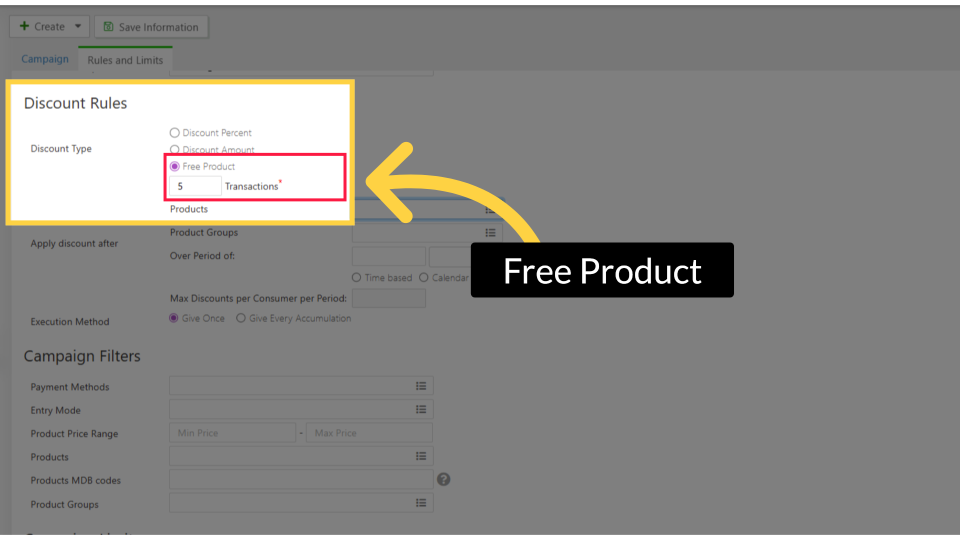
Free Product
Image AttachedOffers a specific product for free after completing a designated number of qualifying transactions.
For example, buy 5 transactions and receive the next product free.
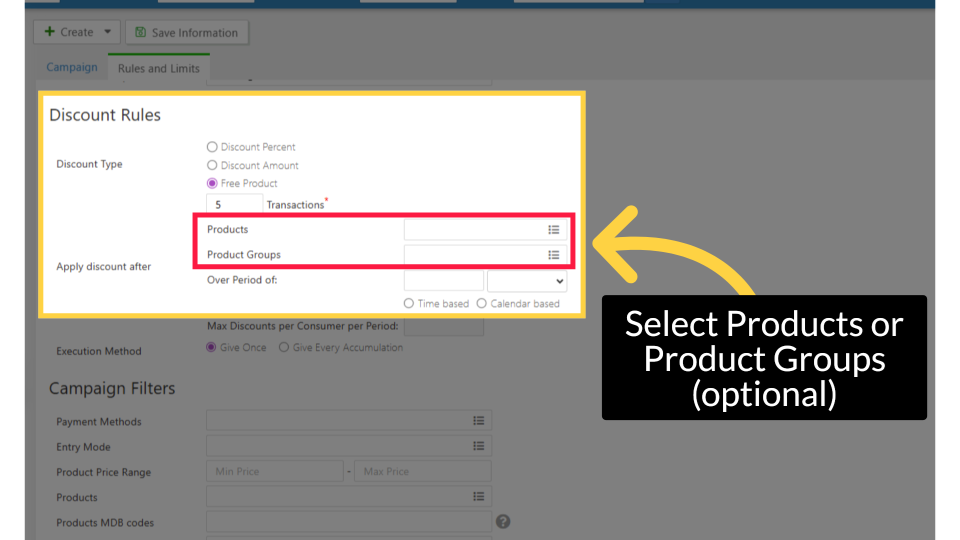
Select Products or Product Groups (optional)
Image AttachedIn the Products and Product Groups fields, select the specific products or product groups to which this discount applies to.
Leave both blank to apply the discount to all products.
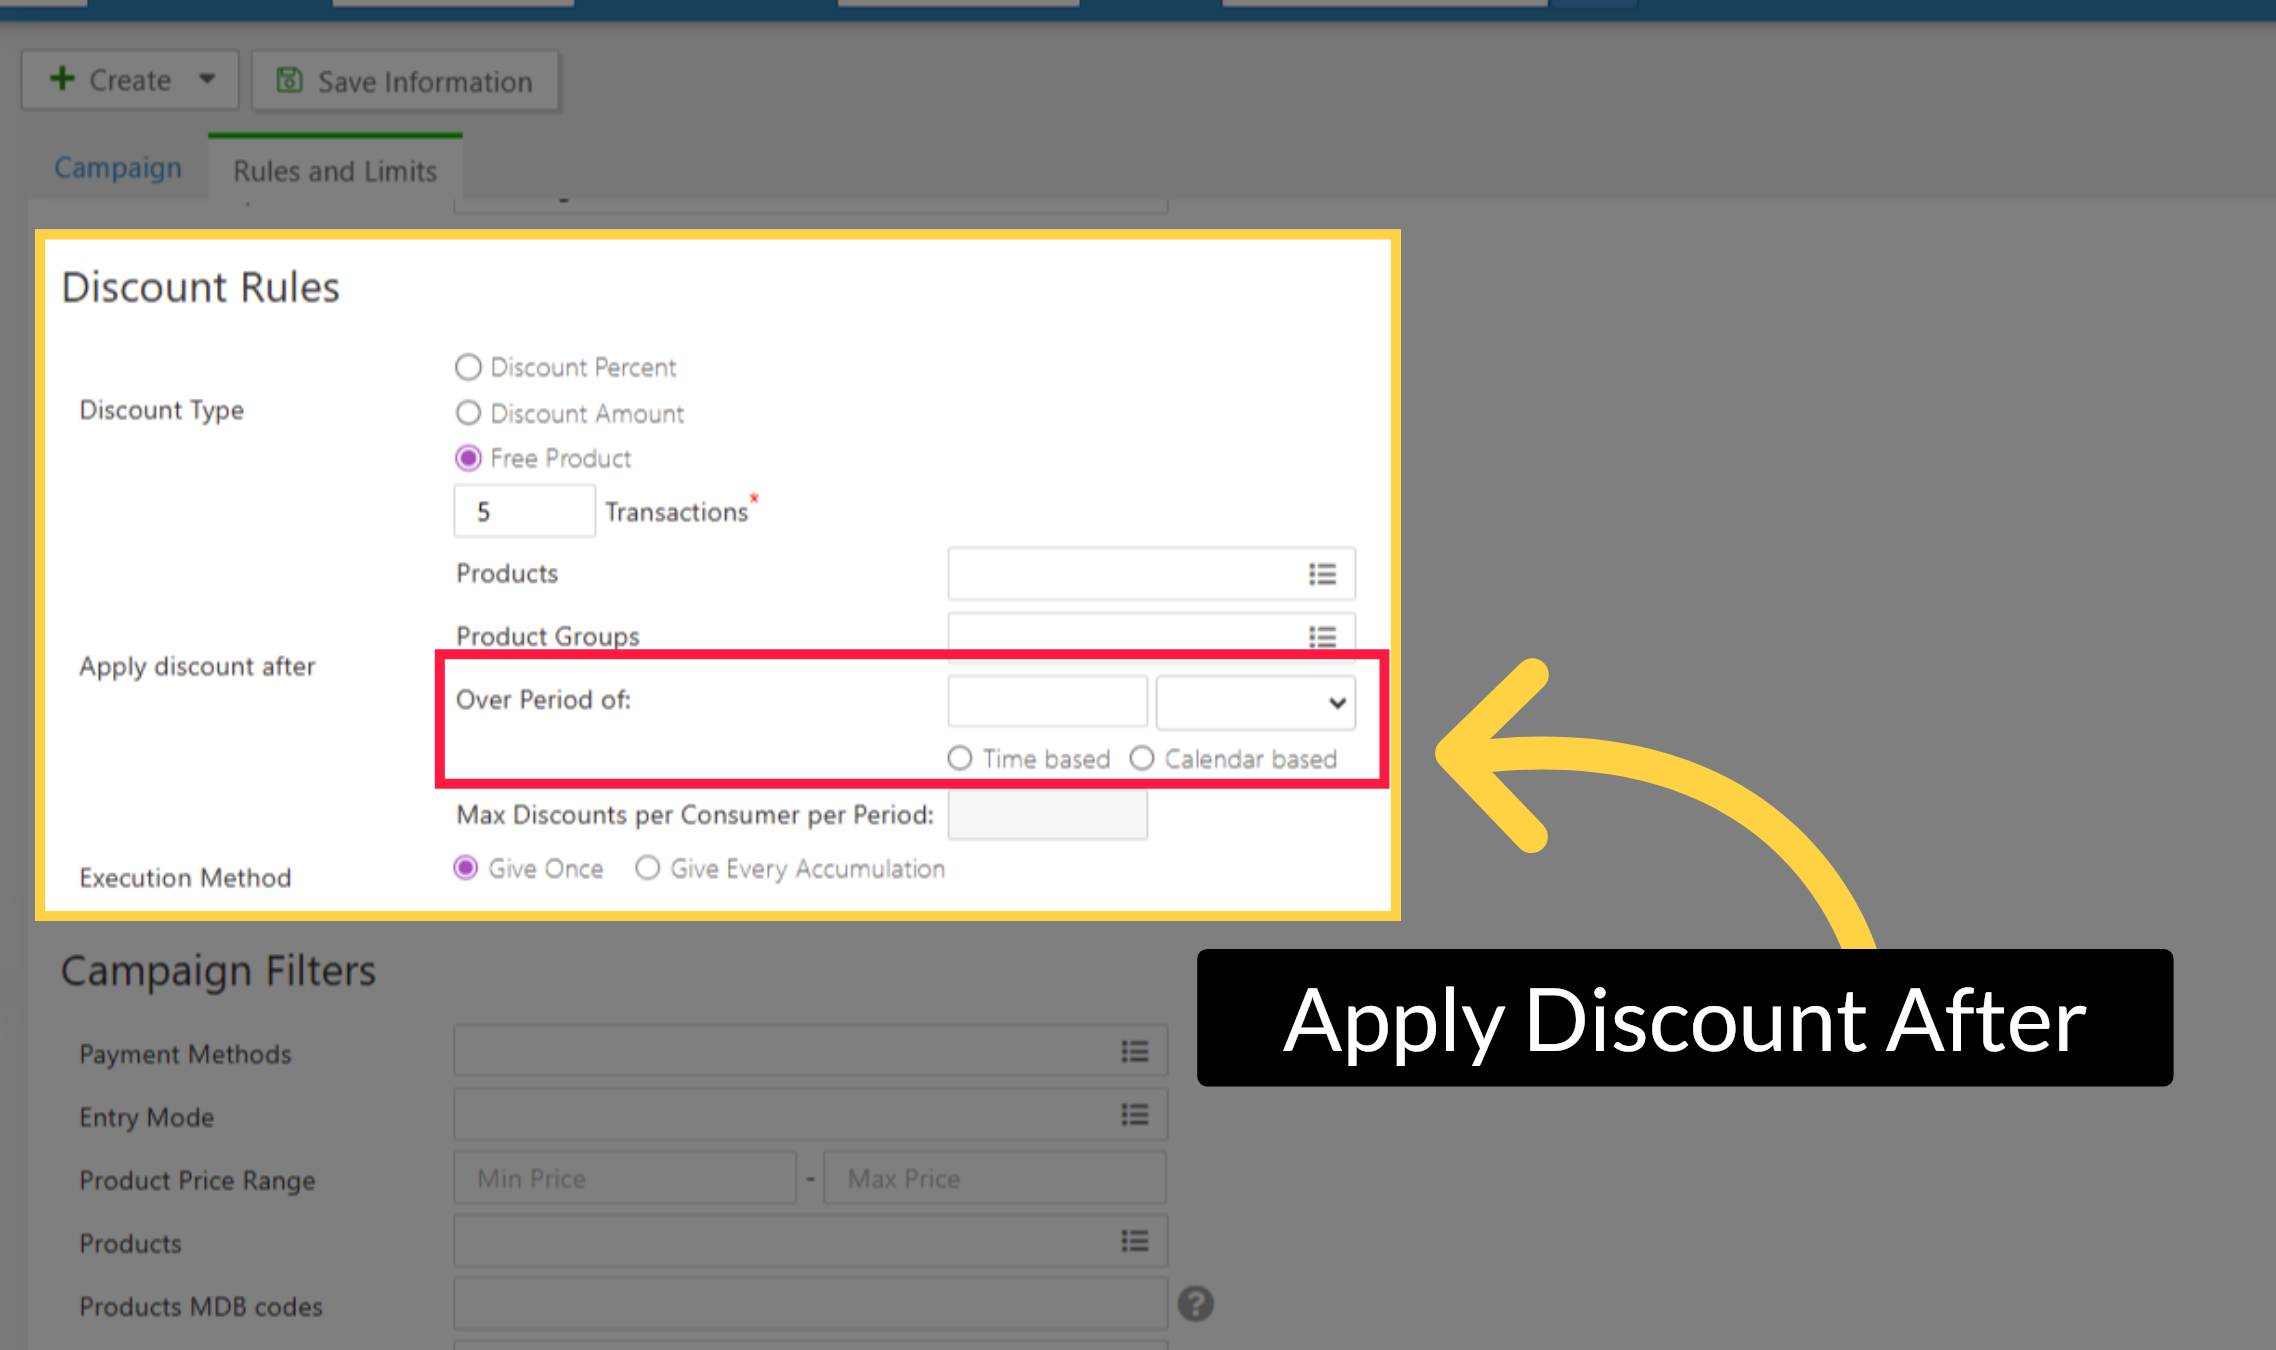
Apply Discount After
Image AttachedSet the qualifying period and consumer cap (optional)
In the Apply Discount After section, use Over Period of to set how long a consumer must have been transacting before the discount is triggered. Choose a number and a time unit (Hours, Days, Weeks, Months). Then select Time based or Calendar based to control how the period is measured.
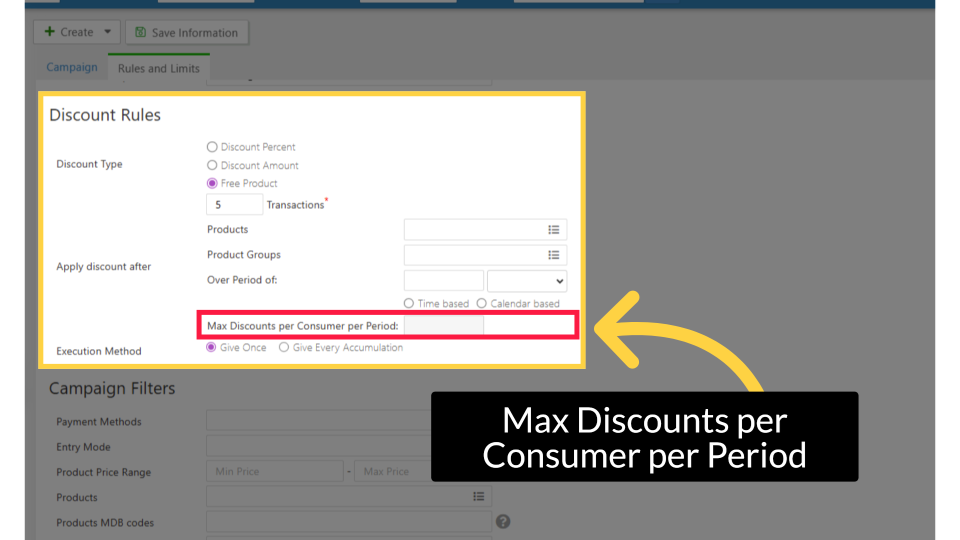
Max Discounts per Consumer per Period
Image AttachedIn Max Discounts per Consumer per Period, enter the maximum number of times a single consumer can receive this discount within the defined period. Leave blank for no per-consumer limit.
Set the Execution Method
Choose how the discount is applied:
- Give Once to apply it a single time, or
- Give Every Accumulation to apply it each time the defined conditions are met.
Apply Campaign Filters (optional)
Image AttachedCampaign Filters let you narrow eligibility. Complete any of the following filter fields to restrict which transactions qualify for the discount: All fields in this section are optional.
|
Filter Field |
Description |
|
Payment Methods |
Restrict the campaign to specific payment methods. Leave blank to apply to all payment methods. |
|
Entry Mode |
Restrict to a specific reader type (for example, MIFARE, contactless). Leave blank to apply to all entry modes. |
|
Product Price Range |
Set a minimum and maximum product price. Only products within this price range will qualify for the discount. |
|
Products |
Restrict to specific products. Leave blank for all products. |
|
Products MDB Codes |
Restrict to products identified by specific MDB codes. |
|
Product Groups |
Restrict to specific product groups. Leave blank for all product groups. |
Campaign Limits (Optional)
Image AttachedIn the Campaign Limits section, enter values to limit the maximum discount that can be given during the campaign. Leave blank if no limit is needed.
Click Save
Image AttachedWhen all fields are complete and the preview looks correct, click Save Information.
Campaign Saved
Image AttachedA completed successfully message will open to confirm your campaign is now created and will be active according to the status you selected.
Thank you!
Did you find this article helpful?