
How to Complete Your Nayax US Onboarding Agreement
Walk you through the Nayax US onboarding agreement, from KYC basics, business details and bank setup to identity verification and digital signing.
Video Guide: How to Complete Your Nayax US Onboarding Agreement
00:00: In this video, we'll walk you through the Nayax US onboarding agreement, from KYC
00:04: basics to digitally signing your contract.
00:06: Click the 'Learn More' link to view a full explanation in Nayax U.
00:10: Before you start, have your registration number, Ultimate Beneficial Owner details,
00:14: bank information with proof of bank, and a passport or ID ready. Gather everything
00:19: in advance; progress may not be saved if you exit mid-step.
00:23: In addition to the documents required from all entities, Nayax requires specific
00:27: information depending on your business structure.
00:30: Select the type that applies to you.
00:32: Click the 'Learn More' link to view a full explanation in Nayax U.
00:37: The form has six steps, Welcome, Business Information, About Your Account, Fees and
00:42: Payment Details, Related Individuals, and Your Contracts.
00:46: All fields marked with an asterisk on the form are compulsory.
00:49: You cannot proceed to the next step until all required fields are complete
00:54: Enter your country of operation and legal details
00:56: using your TIN, EIN, or SSN.
00:59: Ensure your name matches official records.
01:01: You have three attempts to enter the information.
01:03: If the search fails, provide registration documents as proof of registration.
01:09: Your name, entity type, and address must match your official records
01:12: exactly. Please note that fields marked with an asterisk are required.
01:17: If your company is owned 51% or more by a publicly traded company, tell us here, and
01:22: describe your ownership structure.
01:24: Then complete your W9
01:25: details,
01:26: select your federal tax classification, and enter your tax classification code.
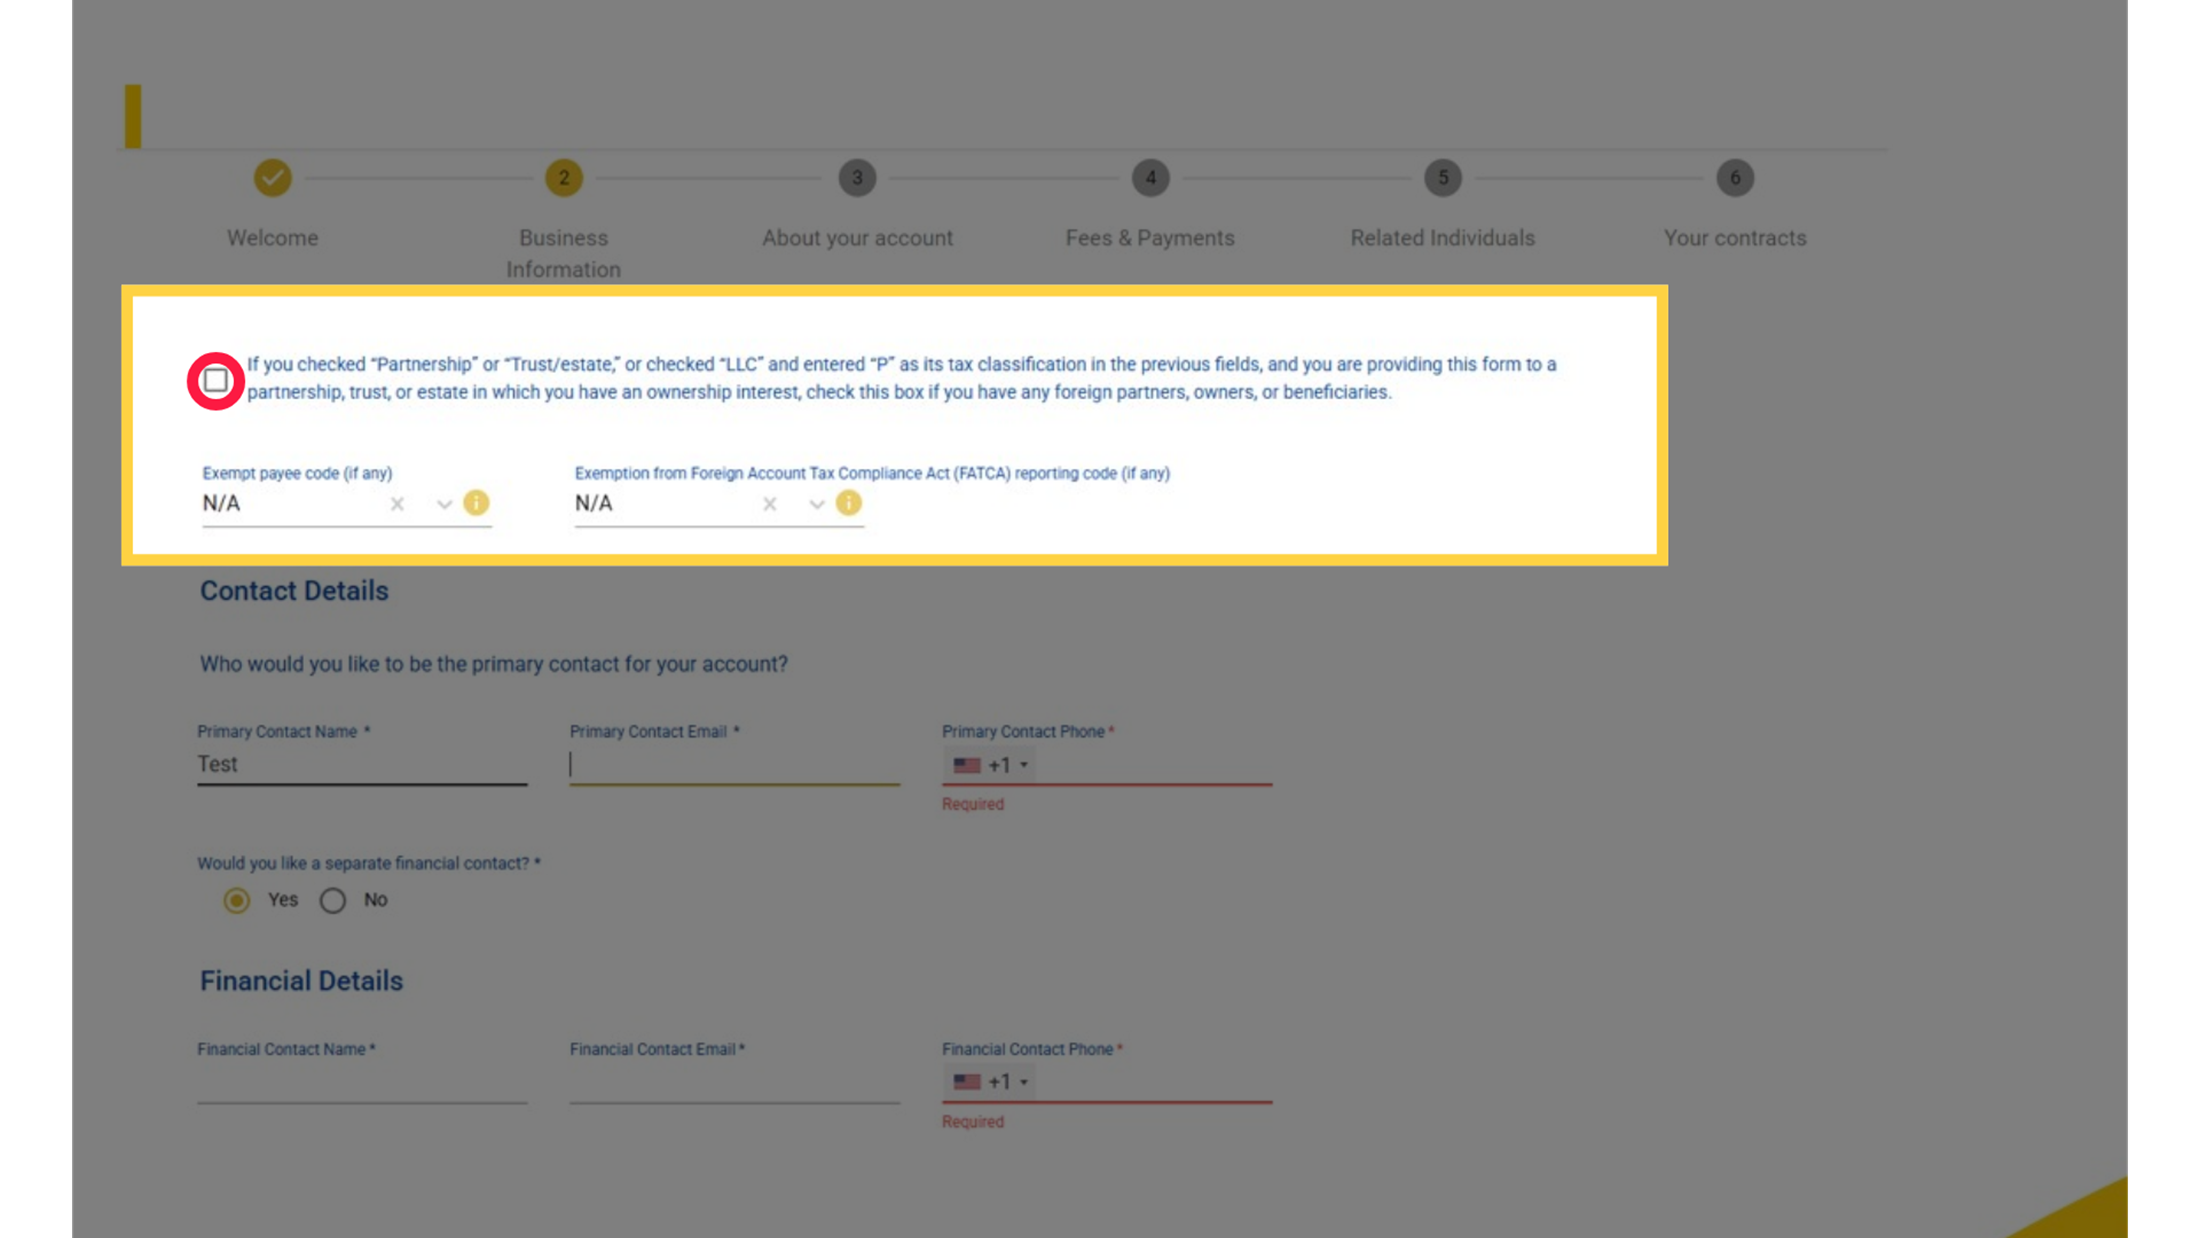
01:31: If you checked Partnership, trust, estate, or LLC, tick the box for foreign partners,
01:35: owners, or beneficiaries. Select the number of exempt payee codes. If none, select N/A.
01:41: applicable.
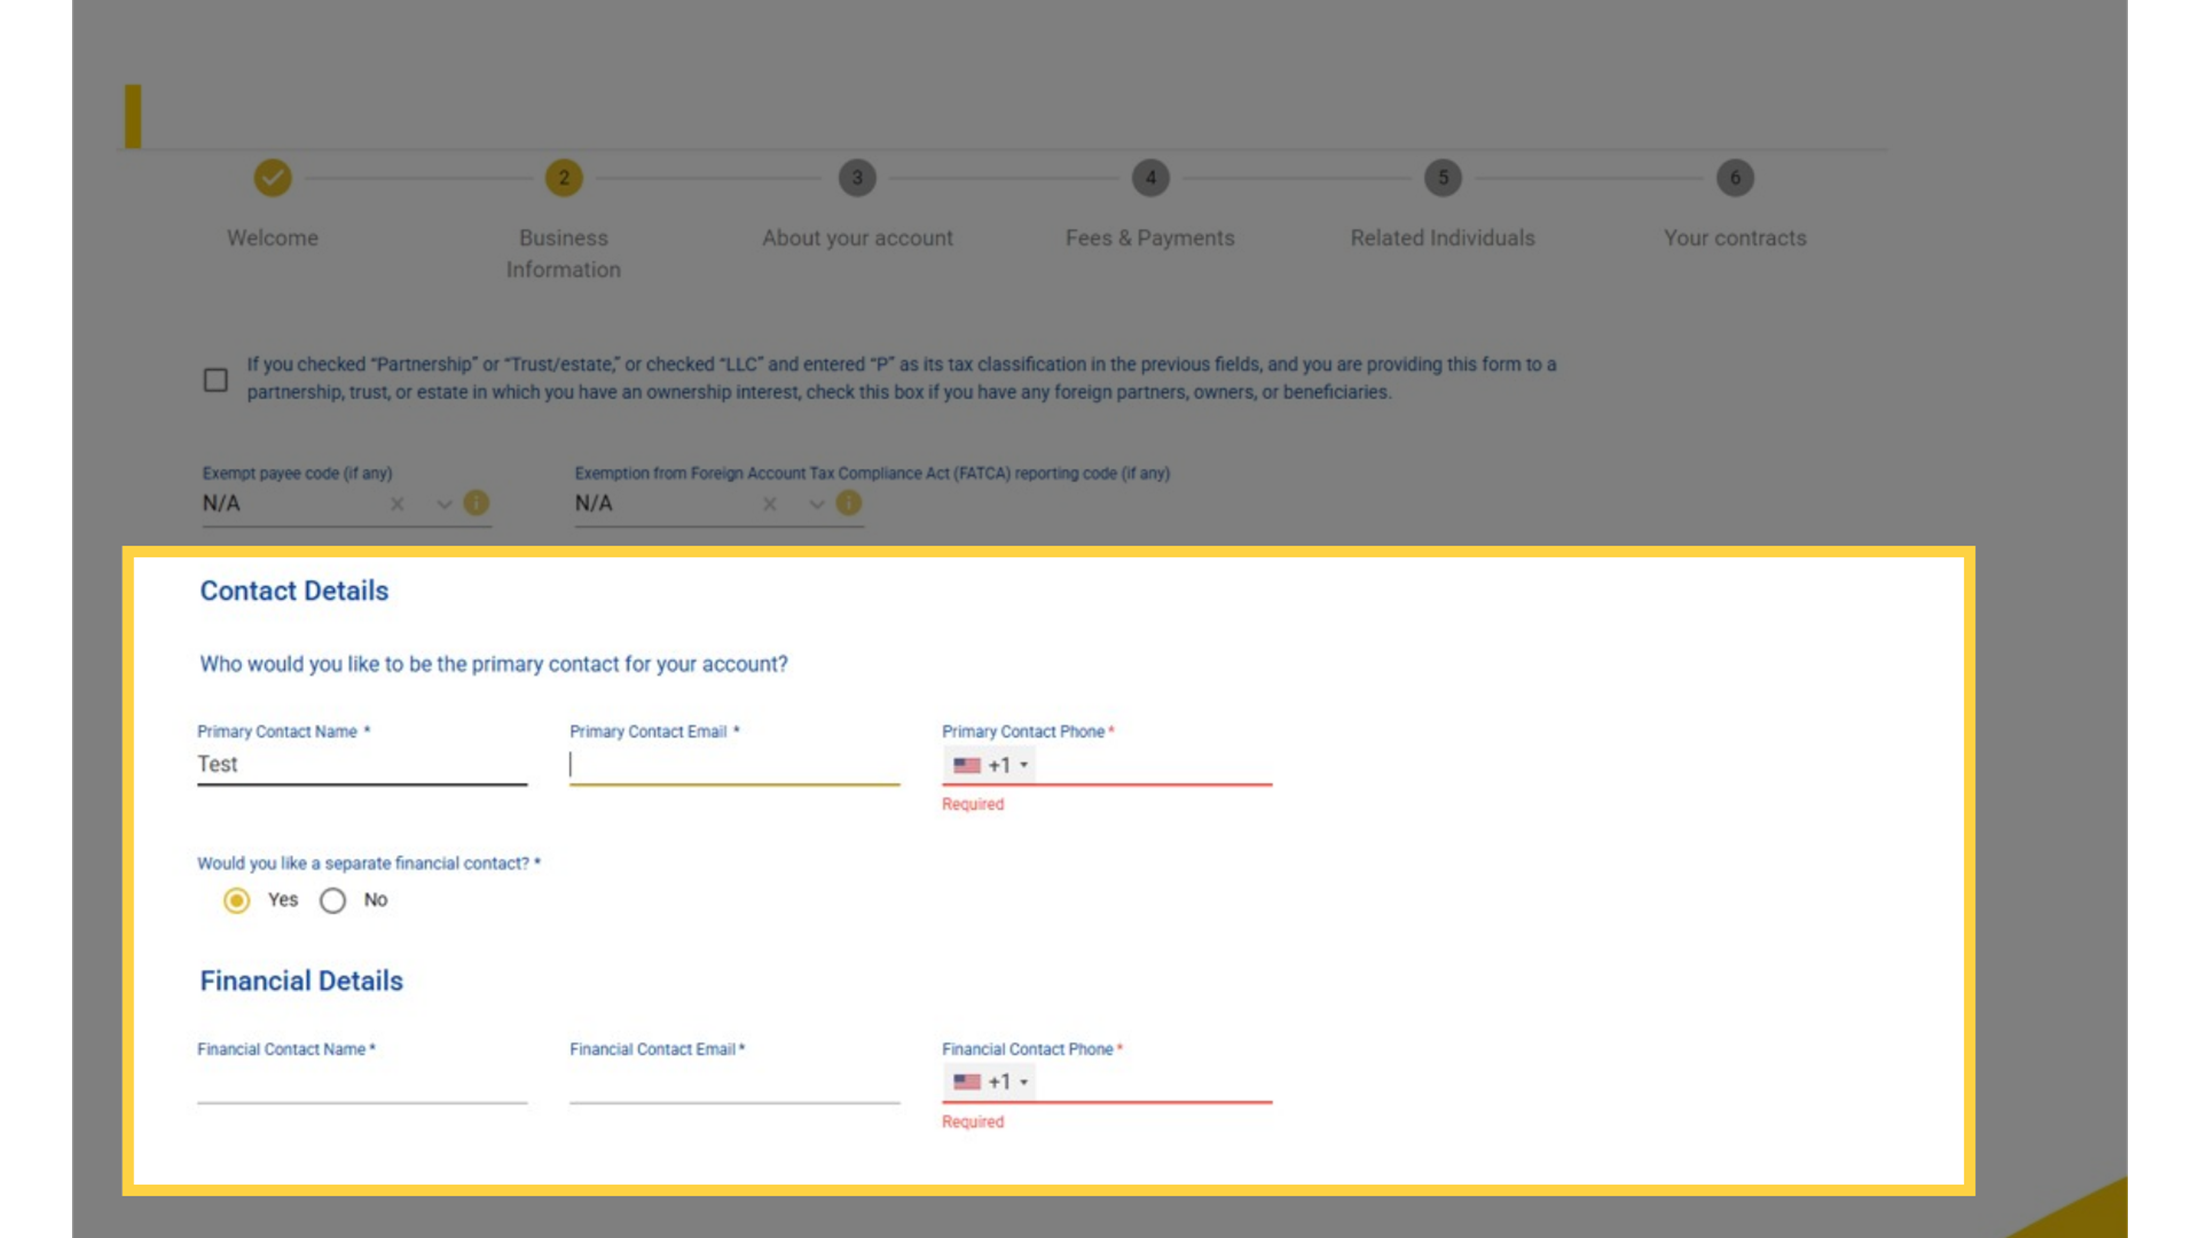
01:43: Add your primary contact details
01:44: and, if billing goes to someone else, a financial contact. Confirm your entity
01:48: details,
01:48: then continue.
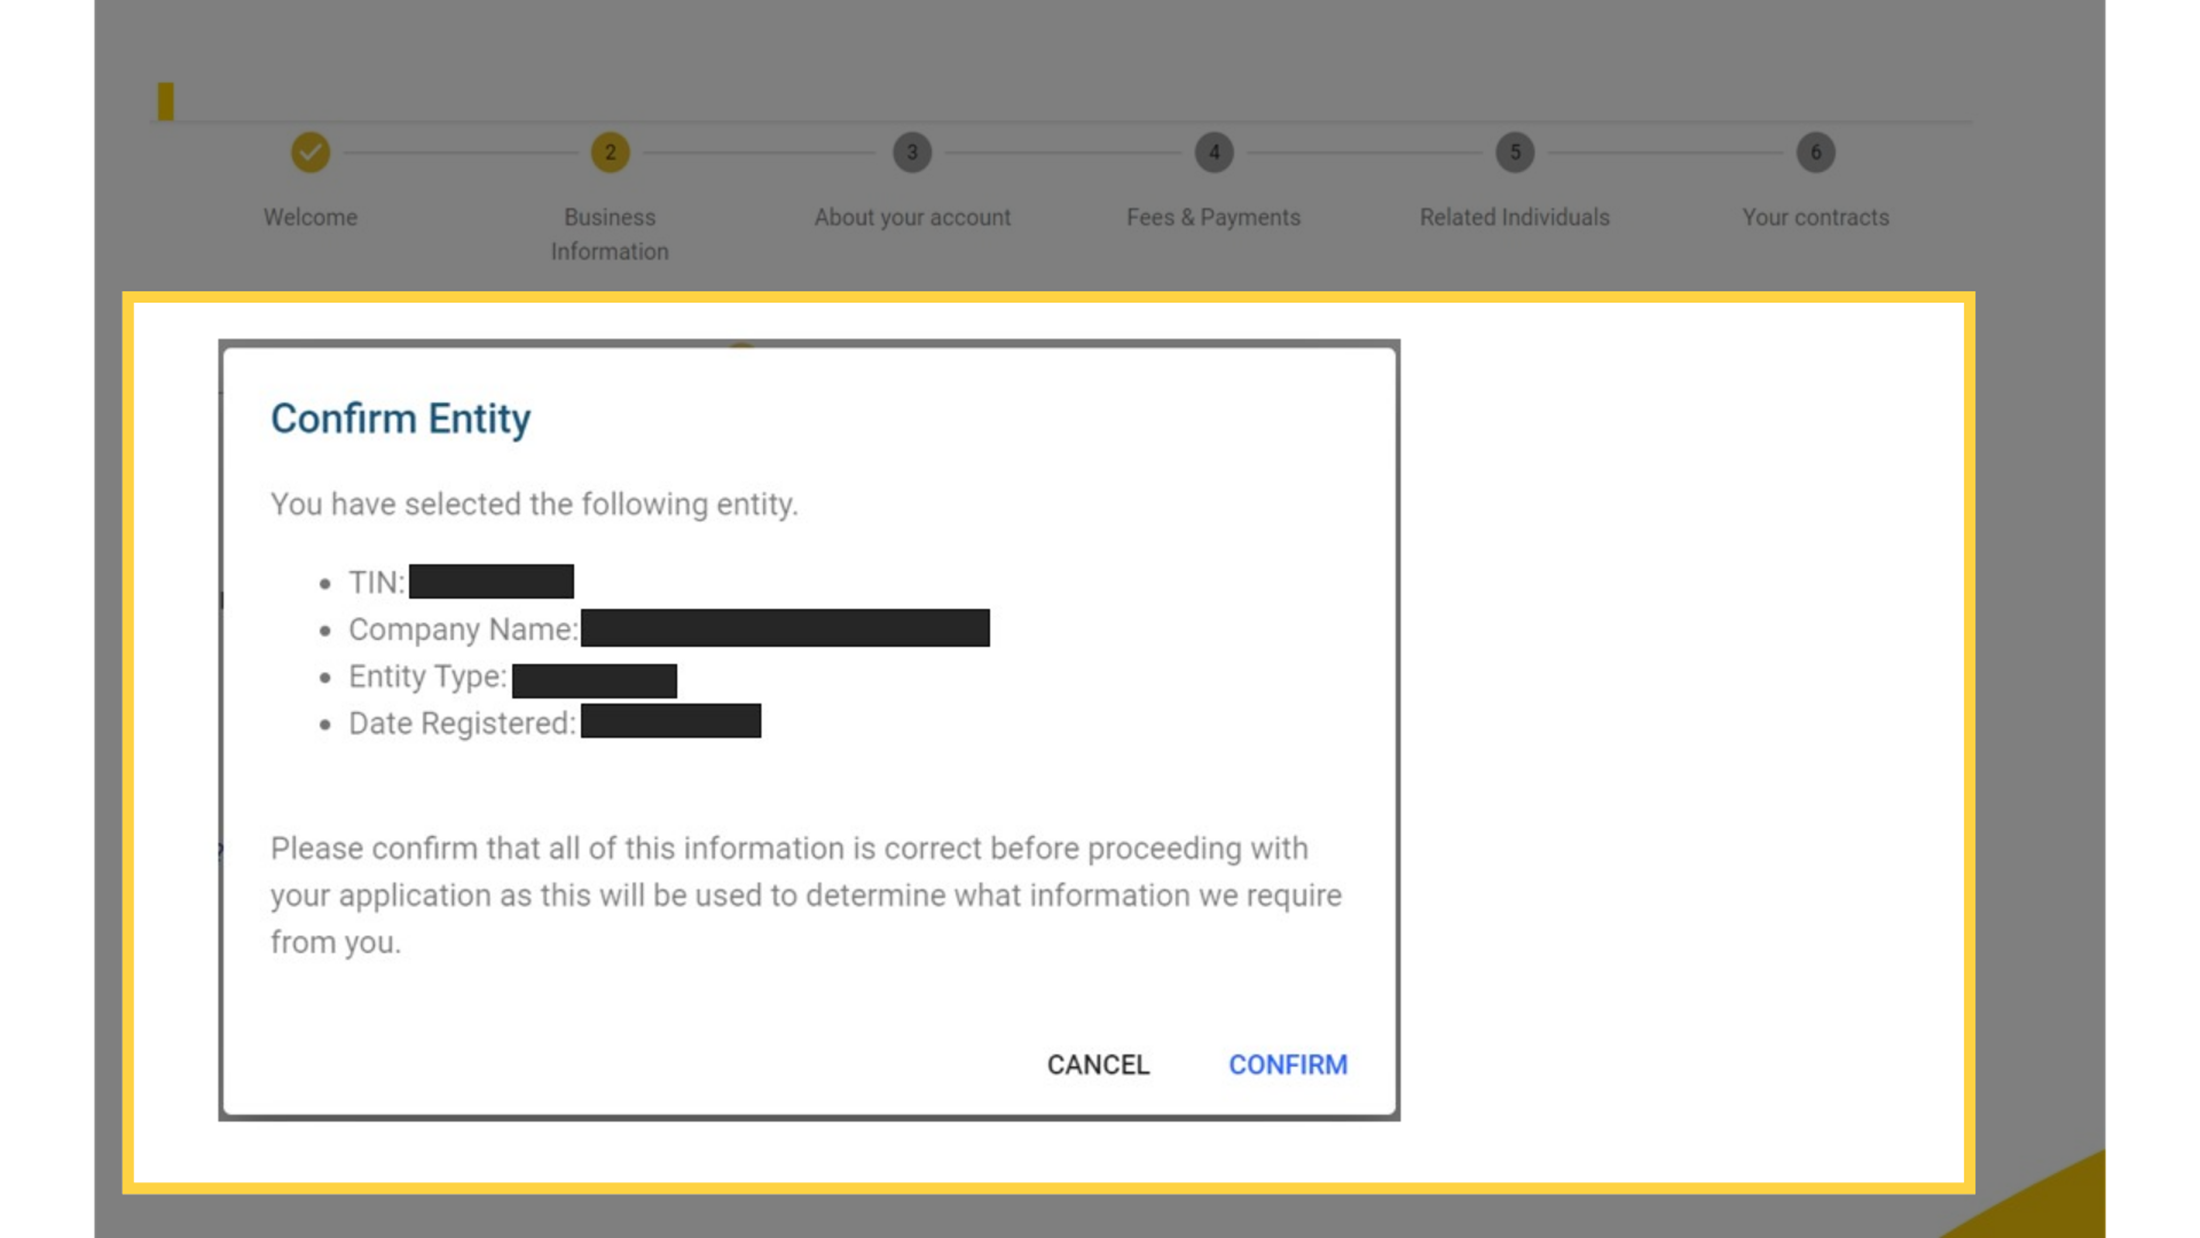
01:50: Review the Confirm Entity popup carefully. This information determines what
01:54: else we'll ask for, so make sure it's correct before clicking Confirm.
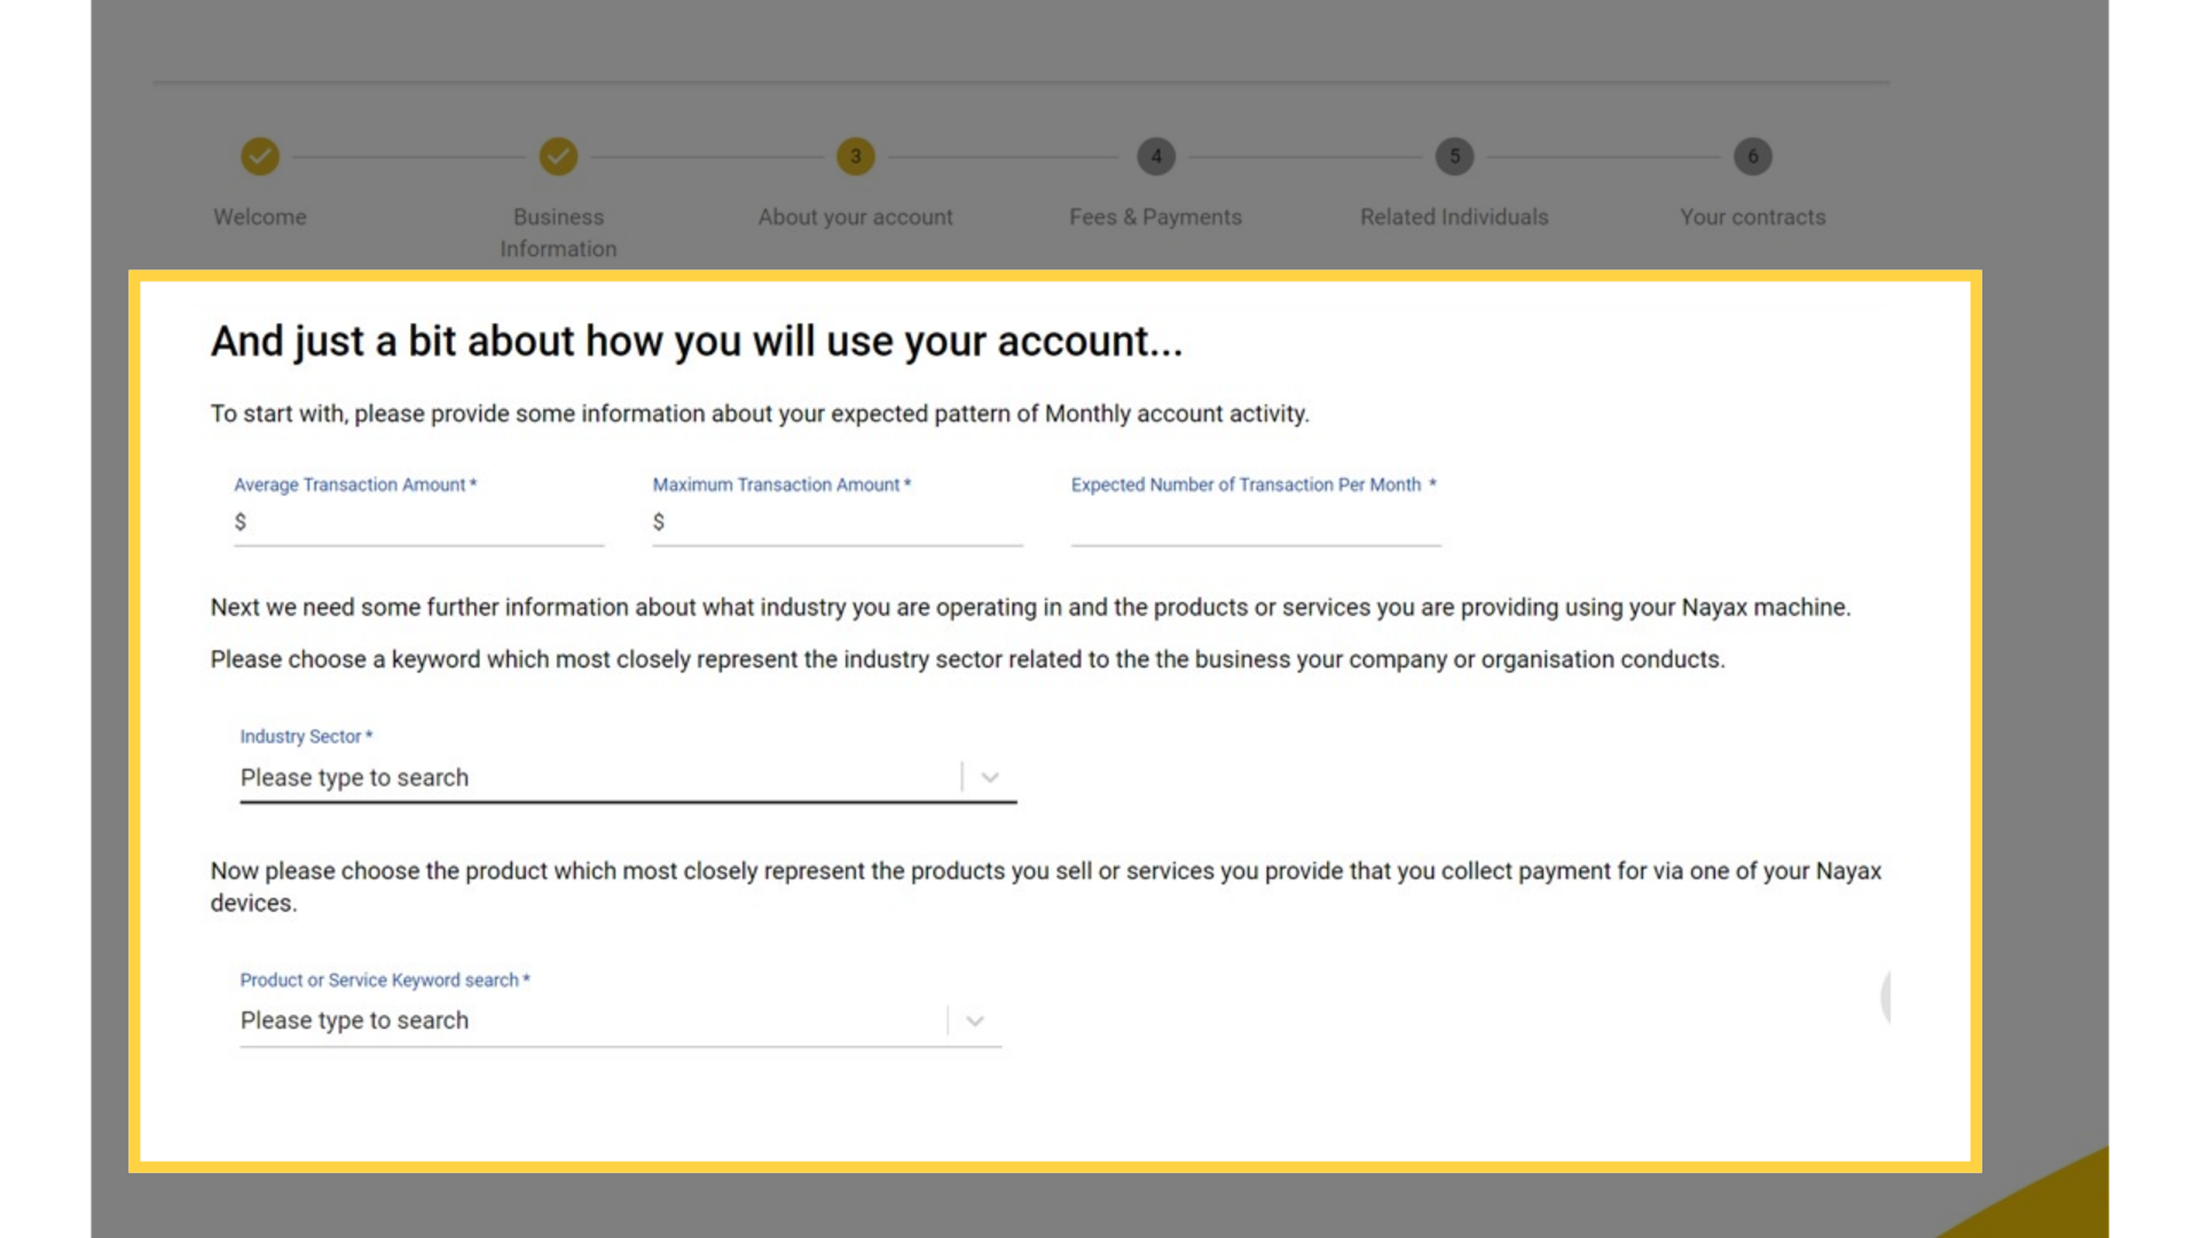
01:58: Enter your expected transaction amounts, monthly volume, and industry sector.
02:02: Use realistic estimates;
02:04: they're used for compliance risk profiling.
02:06: Add your account name,
02:07: number, bank name, and 9-digit routing number. The
02:10: account name must match your registered entity name. Your proof of bank account statement,
02:14: voided check, or bank letter dated within 30 days must show full account and
02:18: routing numbers. No
02:19: handwritten documents accepted.
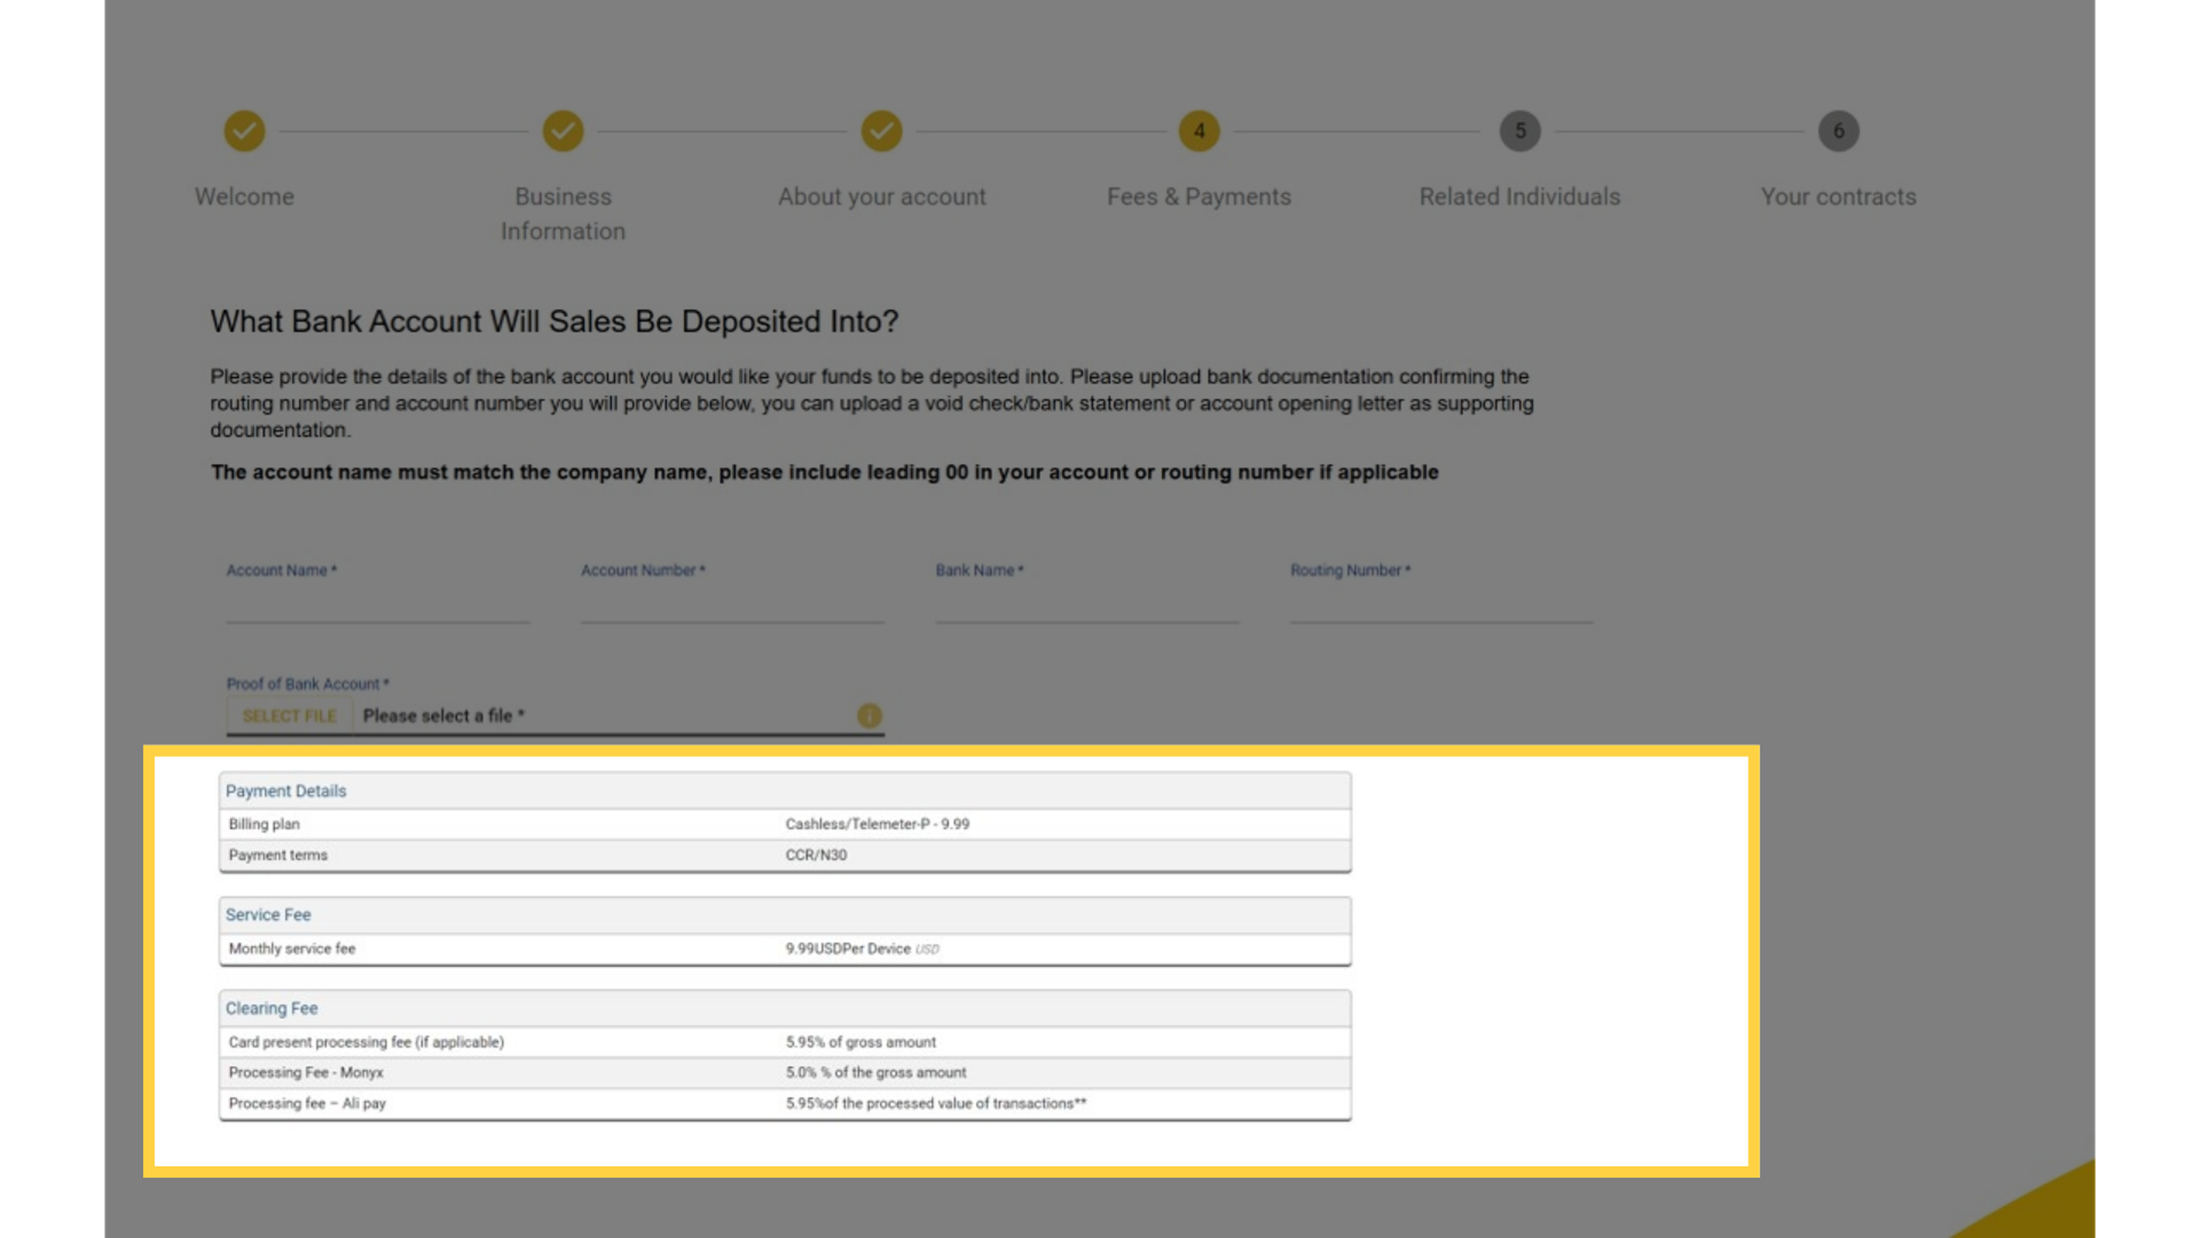
02:22: Here's your fee schedule at a glance:
02:23: your billing plan, payment terms, monthly service fee, and the processing fees that
02:28: apply to card, Monyx, and Ali Pay transactions.
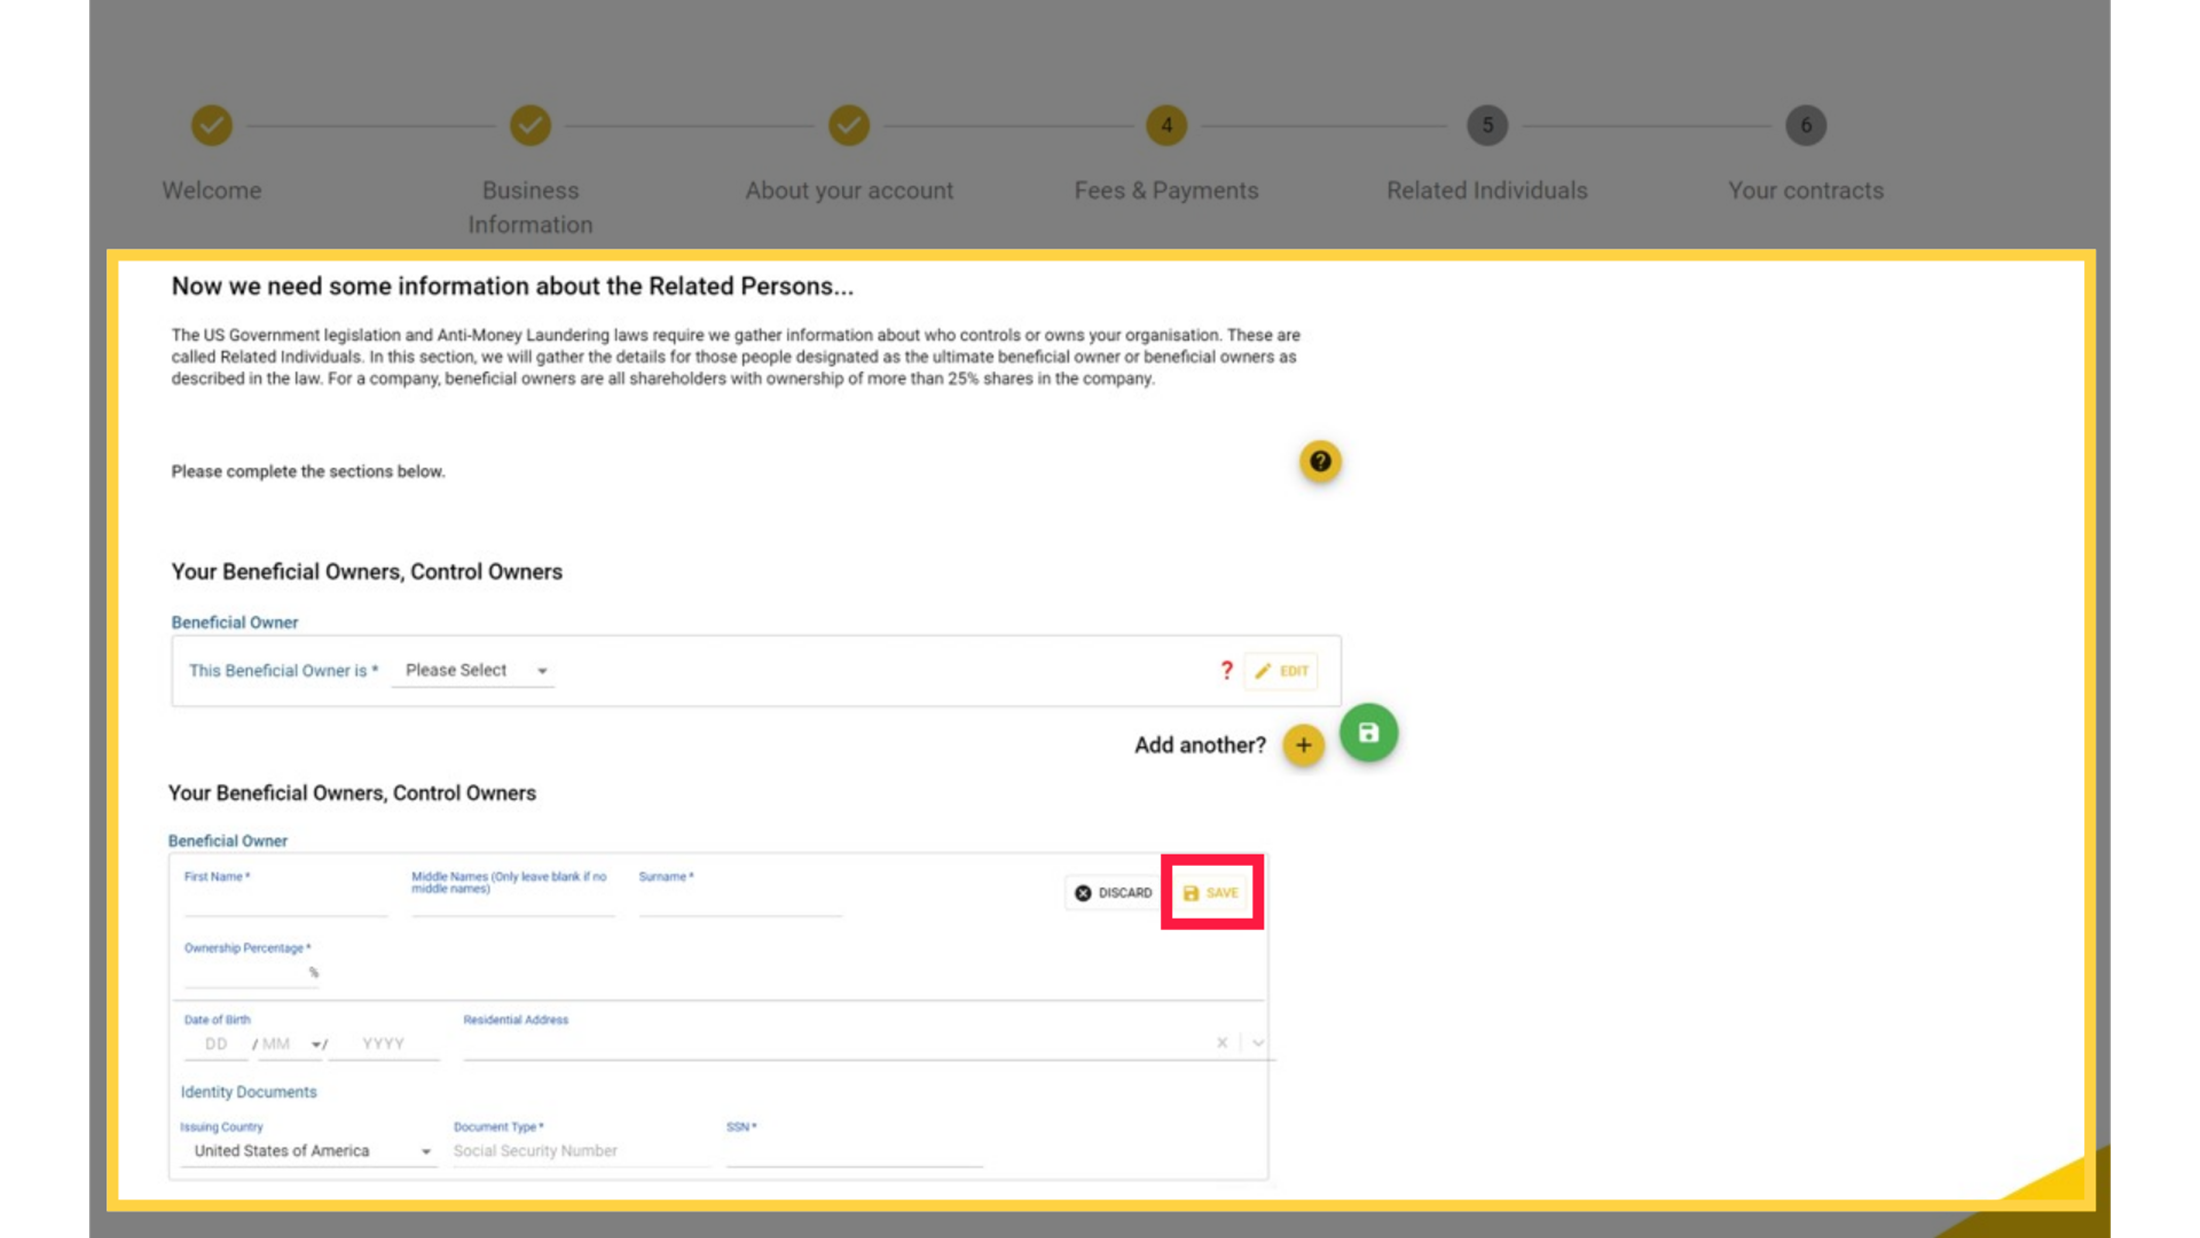
02:32: Identify your business controllers.
02:34: This is required by U.S. law and Anti-Money-Laundering regulations. Add
02:37: all Ultimate Beneficial Owners with 25% or more ownership, plus your CEO or senior
02:43: official. Include each person's ID document details, then save to continue.
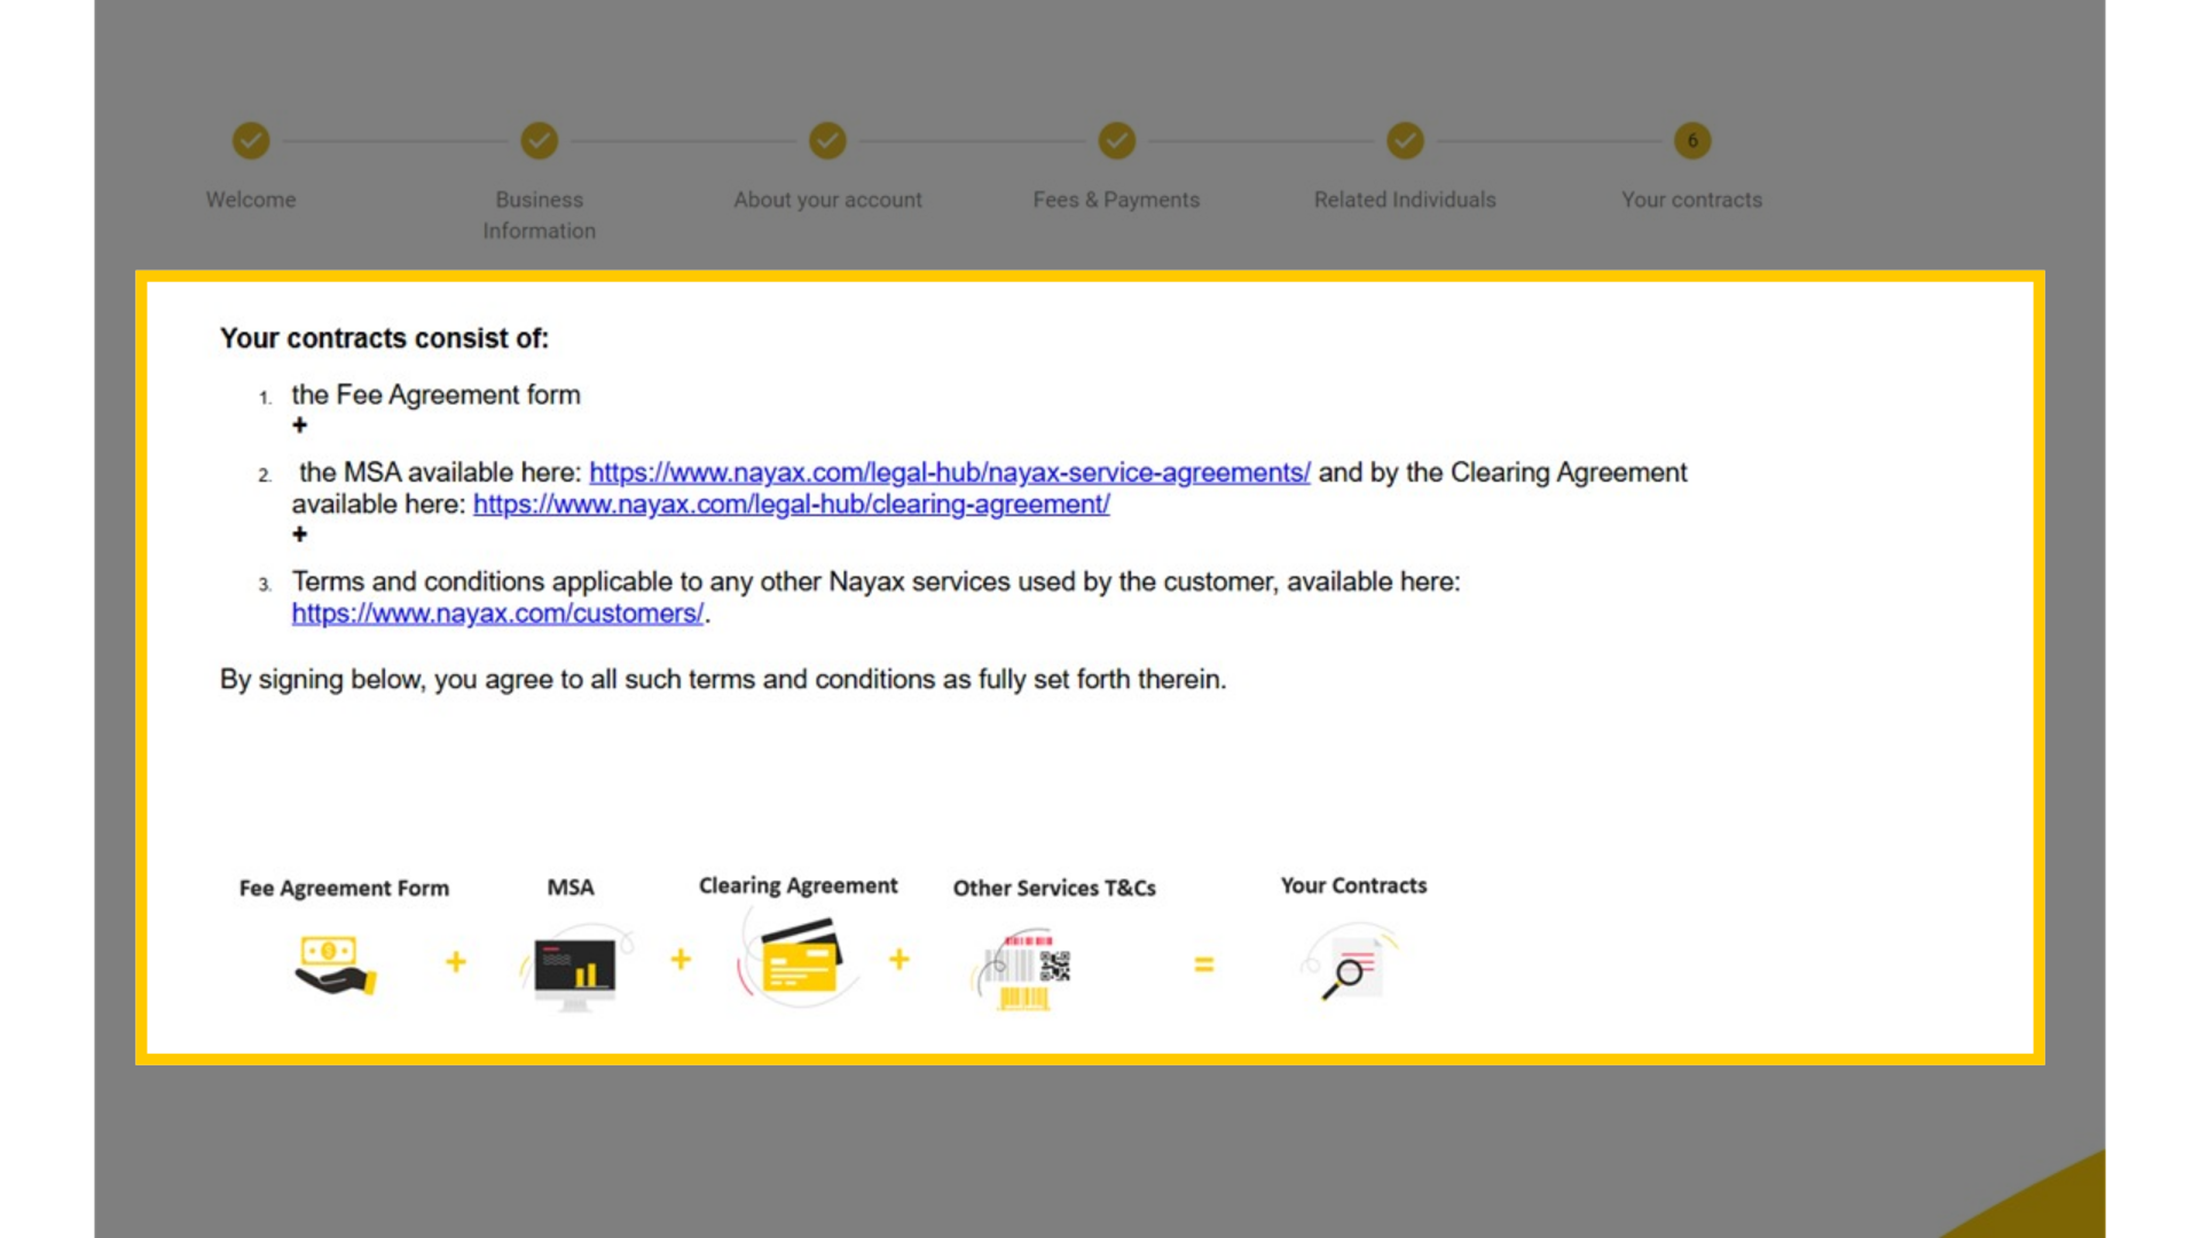
02:49: The final step combines four documents into your contract: your Fee Agreement Form,
02:53: the MSA, the Clearing Agreement, and any other applicable service terms. Review each
02:58: one, then get ready to sign.
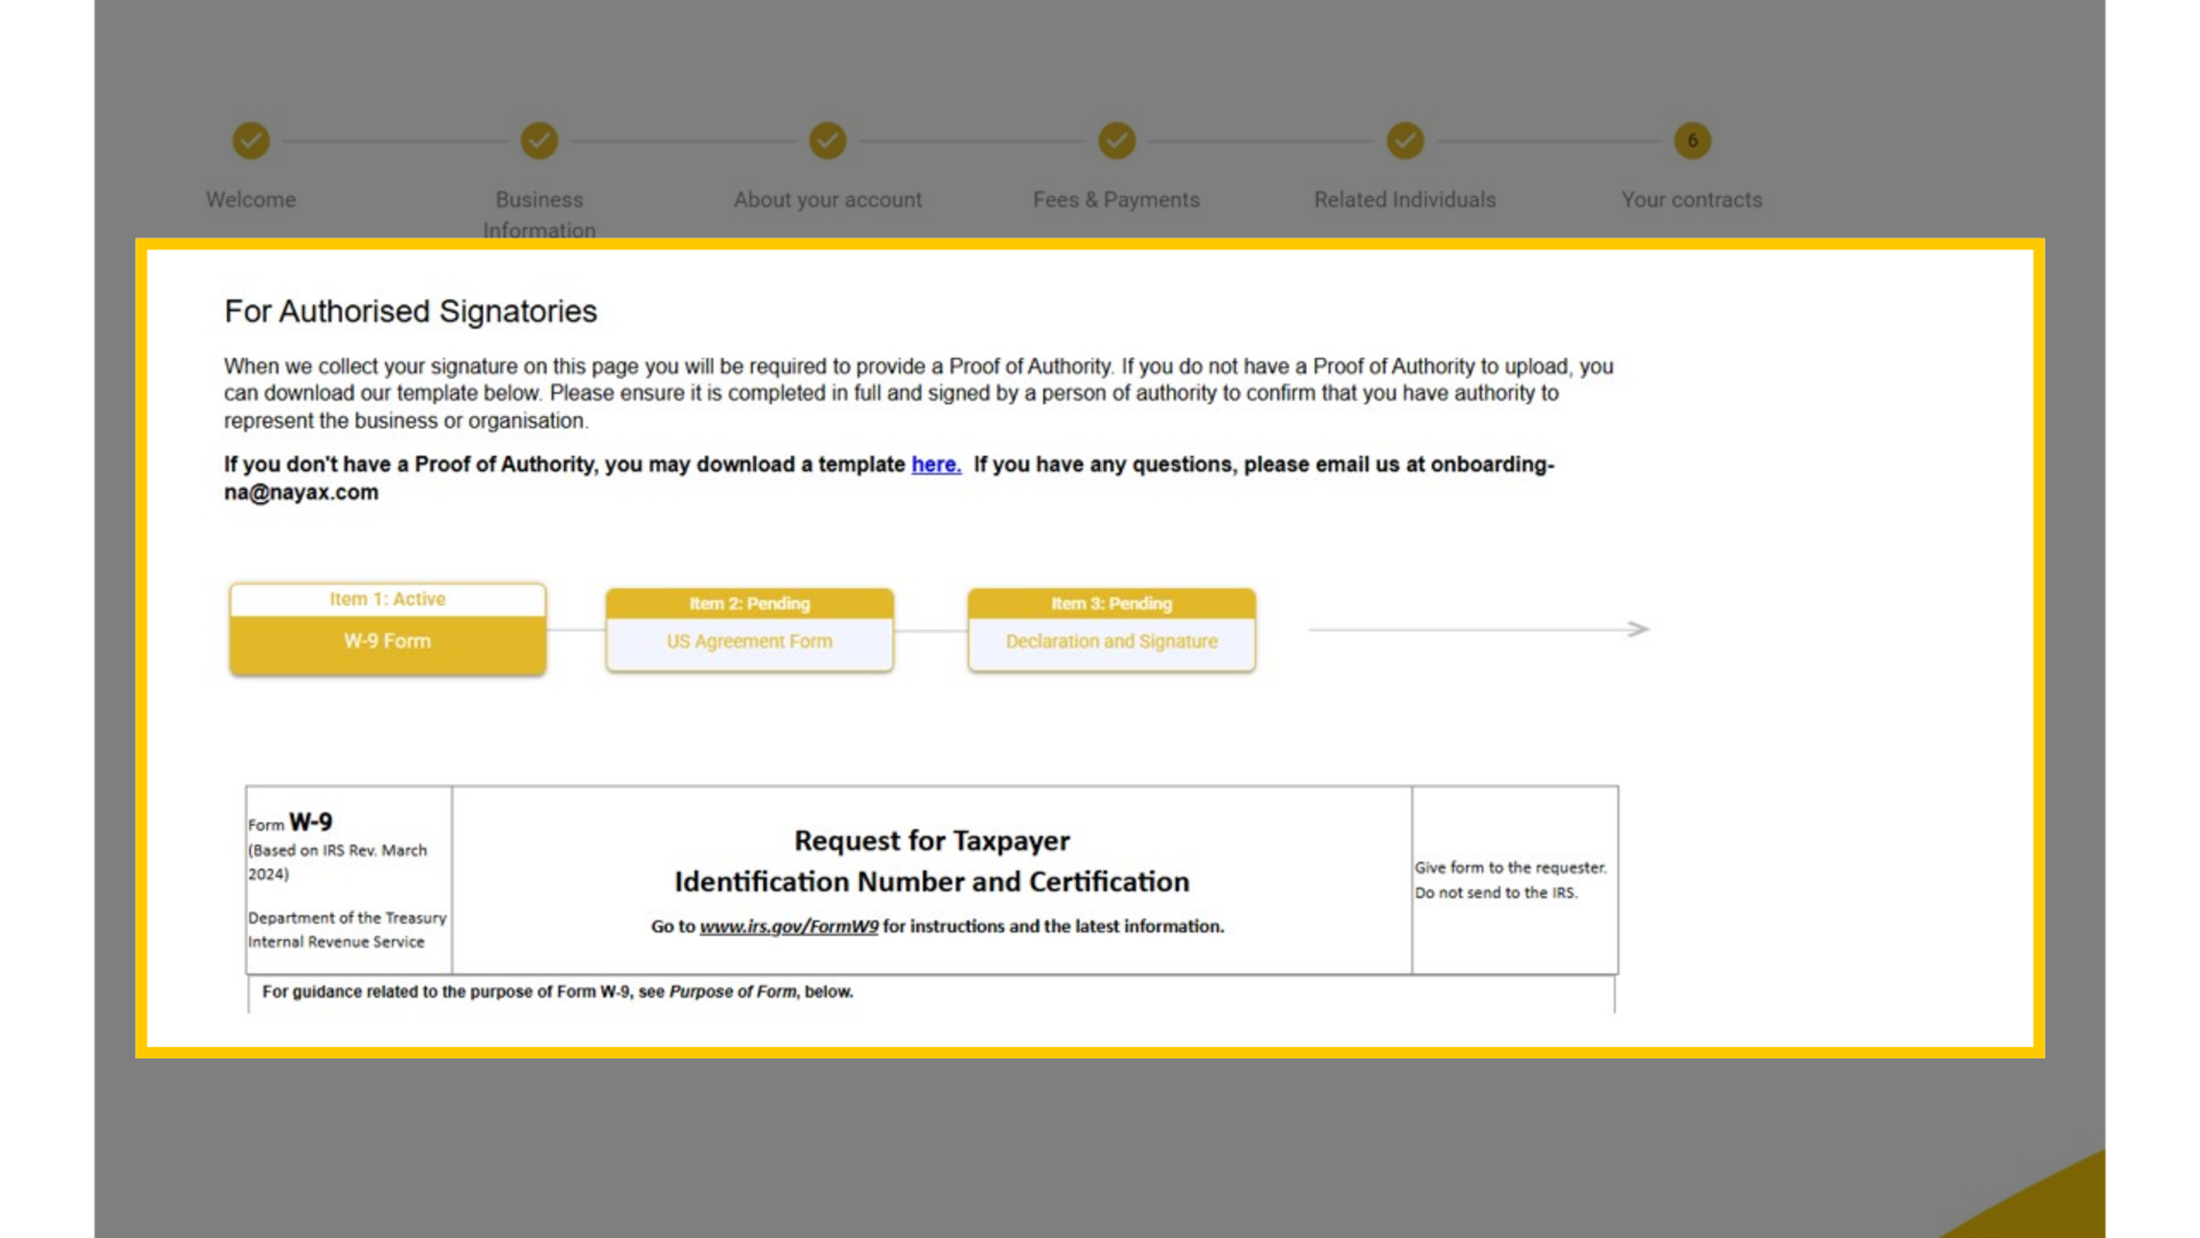
03:01: If you're not signing yourself, you'll need a Proof of Authority.
03:04: No template on hand?
03:05: Download ours
03:06: right from this screen.
03:07: Any questions? Just email the onboarding team.
03:11: From here, three quick items remain: your W9,
03:14: the US Agreement Form, and your Declaration and Signature.
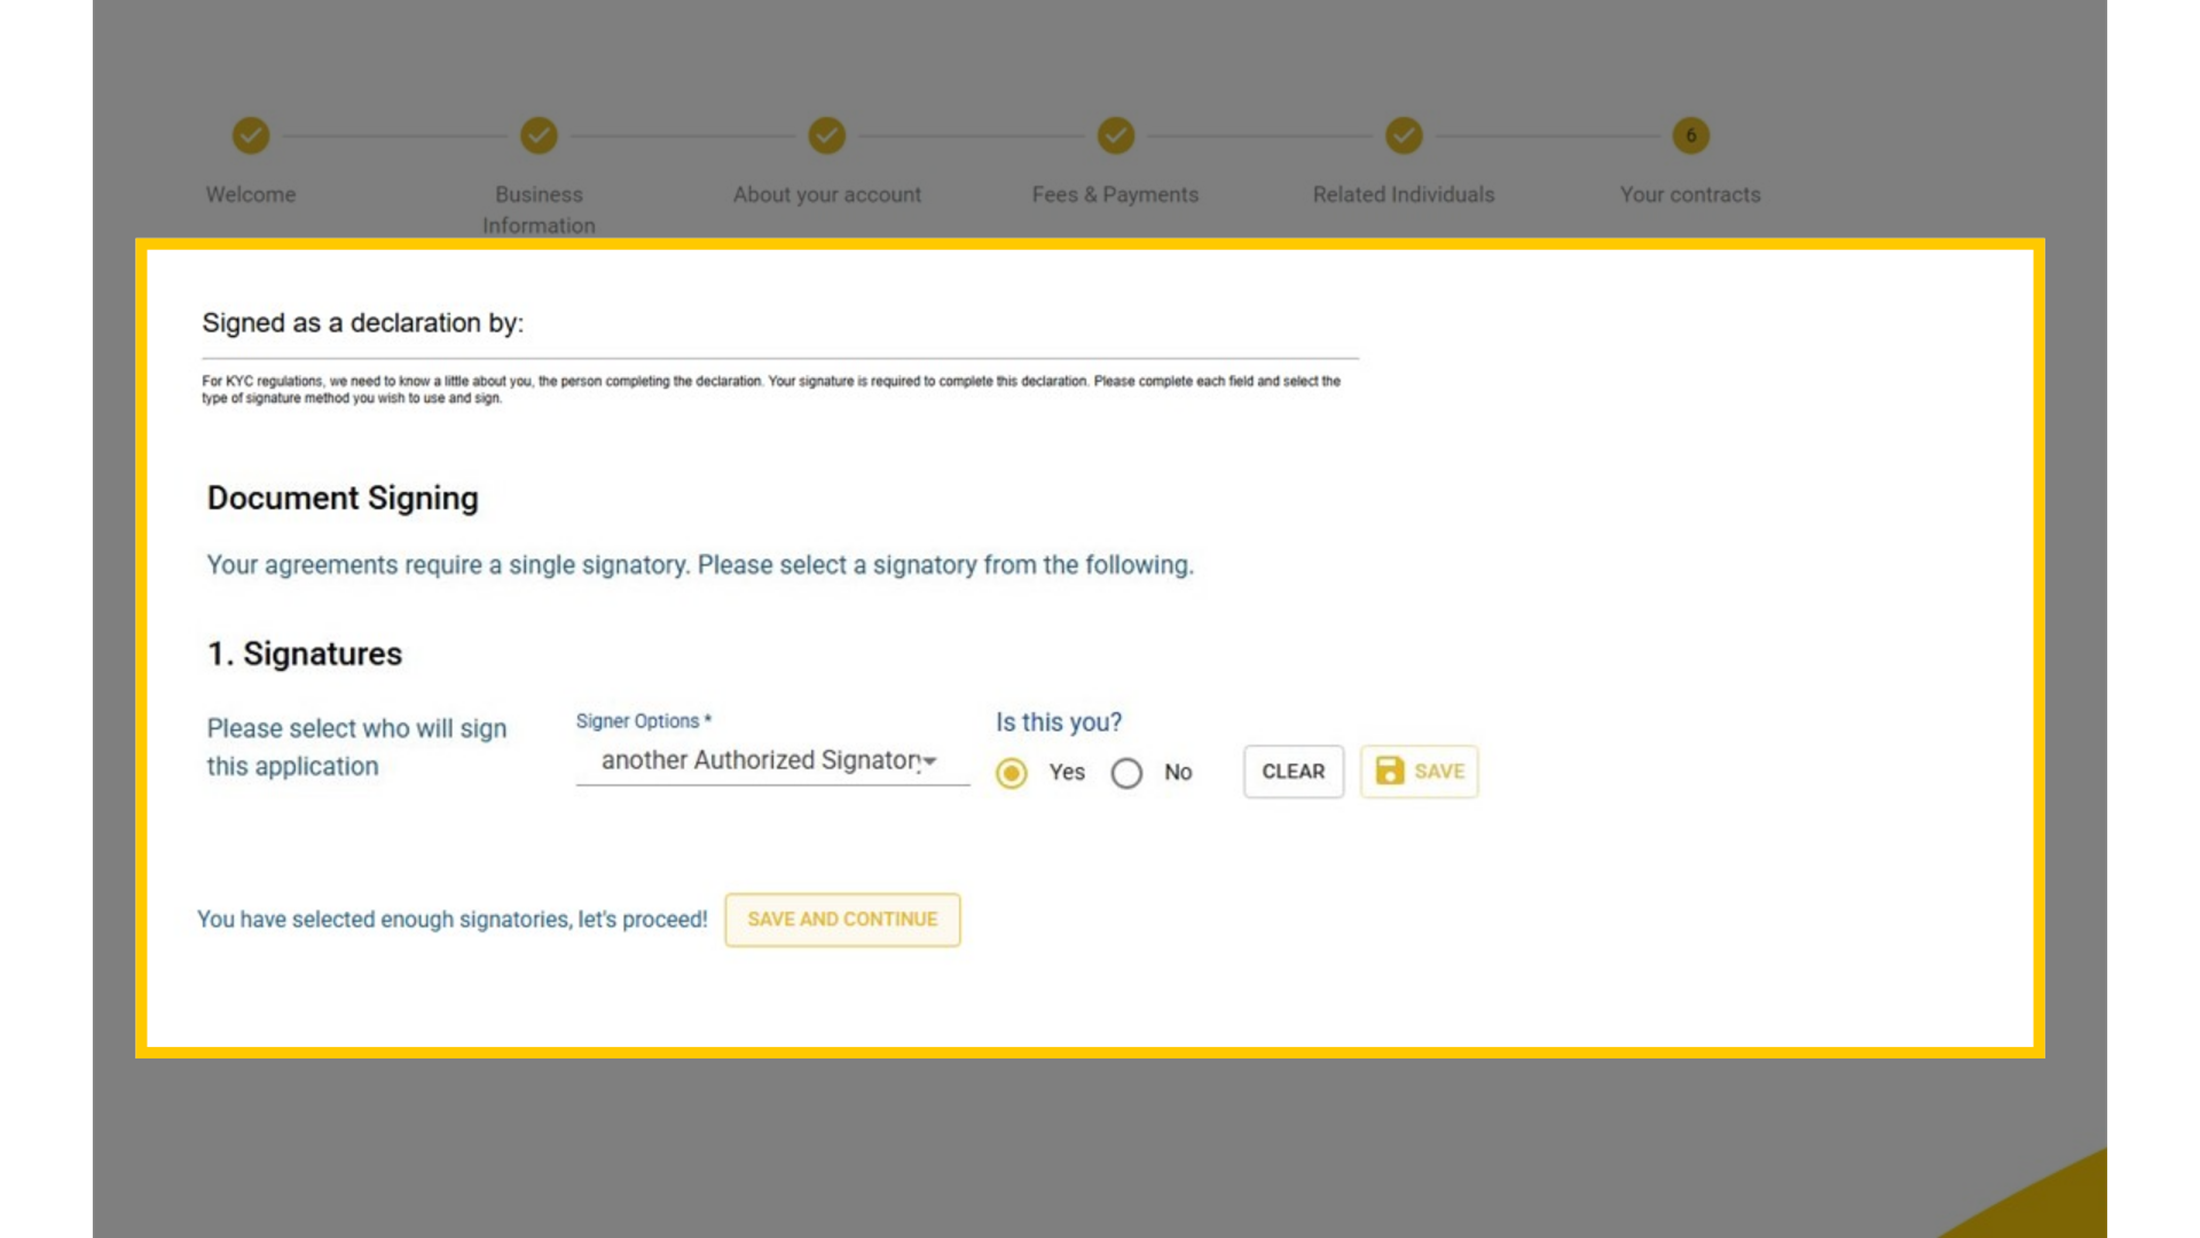
03:18: Select who will sign this application. If you're the signer, choose
03:21: Yes
03:21: if someone else needs to sign;
03:23: choose
03:23: No,
03:24: and we'll send it to them directly.
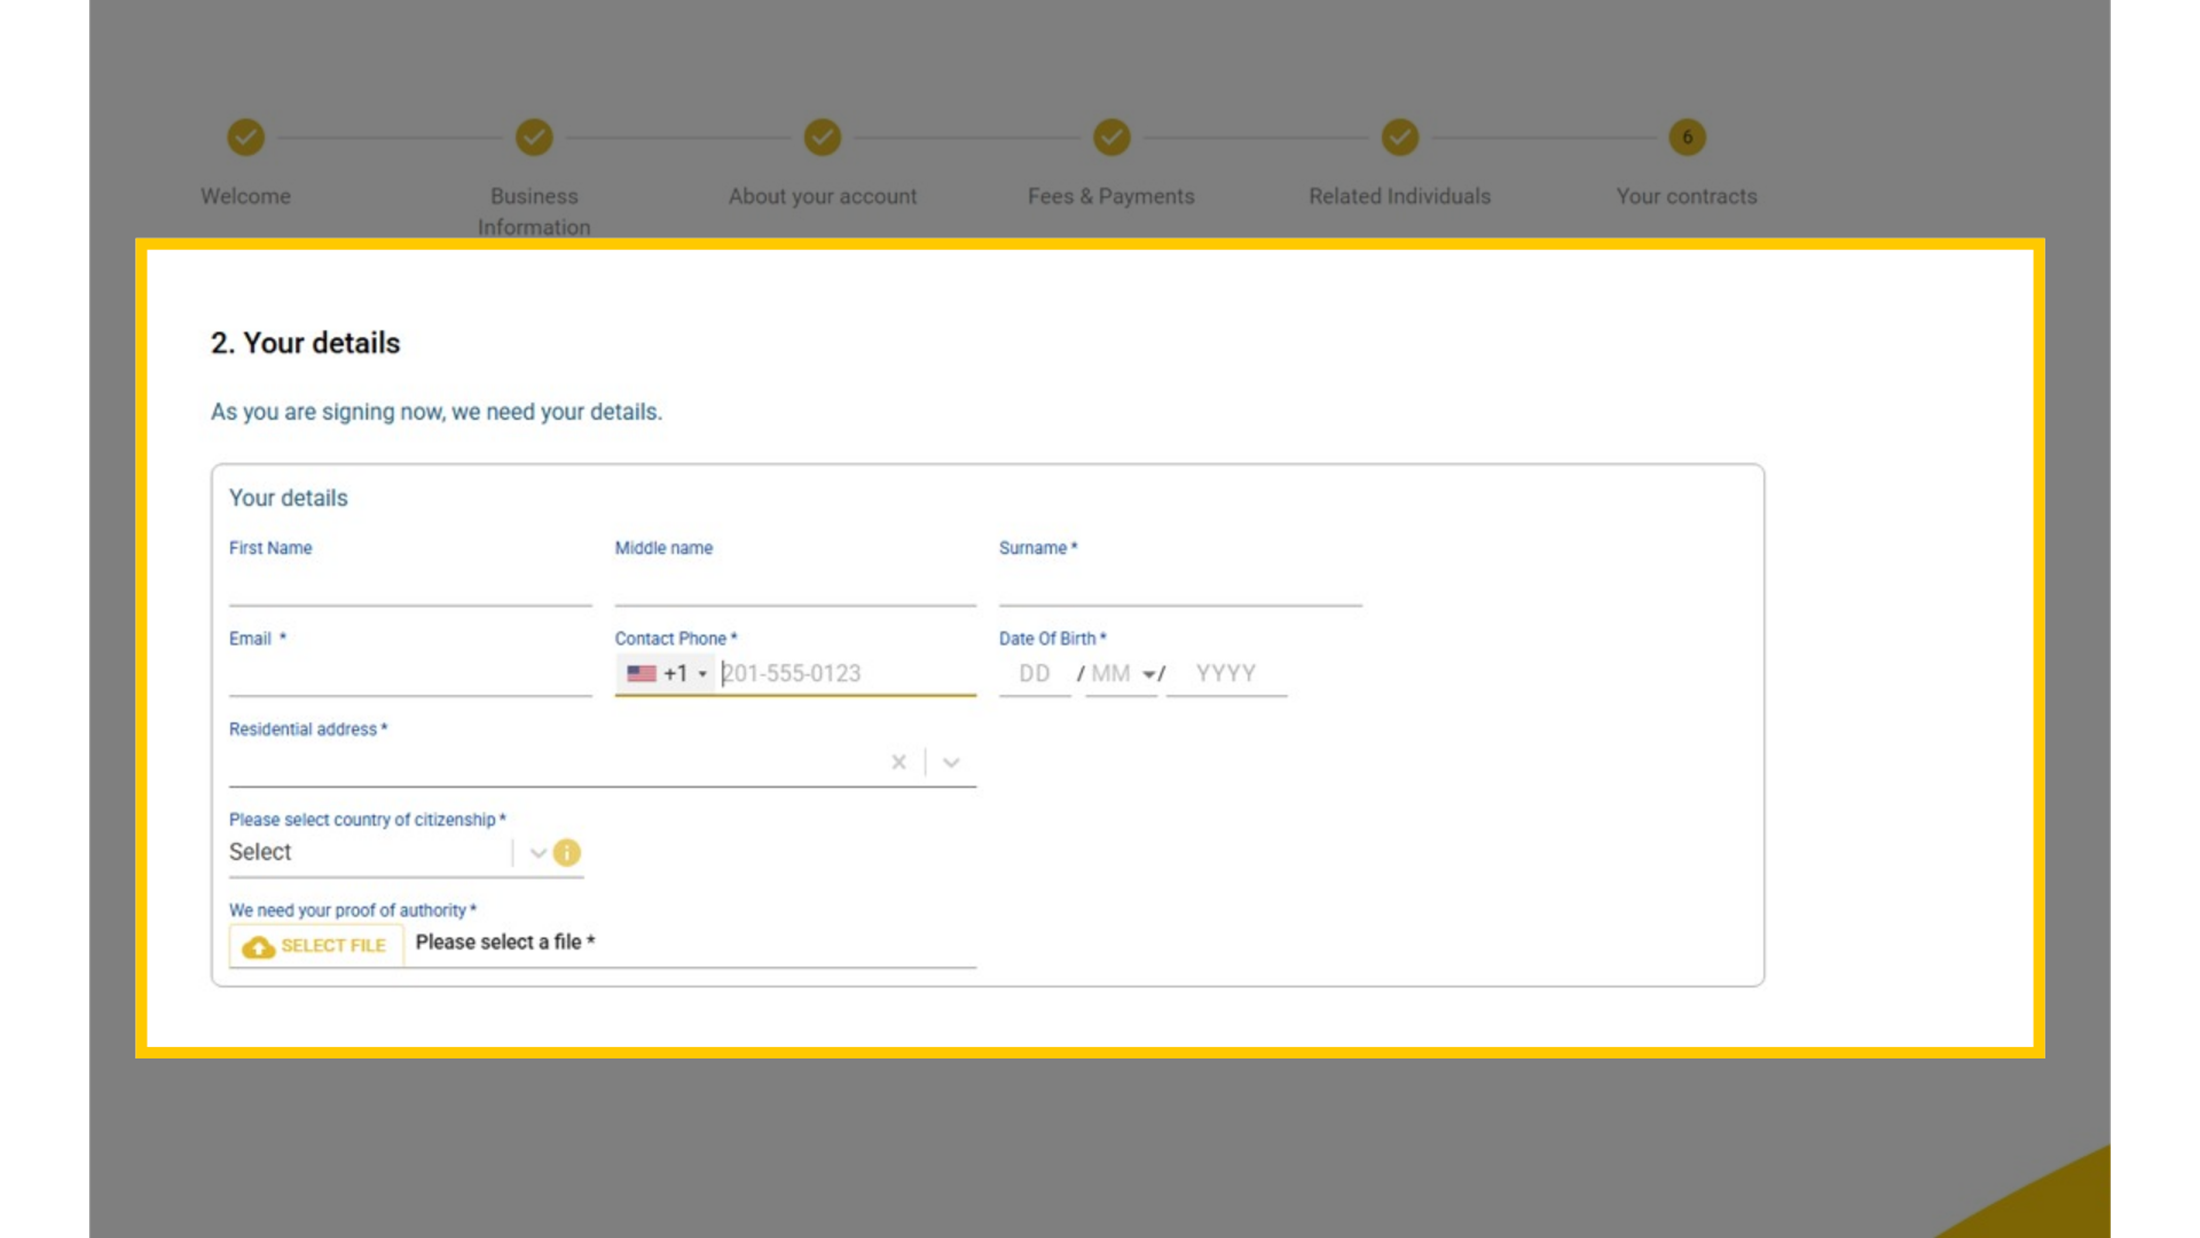
03:26: As you're signing now, we need your details your name, contact information, date of
03:30: birth, address, and citizenship. Then upload your proof of authority.
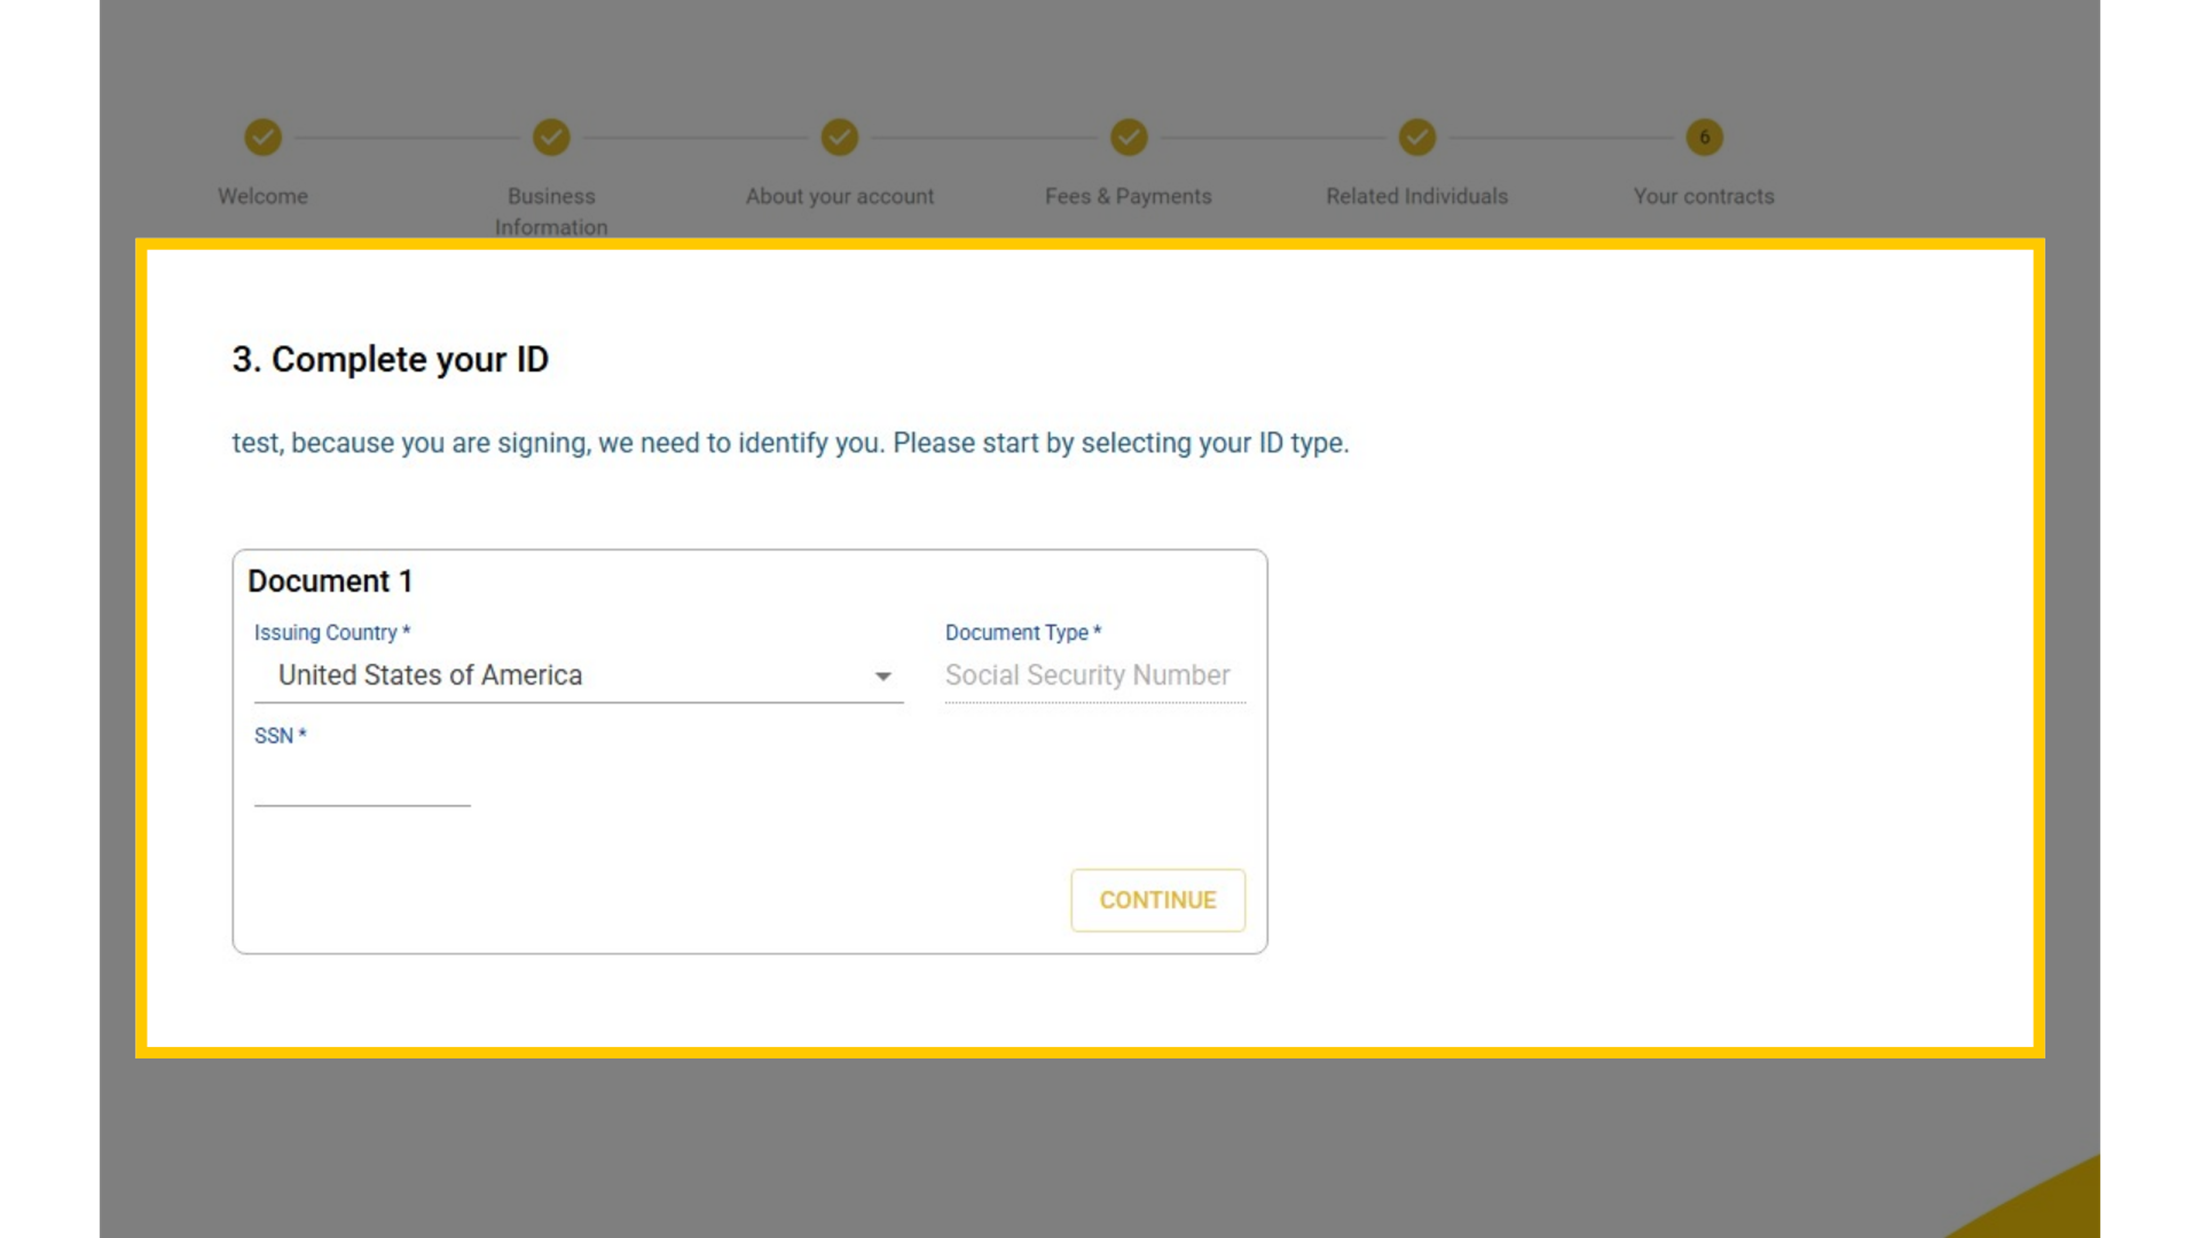
03:35: Next, we need to confirm your identity.
03:37: Start with your SSN select United States of America as your issuing country and
03:41: enter your number.
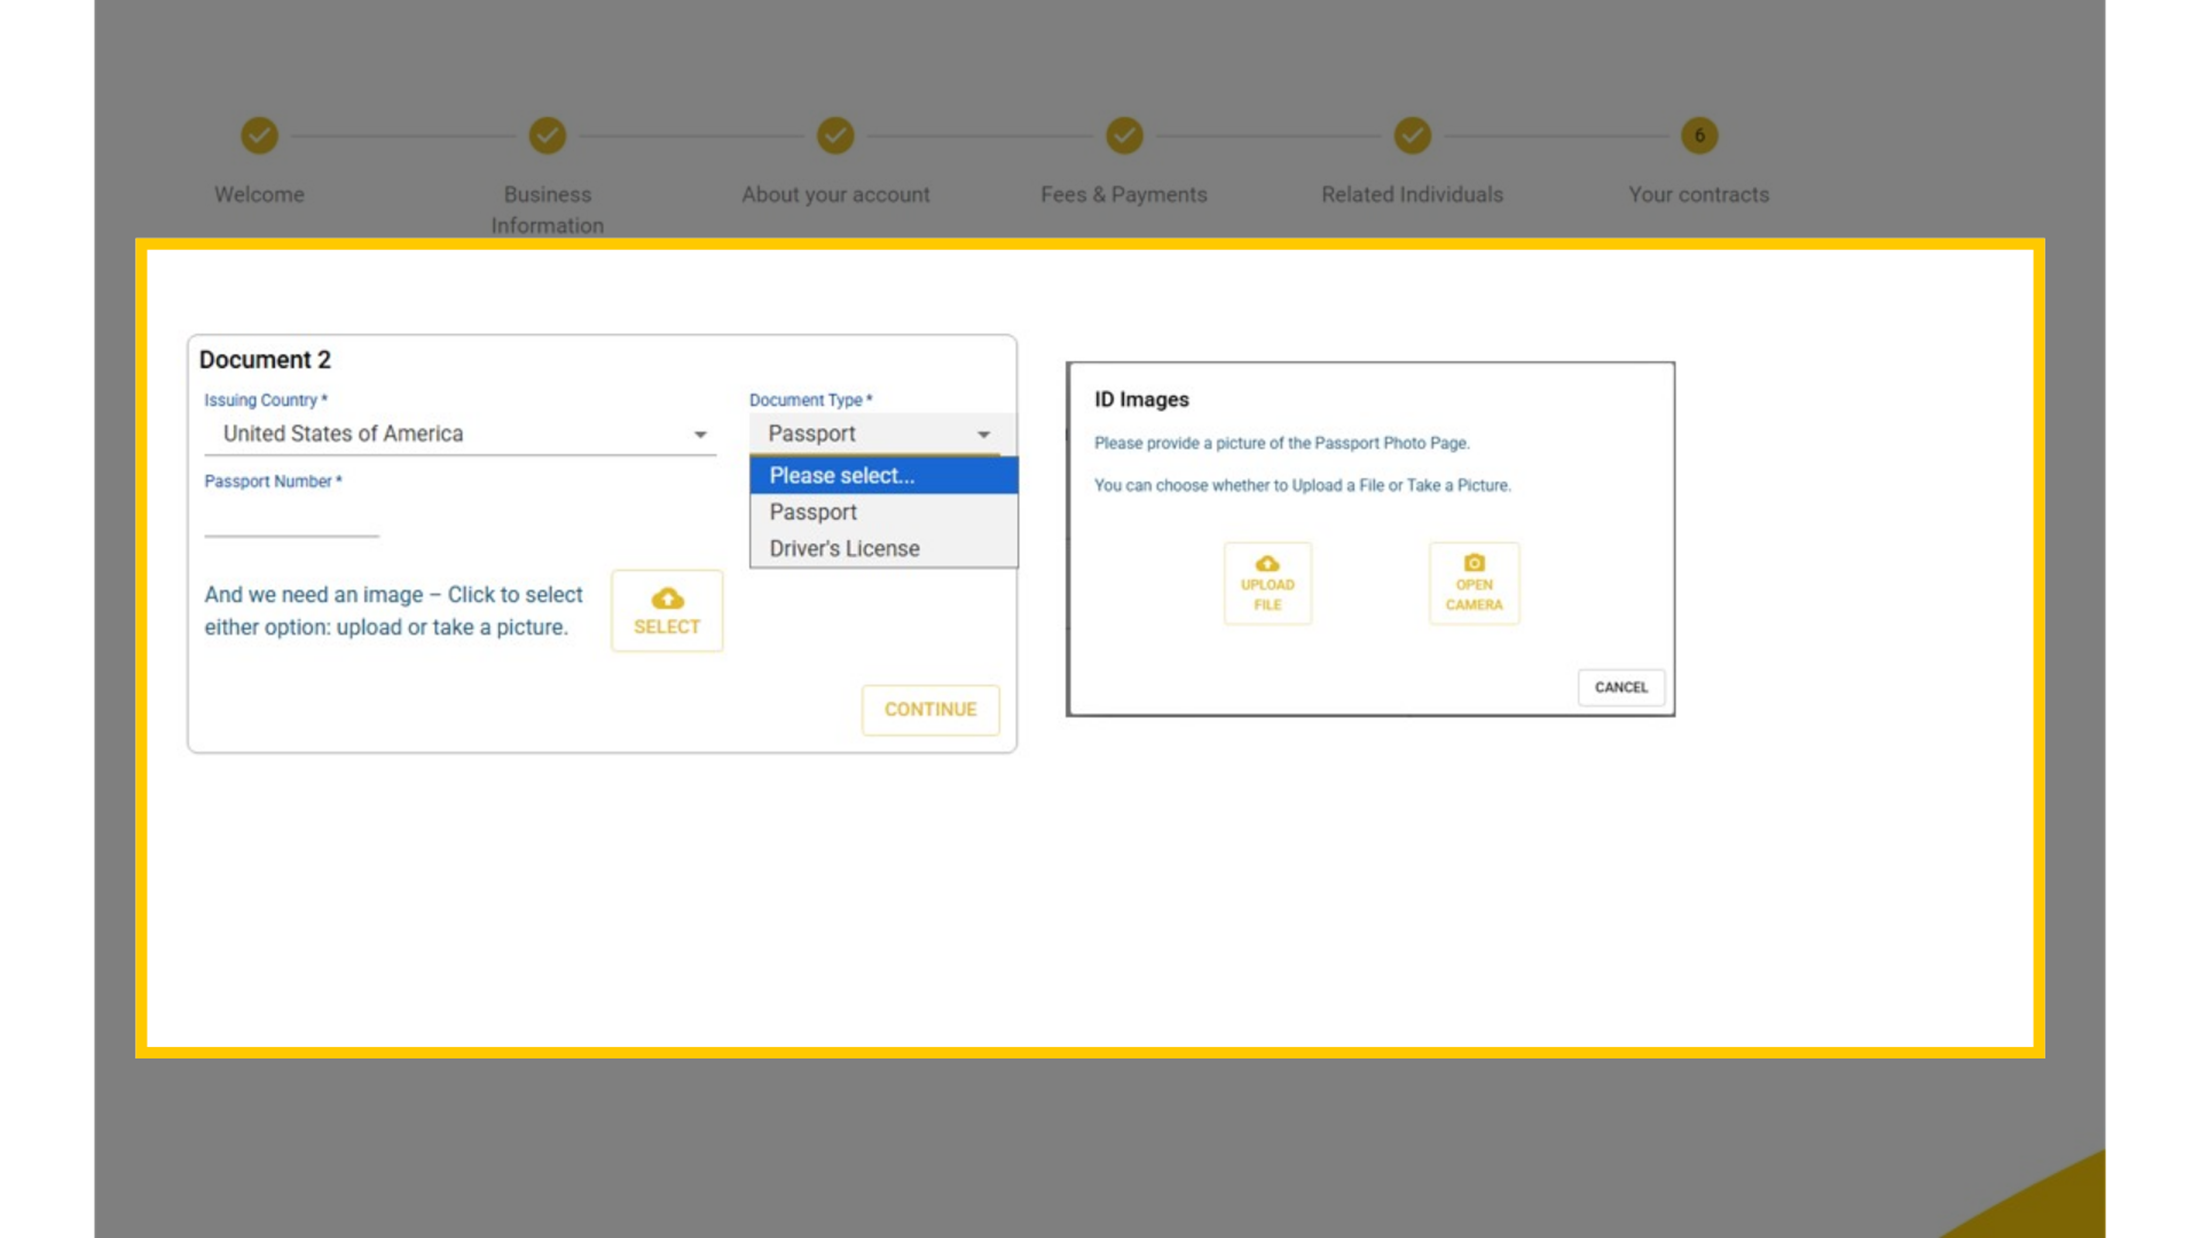
03:43: Now add a second form of ID a passport or driver's license.
03:46: Enter the document number,
03:47: then upload a photo or use your camera to capture the photo page.
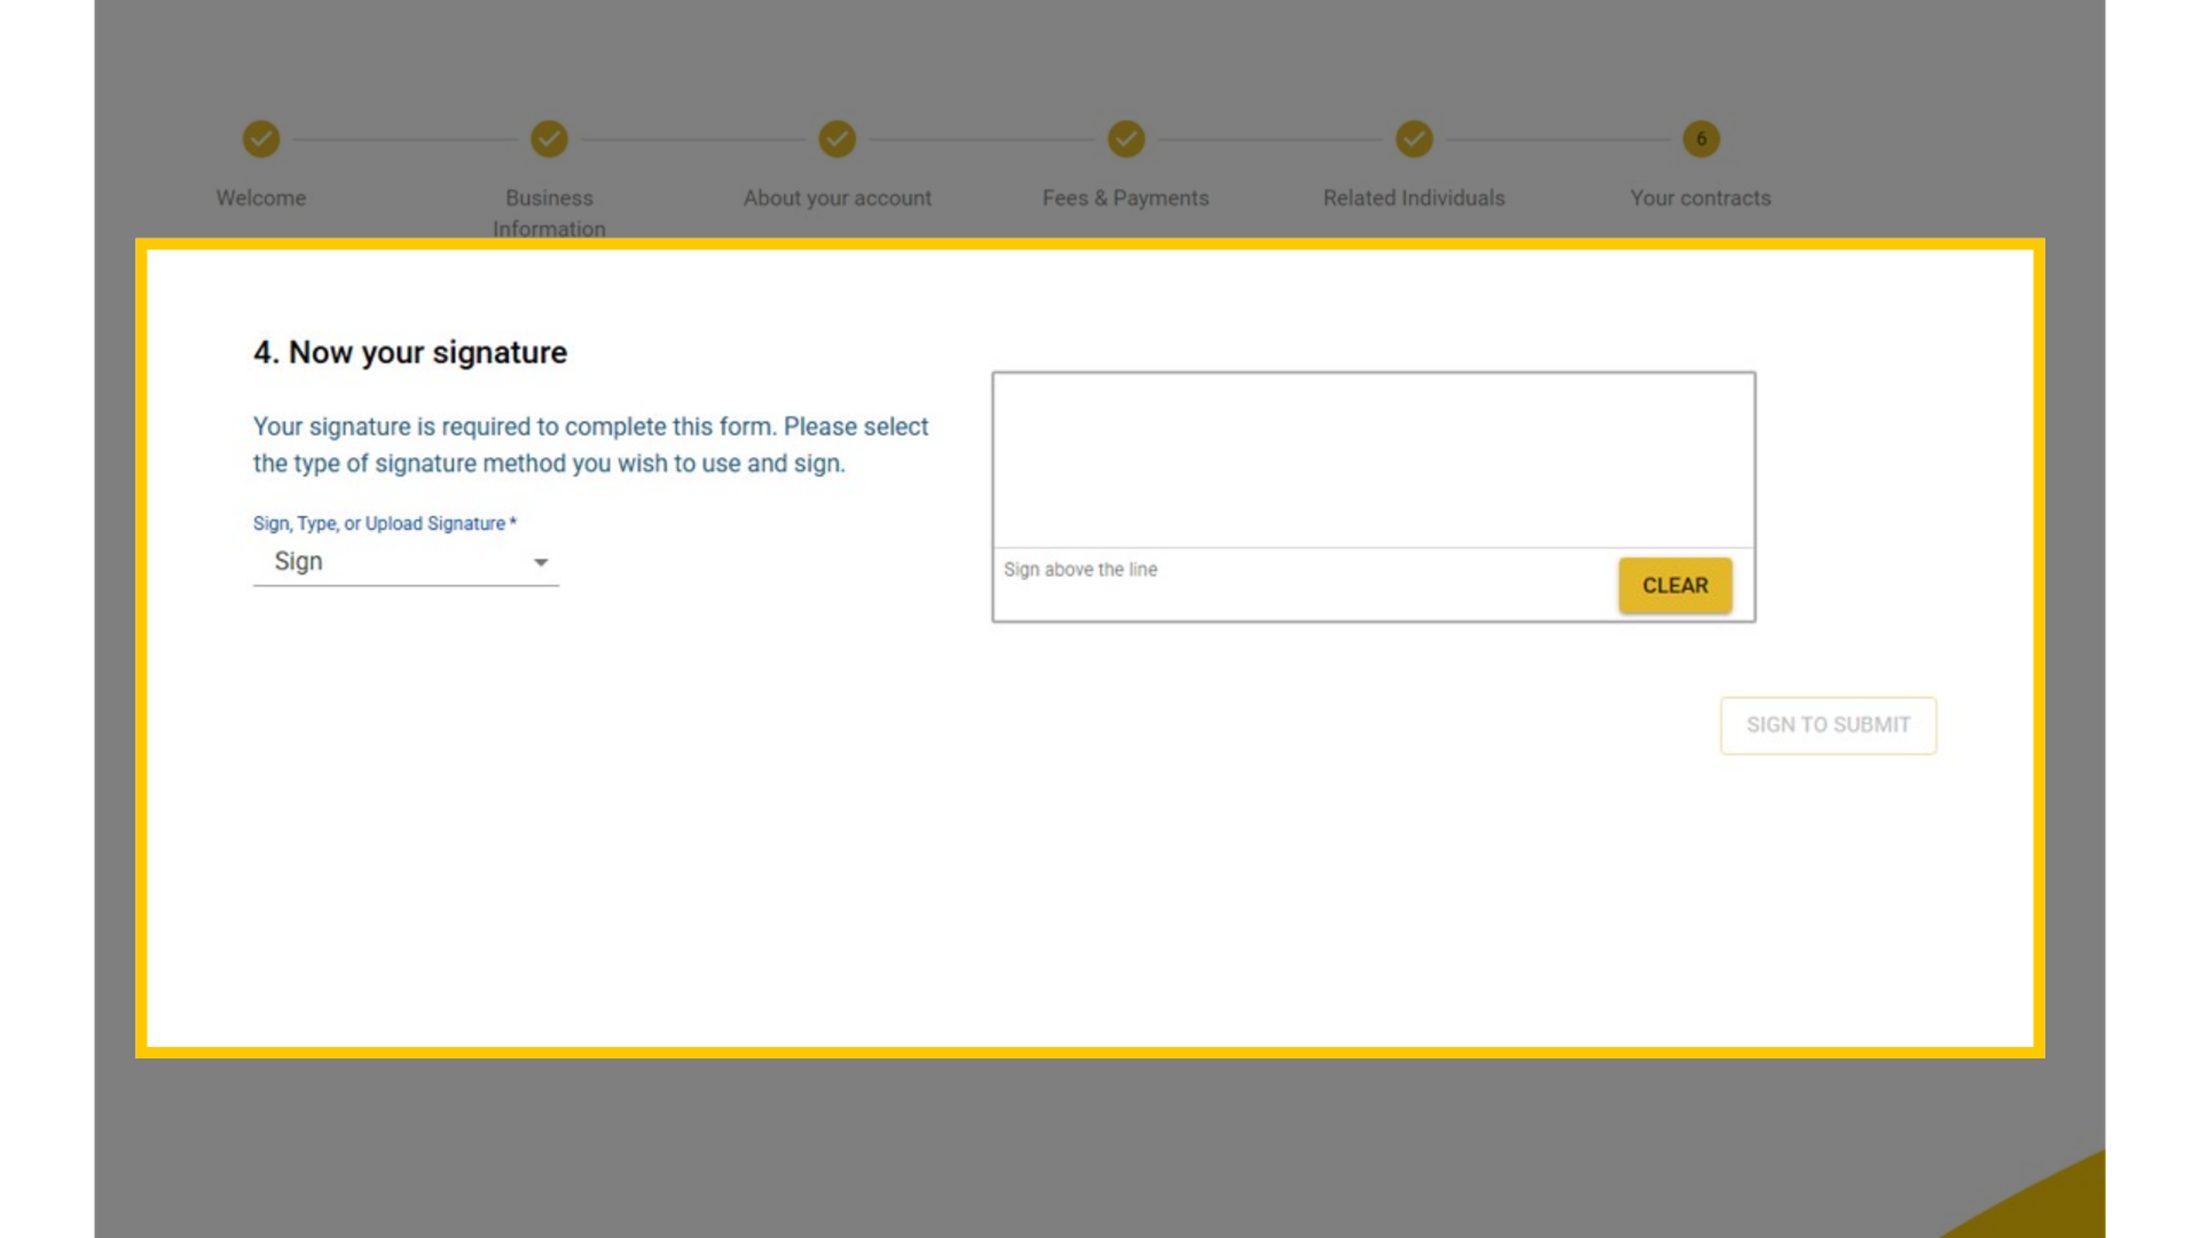
03:51: Finally, your signature. Choose how you'd like to sign, add it above the line, and
03:56: click Sign to Submit when you're ready.
03:58: And that's it; your Nayax
03:59: US agreement is signed and submitted. Our verification team will review it over the
04:03: following days.
04:04: If anything else is needed, we'll reach out by phone or email, and you'll receive a
04:08: confirmation email as soon as your application is approved.
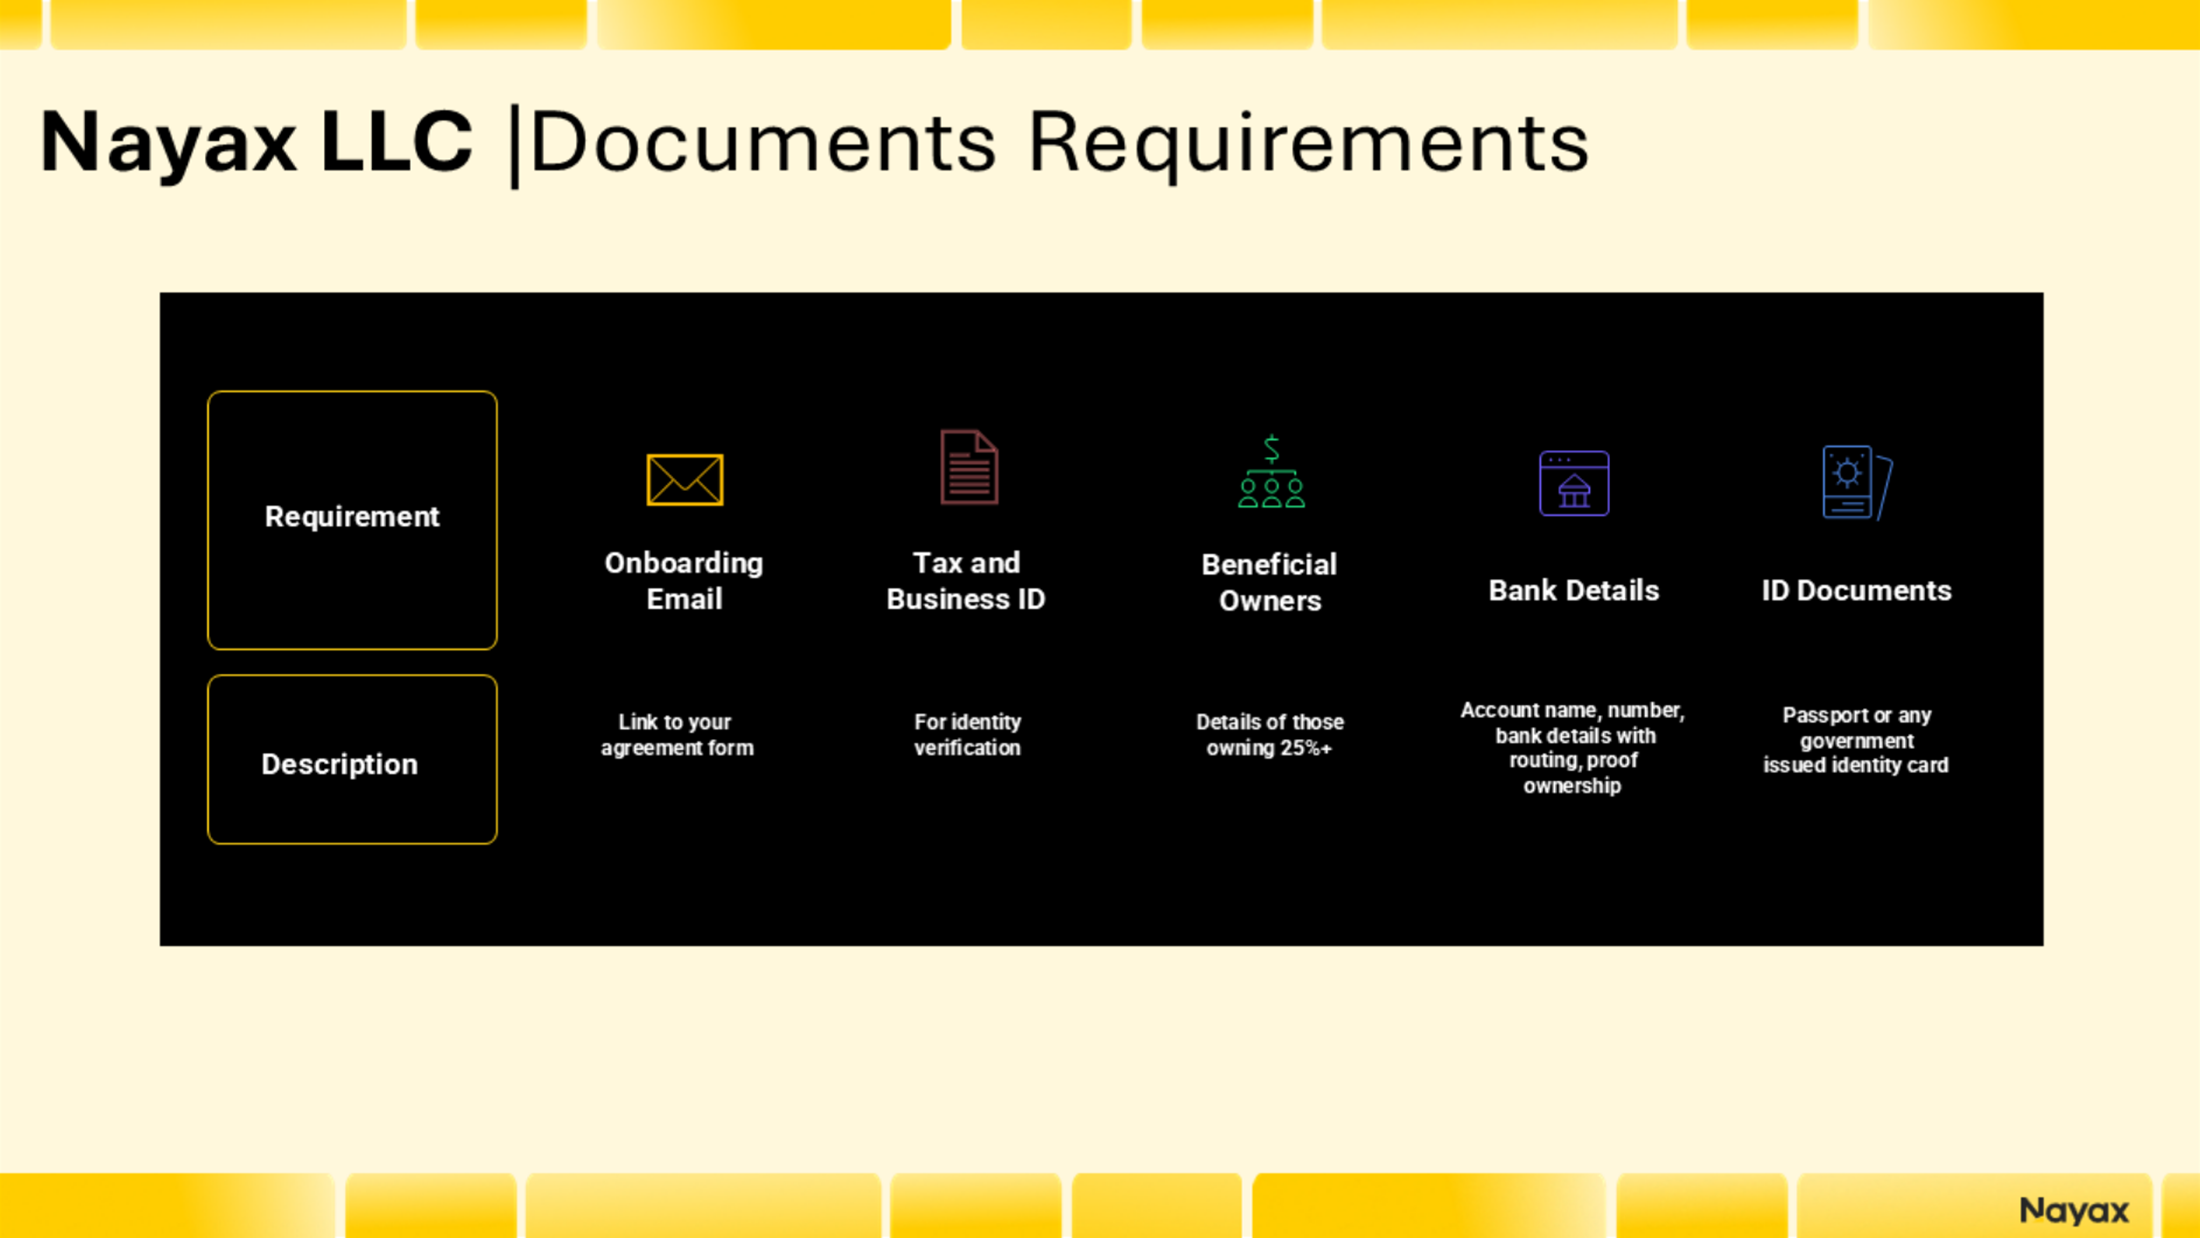
Before you Start
Image AttachedBefore you start, have your registration number, Ultimate Beneficial Owner details, bank information with proof of bank, and a passport or ID ready. Gather everything in advance; progress may not be saved if you exit mid-step.
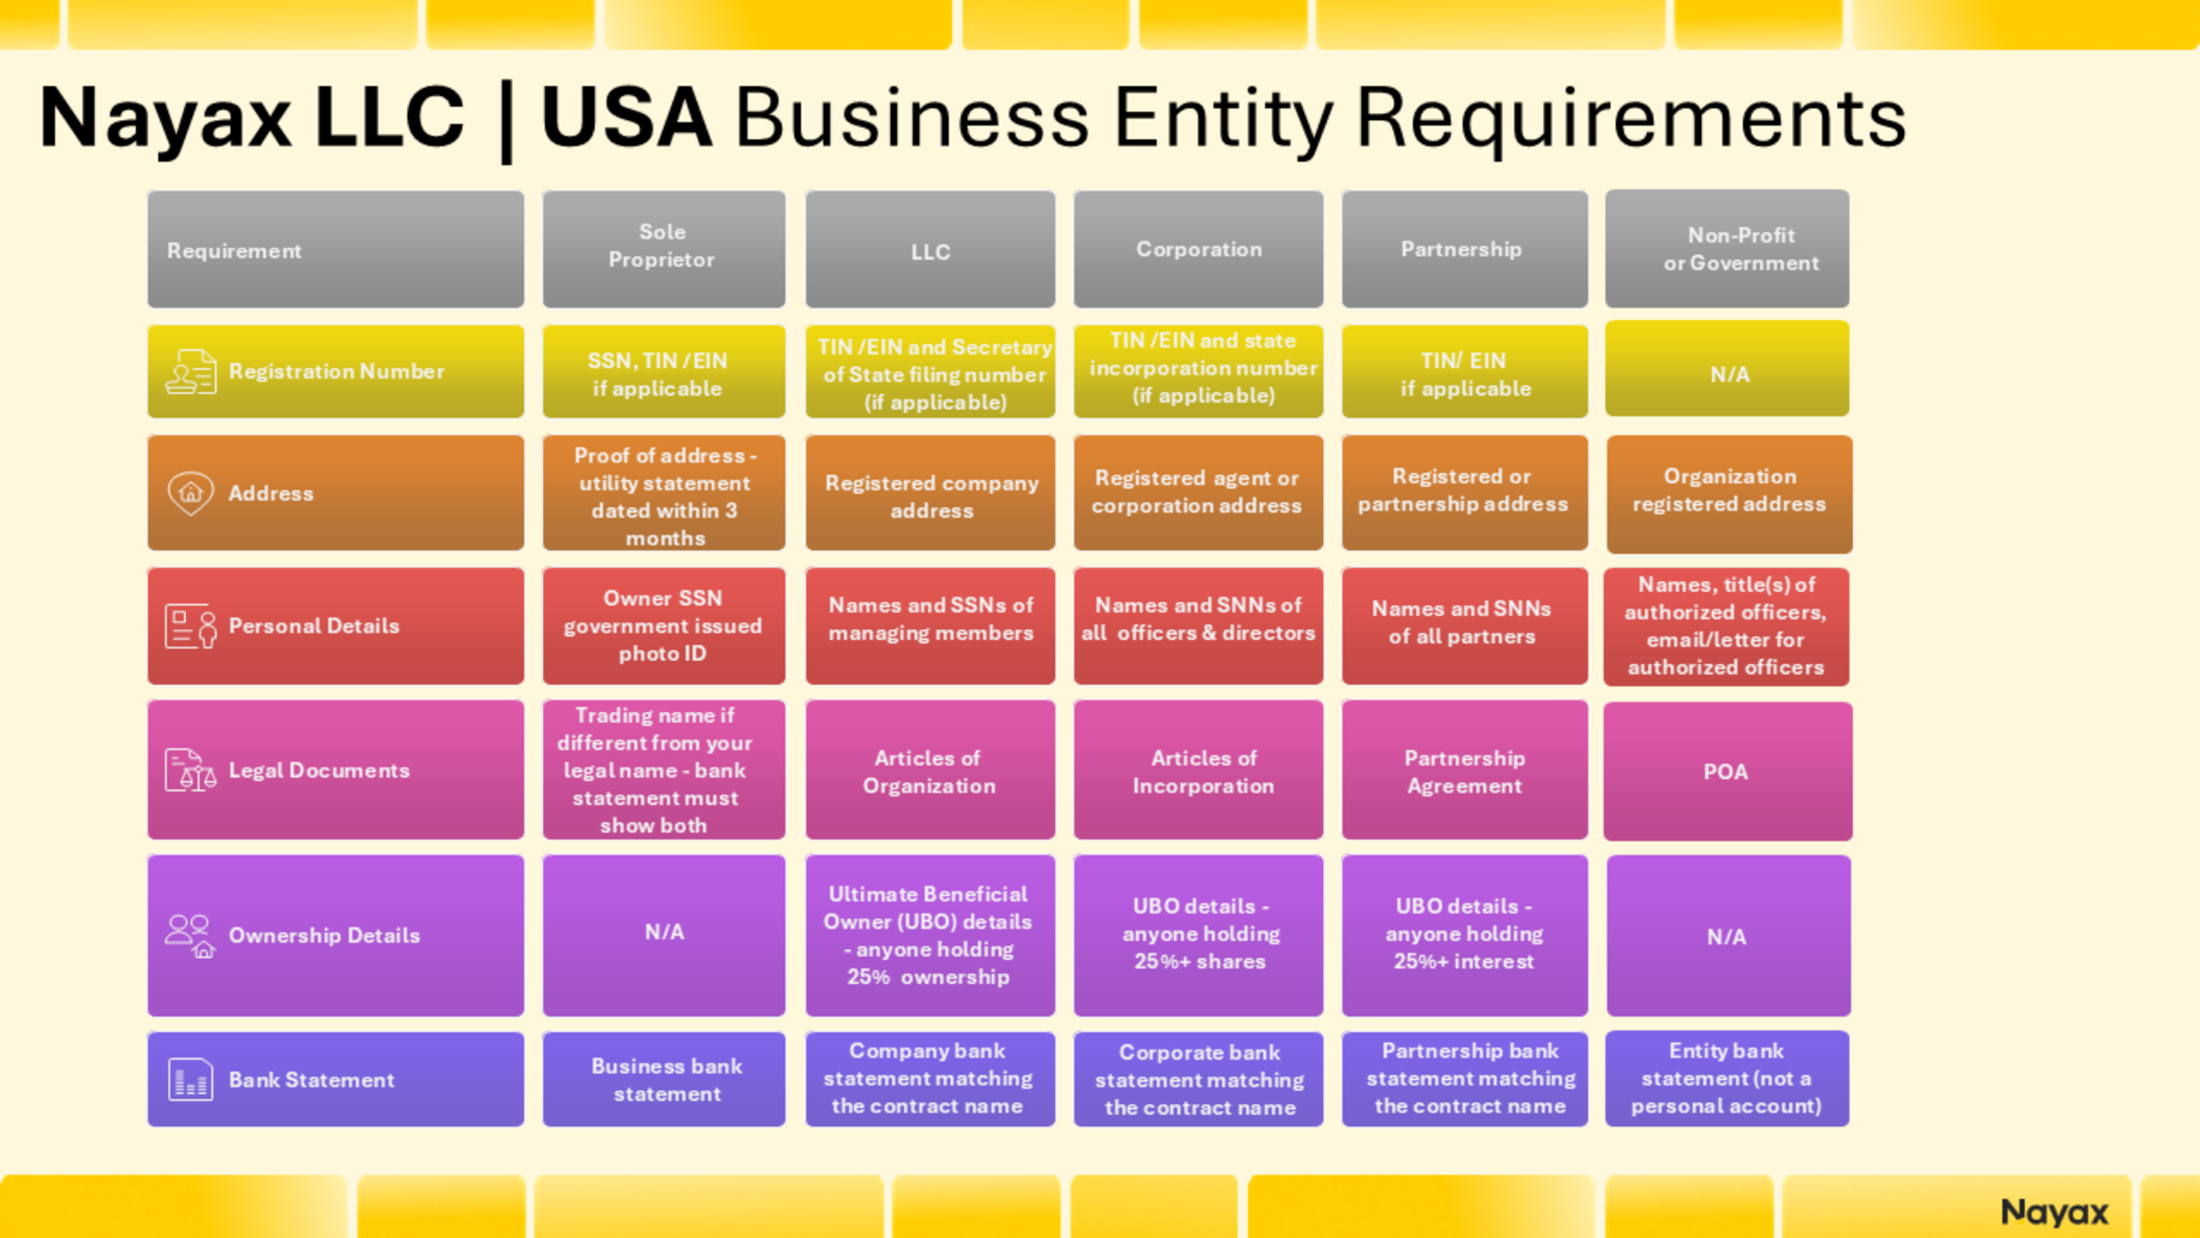
Additional Requirements by Business Type
Image AttachedIn addition to the documents required from all entities, Nayax requires specific information depending on your business structure. Select the type that applies to you.
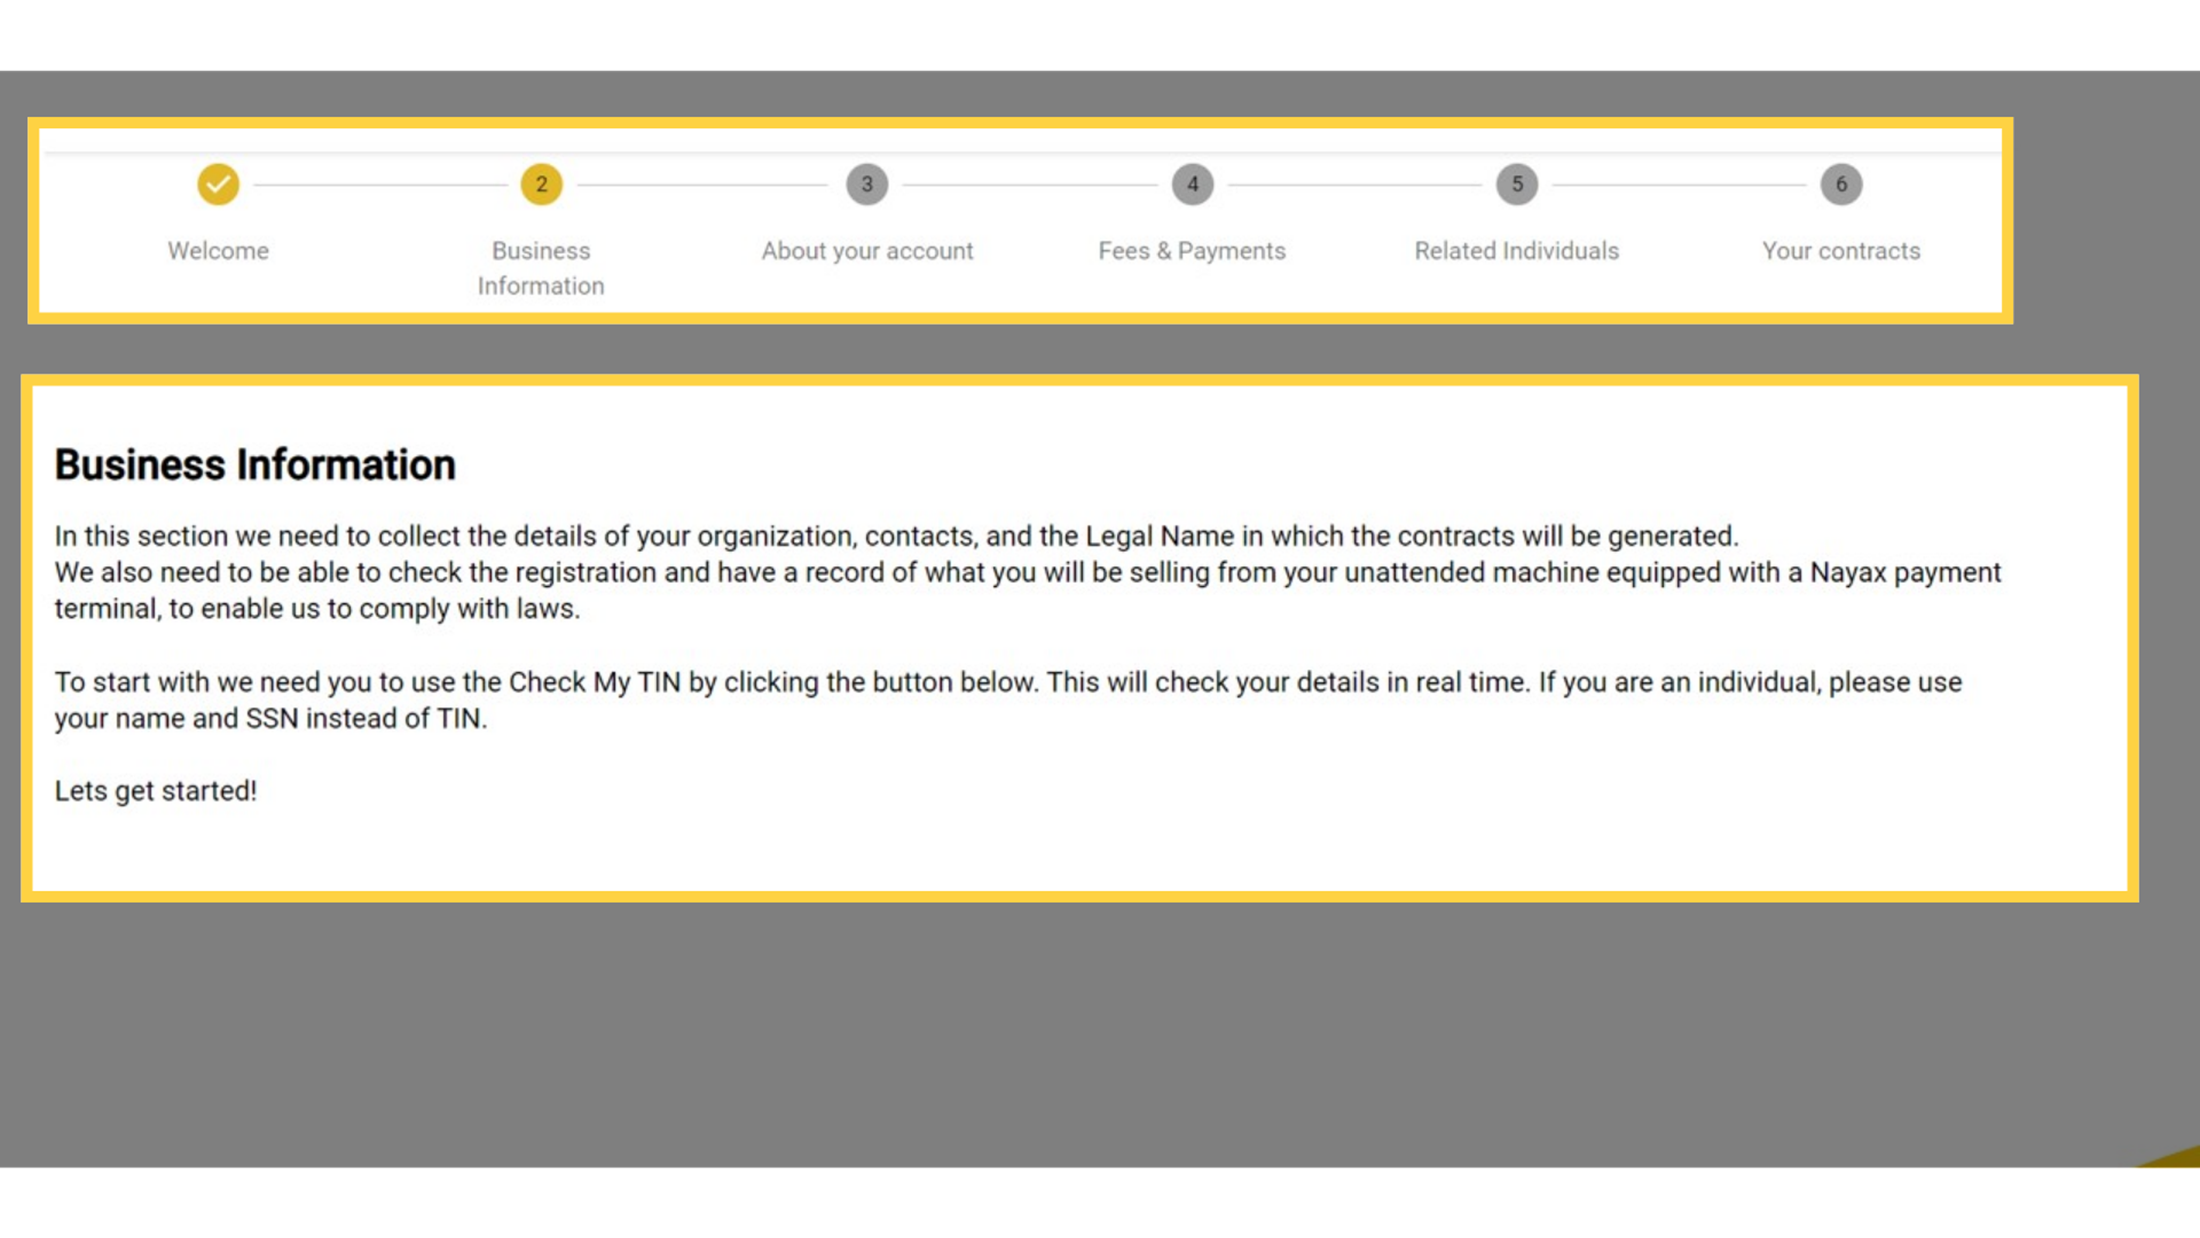
Form Overview
Image AttachedThe form has six steps, Welcome, Business Information, About Your Account, Fees and Payment Details, Related Individuals, and Your Contracts.
Mandatory Fields
Image AttachedAll fields marked with an asterisk * on the form are compulsory. You cannot proceed to the next step until all required fields are complete
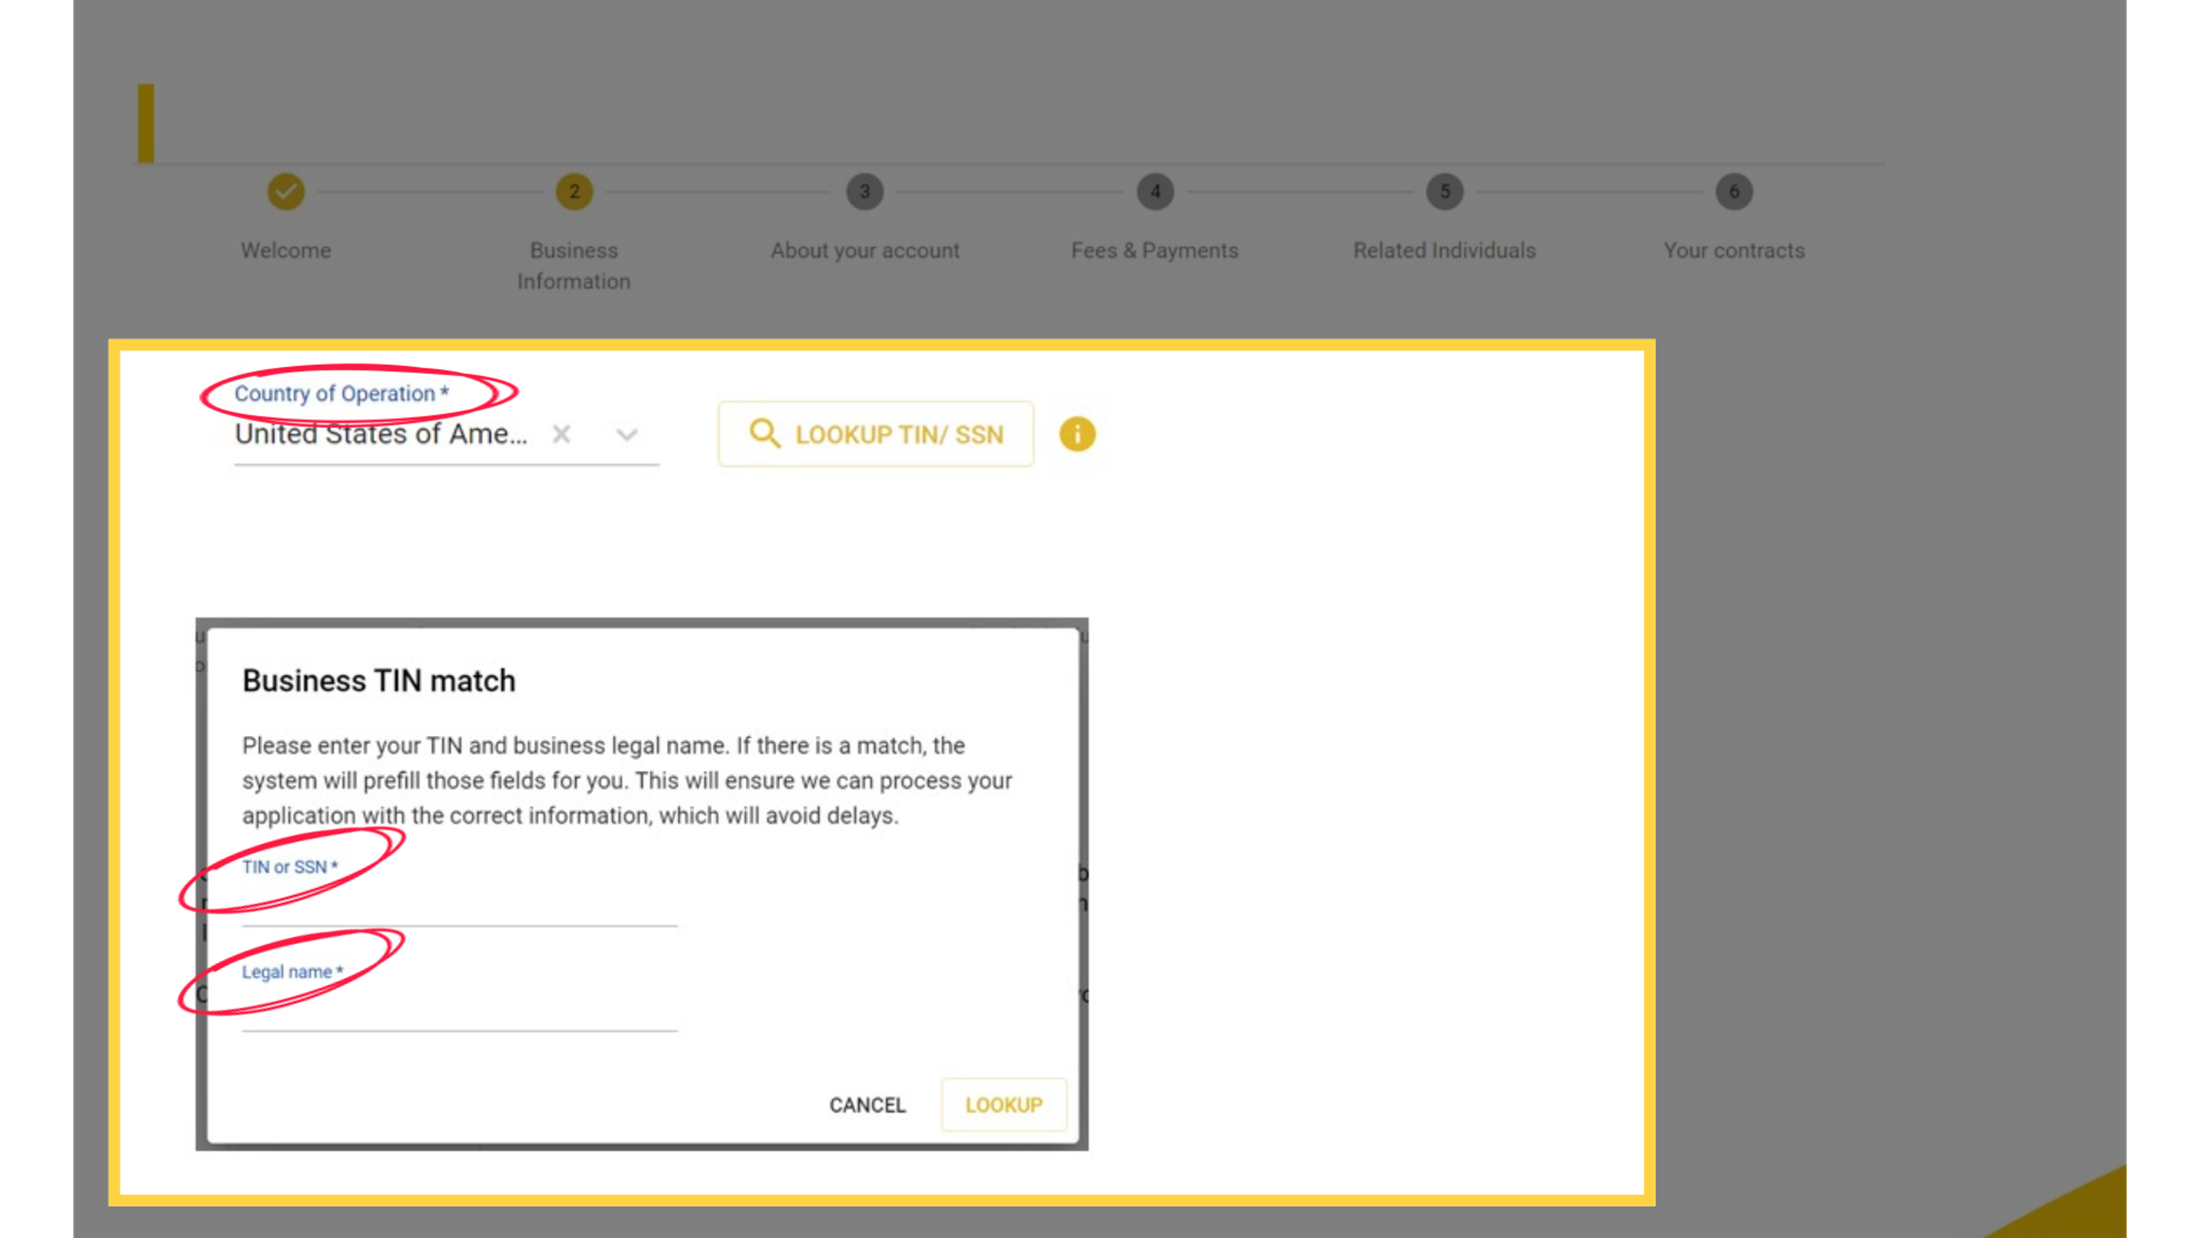
TIN Search
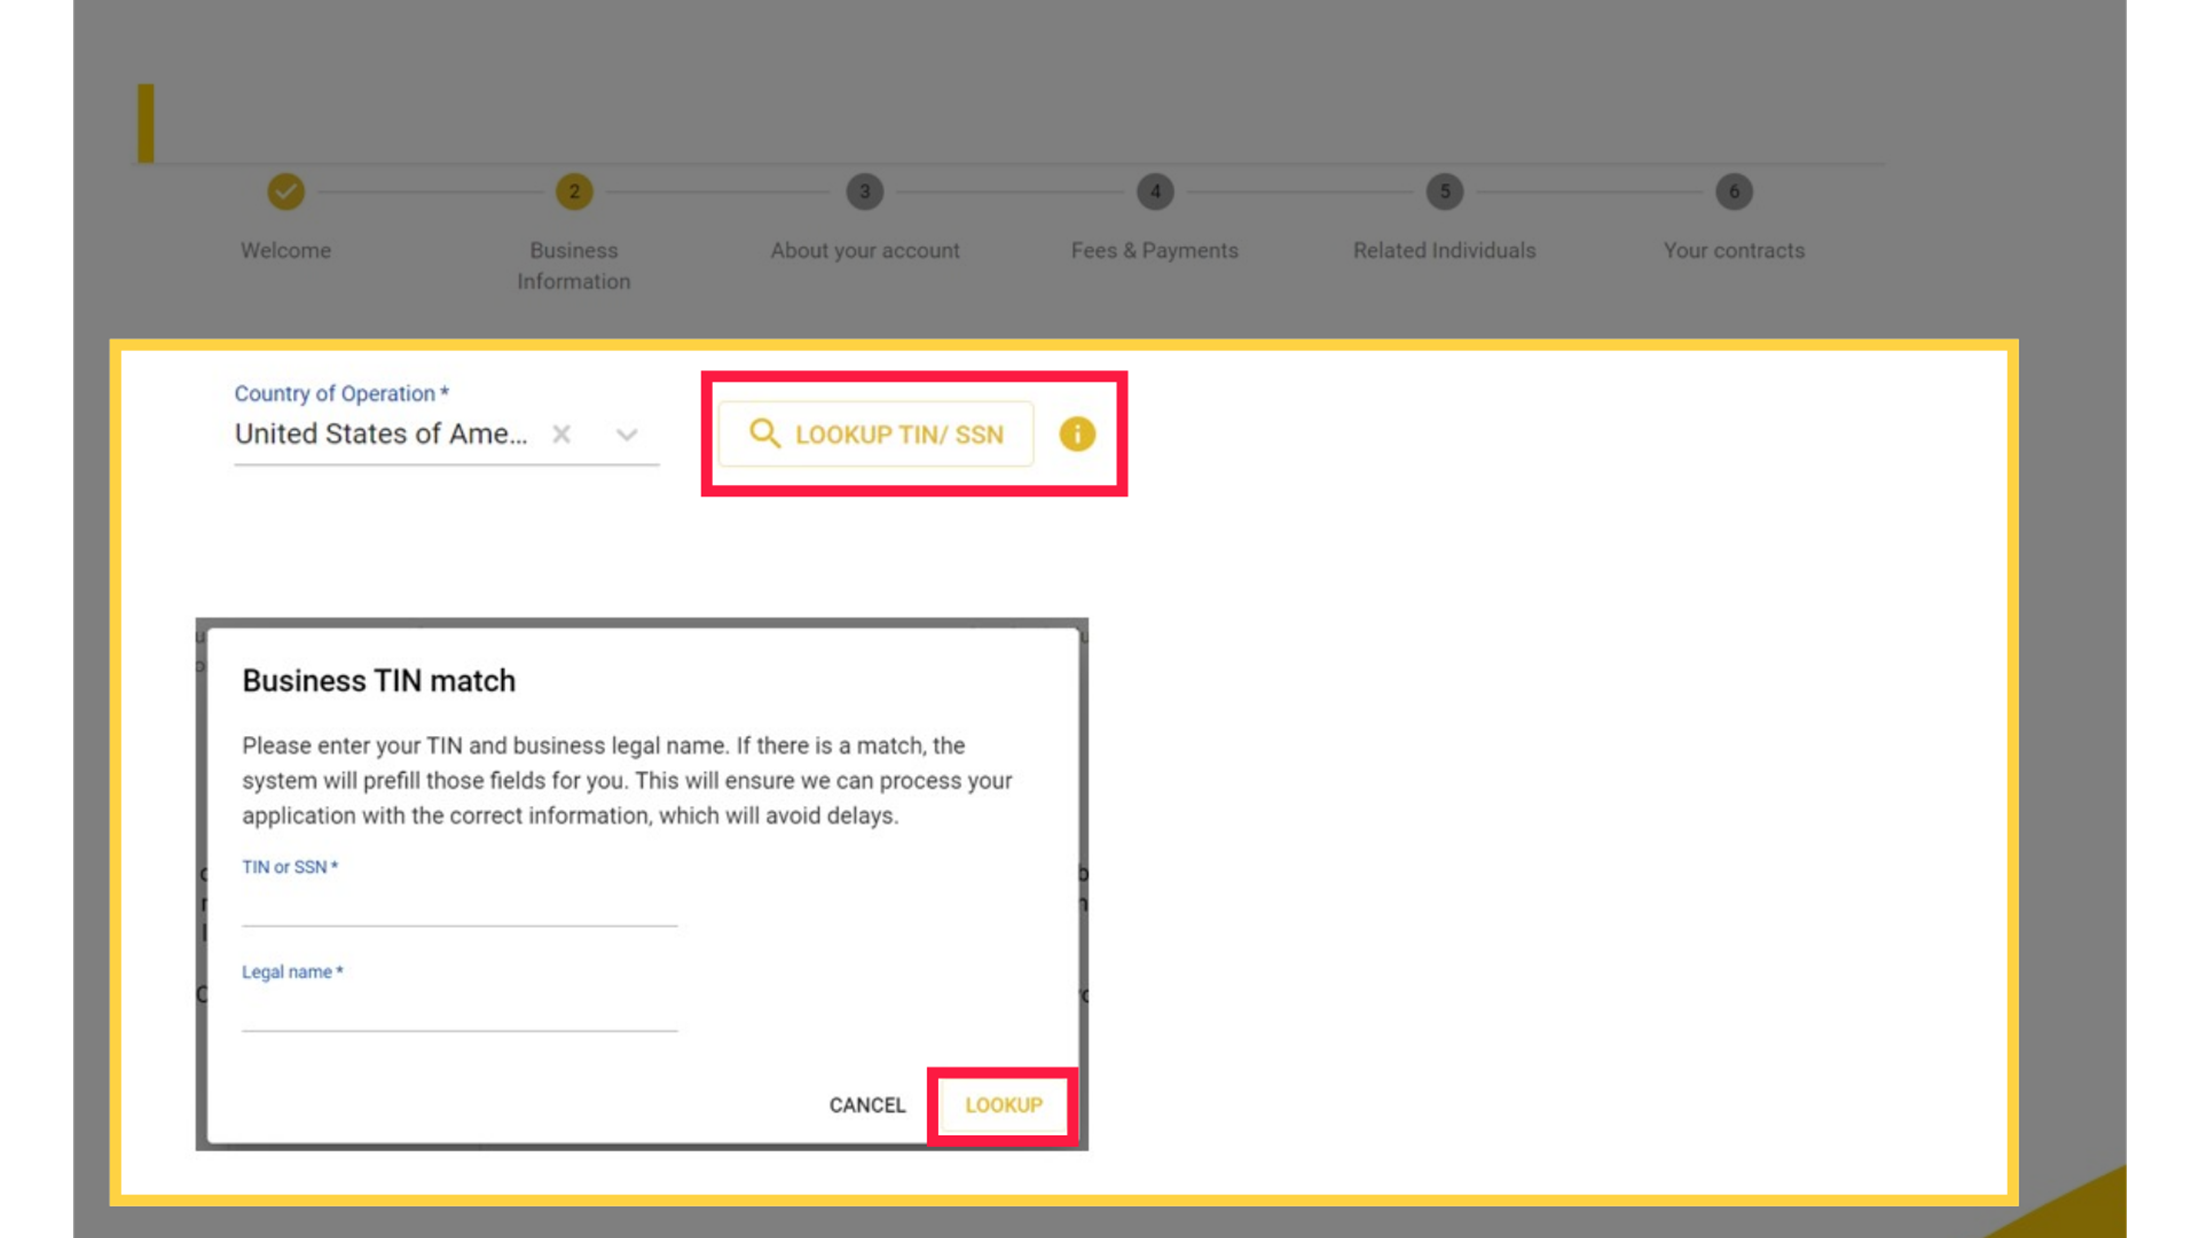
Image AttachedEnter your country of operation and legal details using your TIN, EIN, or SSN. Ensure your name matches official records.
You have three attempts to enter the information. If the search fails, provide registration documents as proof of registration.
Business Information
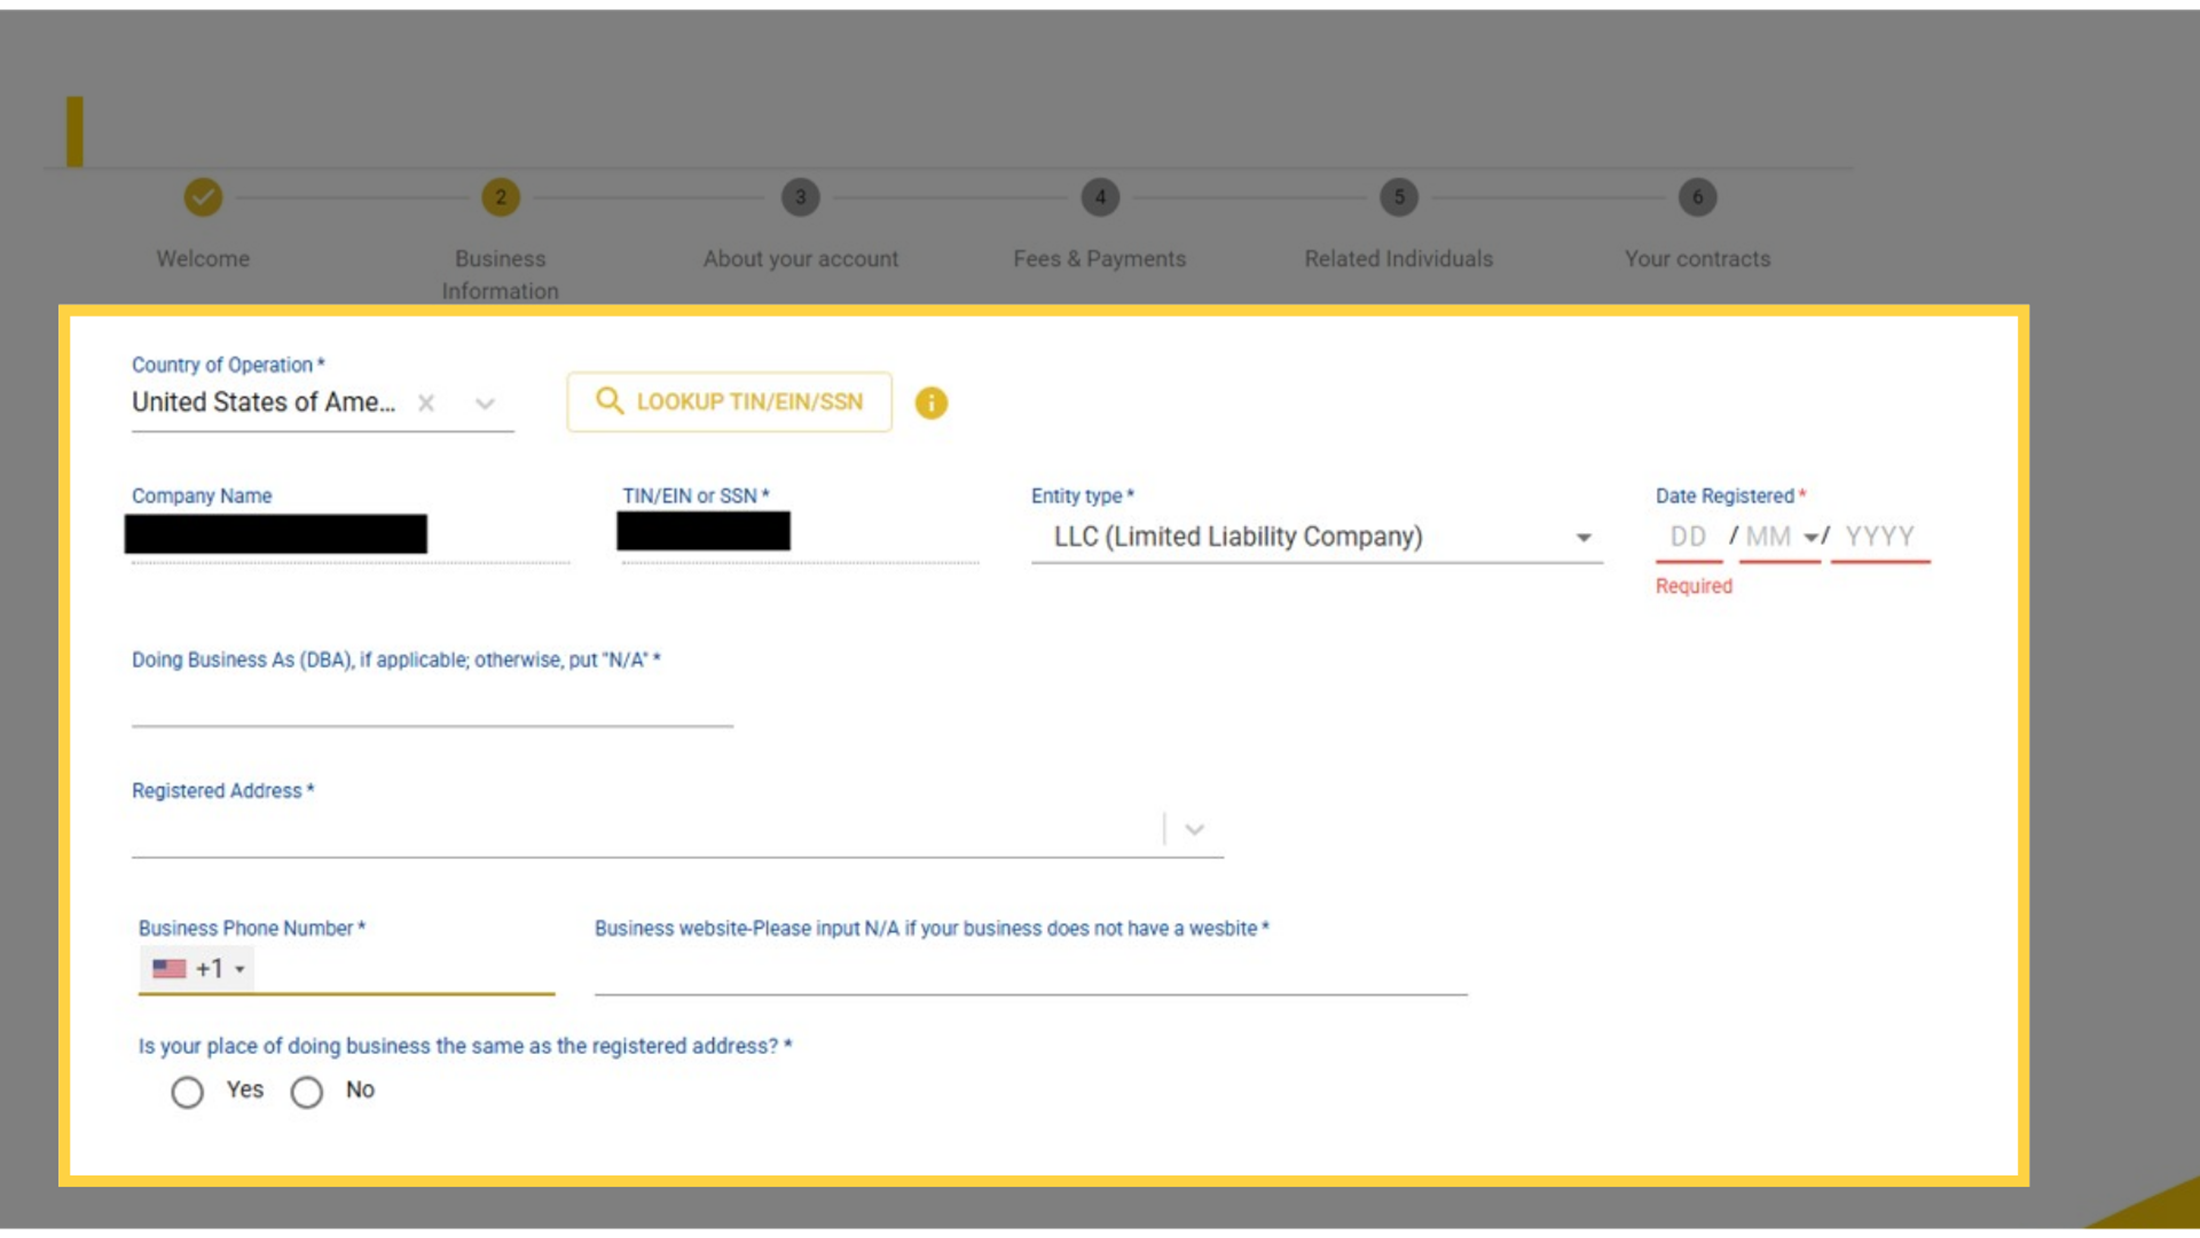
Image Attached| Field | What to enter |
|---|---|
| Country of Operation | Pre-filled as United States of America. Do not change this. |
| Business TIN Match Required | Look up your TIN/EIN/SSN and legal business or individual name. You have three attempts to search. If the lookup fails, you'll need to provide registration documents as proof of the entity's registration. |
| Company Name Required | Your full legal registered name, exactly as it appears on your formation document. |
| SSN / EIN / TIN Required | Exactly as it appears on your Social Security card, IRS record, or business documents. |
| Entity Type Required | Corporation, Government, Not-for-Profit, Partnership, Sole Proprietorship, Limited Liability Company, or Other. |
| Date Registered | The date your business was registered. |
| Doing Business As | Optional. The name your business operates under if different from the registered name. |
| Registered Address Required | Your company's registered address. |
| Business Phone Number | Your business phone number. |
| Business Website | Enter "Not Applicable" if your business doesn't have a website. |
| Same as registered address? Required | Select Yes or No. |
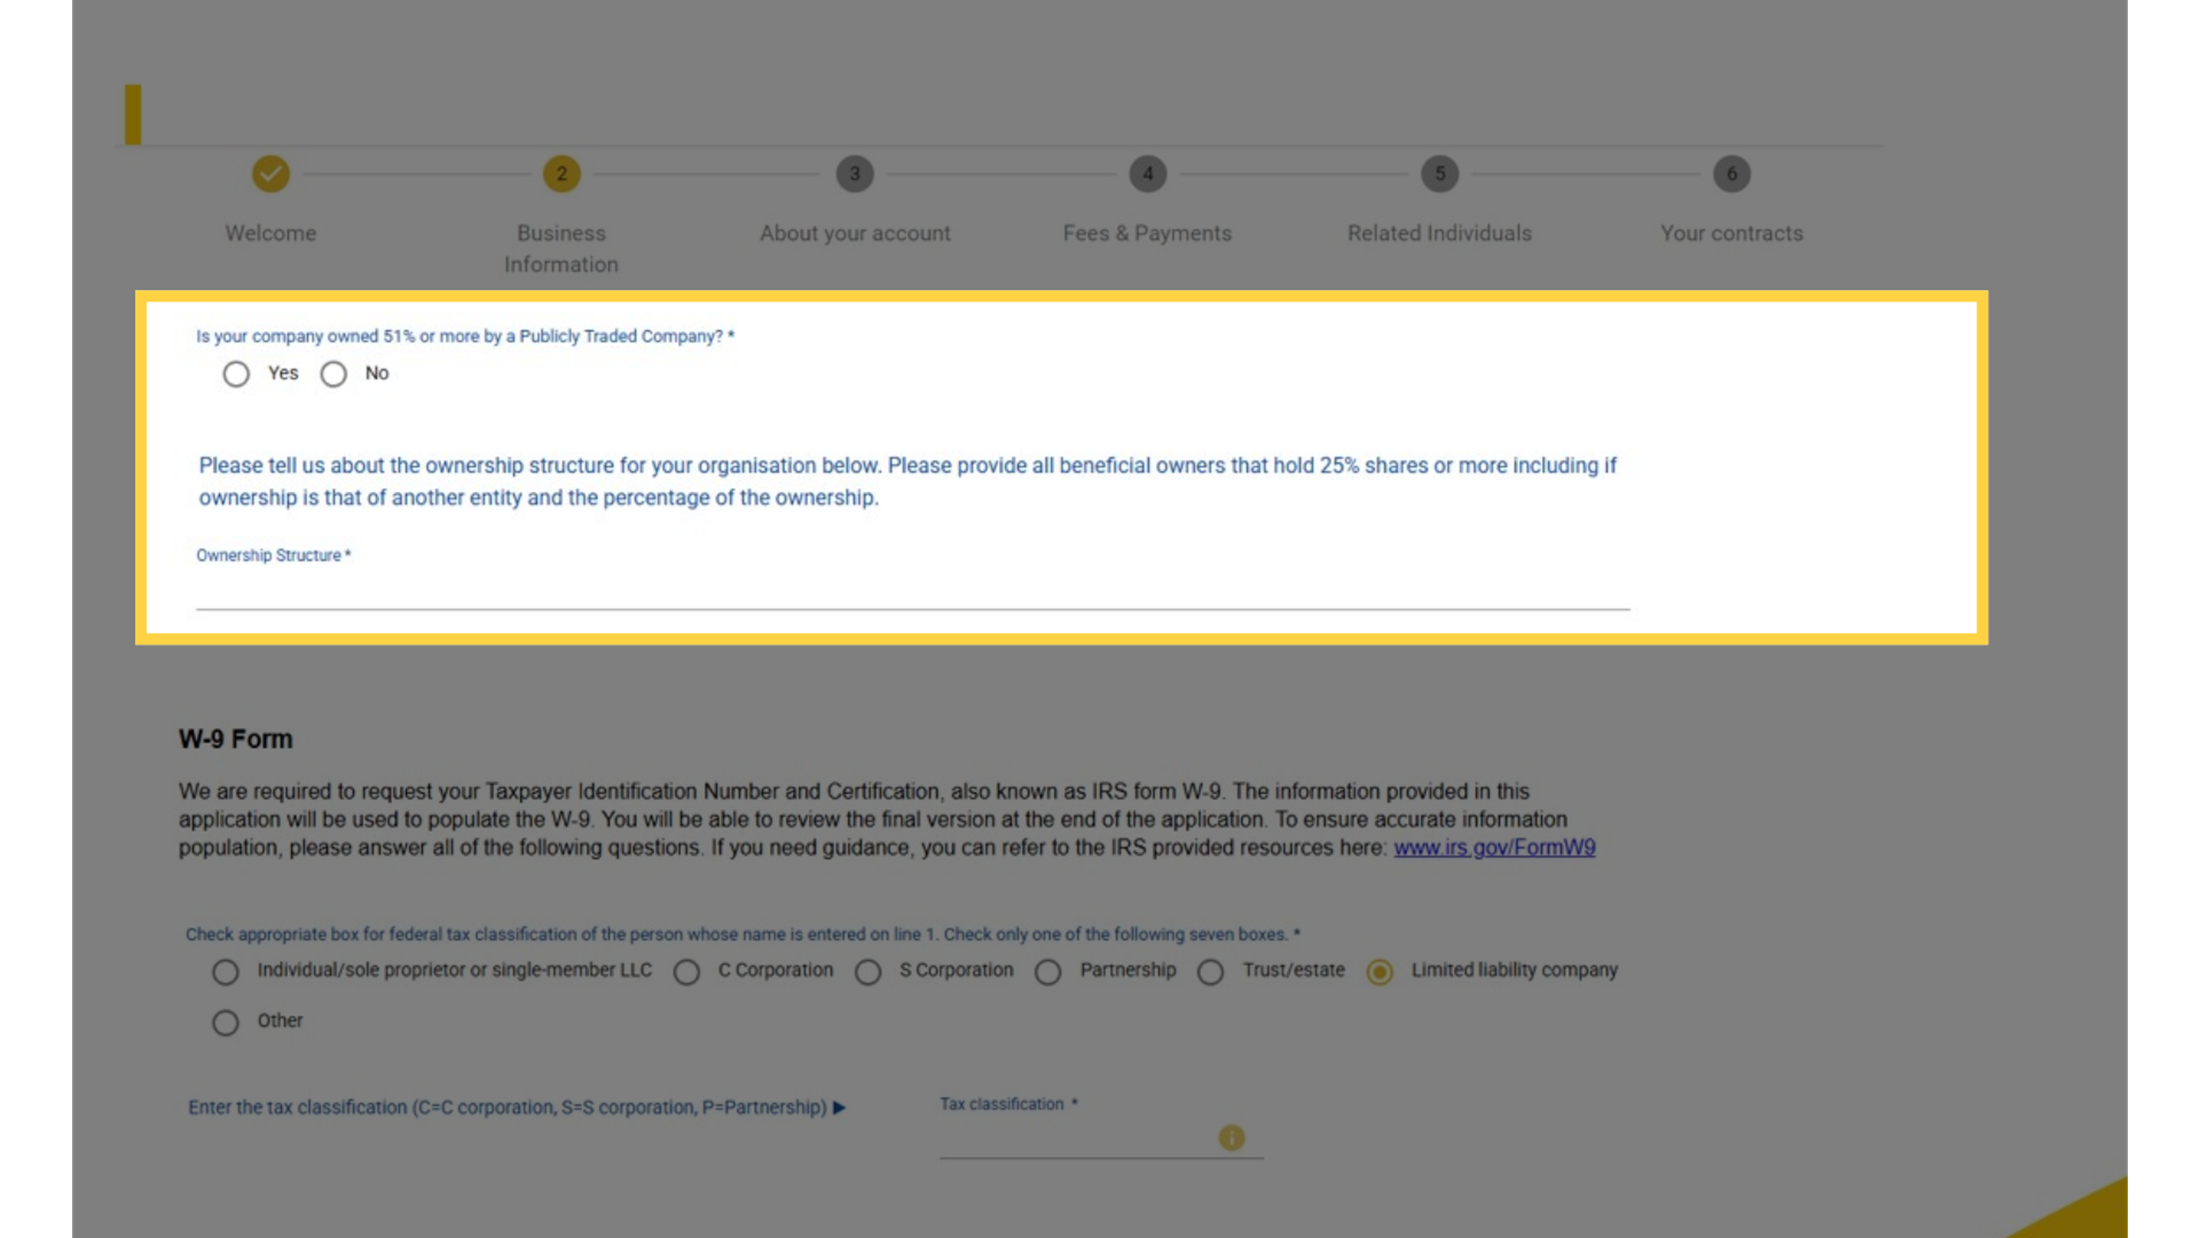
| Owned 51%+ by a public company? Required | Select Yes or No. |
| Ownership Structure | Explain the ownership structure and the ultimate shareholders of the company. |
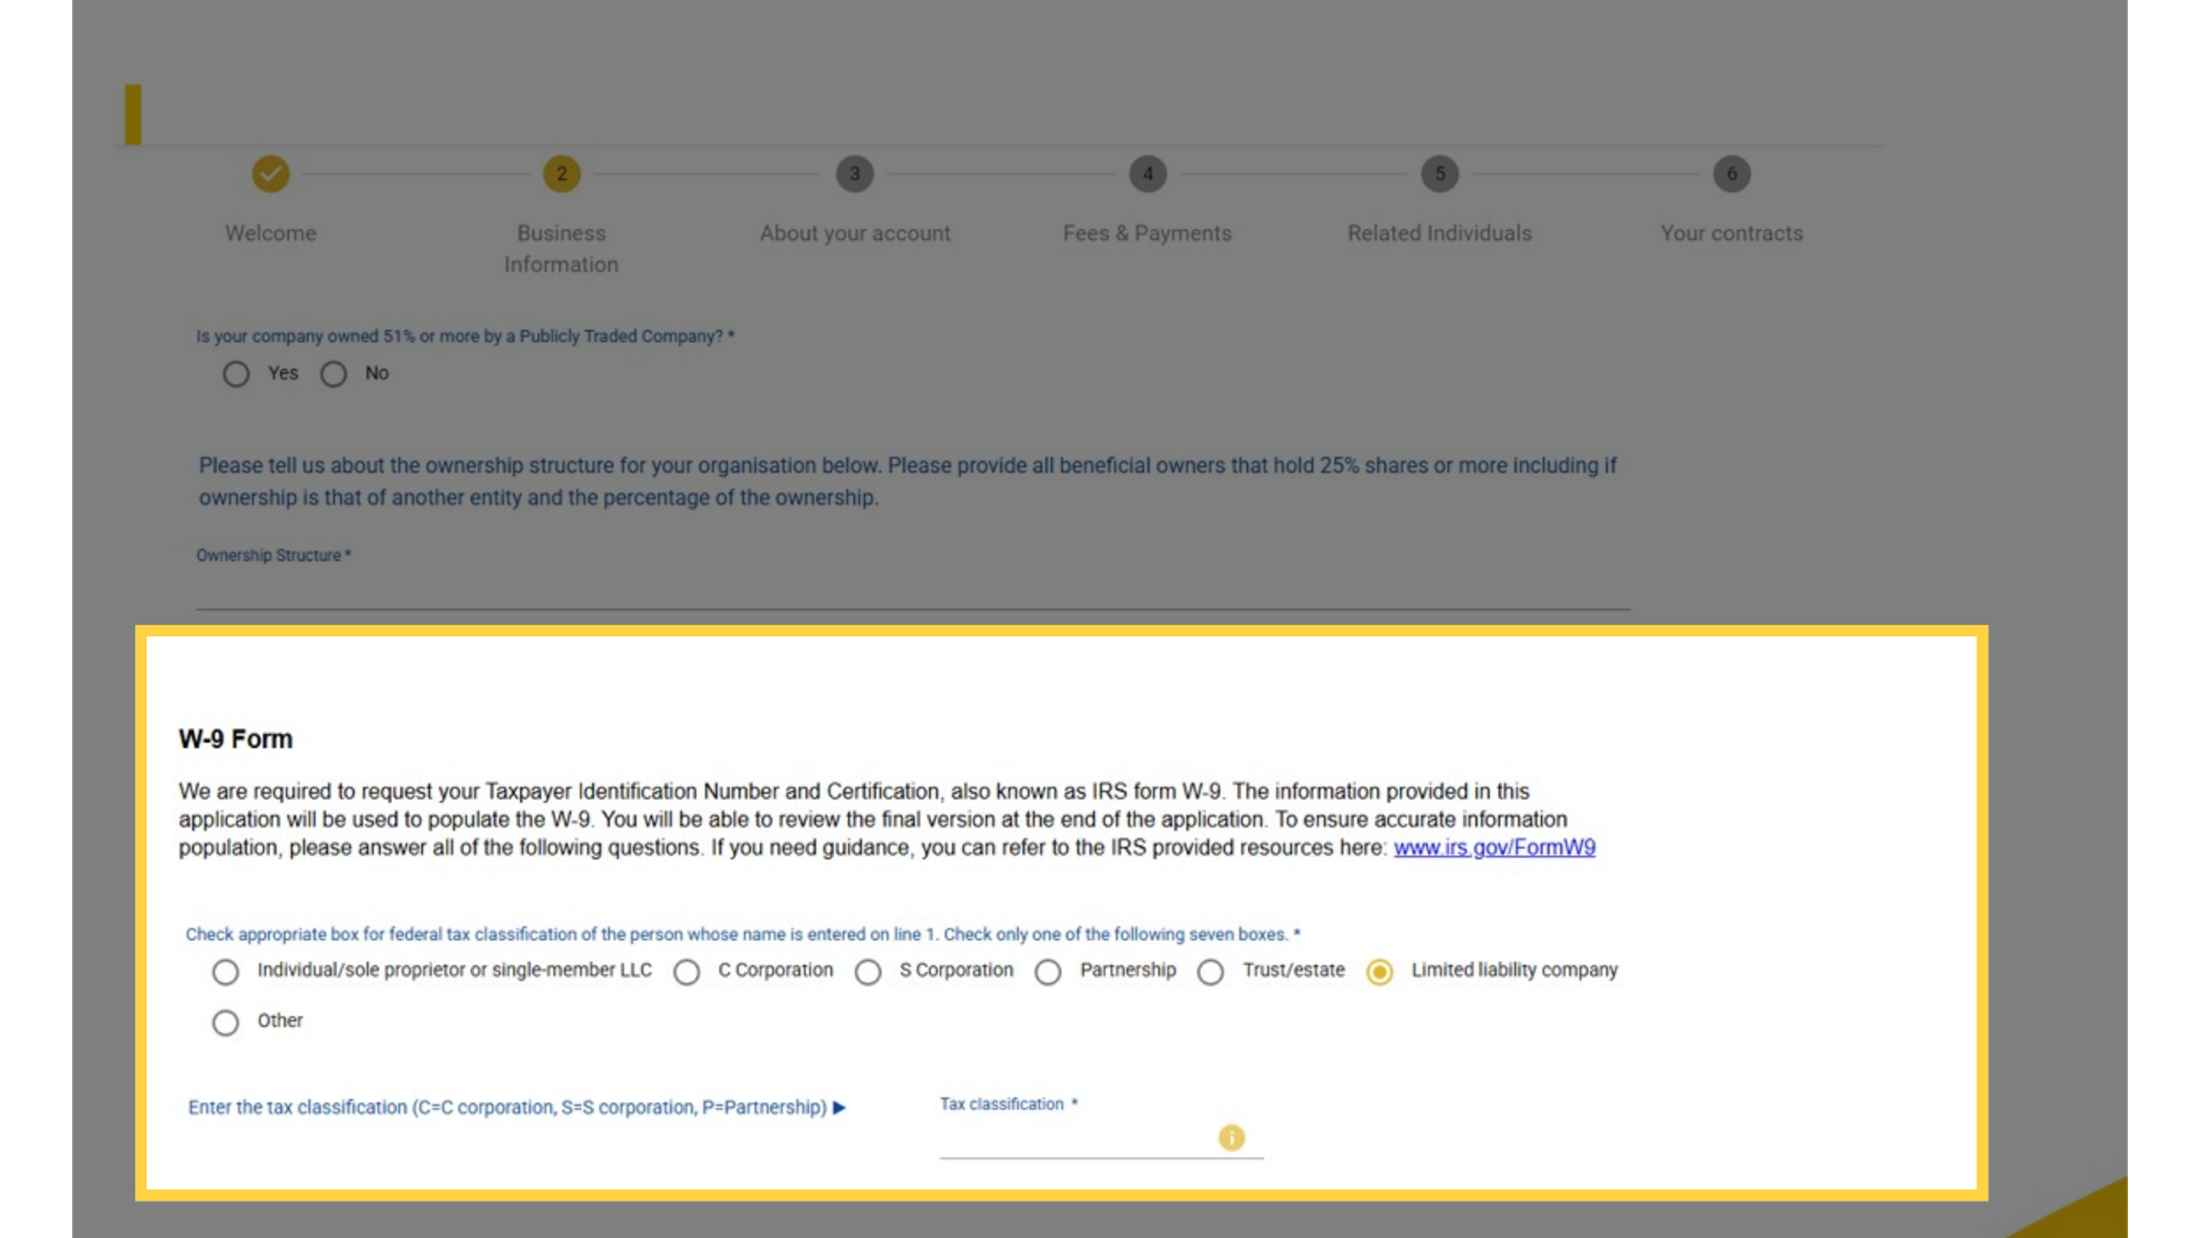
| W-9 Form / Tax Document | Select the applicable federal tax classification: Individual/sole proprietor or single-member LLC, C Corporation, S Corporation, Partnership, Trust/estate, LLC, or Other. |
| Tax Classification | Enter your tax classification. Check the foreign partner box if it applies. |
| Exempt Payee Code | Select the number of exempt payee codes you have, or N/A. |
| FATCA Reporting Code | Select your FATCA code, or N/A. |
Ownership Structure
Image AttachedIf a publicly traded company owns 51% or more of your company, describe your ownership structure here.
W9 Form
Image AttachedThen complete your W9 details, select your federal tax classification, and enter your tax classification code.
Foreign Interests
Image AttachedIf you checked Partnership, trust, estate, or LLC, tick the box for foreign partners, owners, or beneficiaries. Select the number of exempt payee codes. If none, select N/A.
Contact Details
Image AttachedAdd your primary contact details and a financial contact if billing differs. Confirm your entity details, then continue.
Confirm Entity
Image Attached| Field | What to enter |
|---|---|
| Primary Contact Name Required | The main person Nayax US should contact for account queries. |
| Primary Contact Email Required | Business email address for the primary contact. |
| Primary Contact Phone Required | Direct phone number including +1. |
| Separate financial contact? Required | Select Yes if a different person should receive billing and finance queries. |
| Financial Contact Name / Email / Phone | Required if you selected a separate financial contact above. |
About Your Account
Image Attached| Field | What to enter |
|---|---|
| Average transaction amount Required | Typical amount per individual transaction in dollars. |
| Maximum transaction amount Required | The highest amount a single transaction could be. |
| Monthly expected transactions Required | Total number of single transactions expected monthly. |
| Industry Sector Required | Type to search and select your primary industry sector. |
| Product or service sold Required | Select the keyword that best describes what you sell through your Nayax device. |
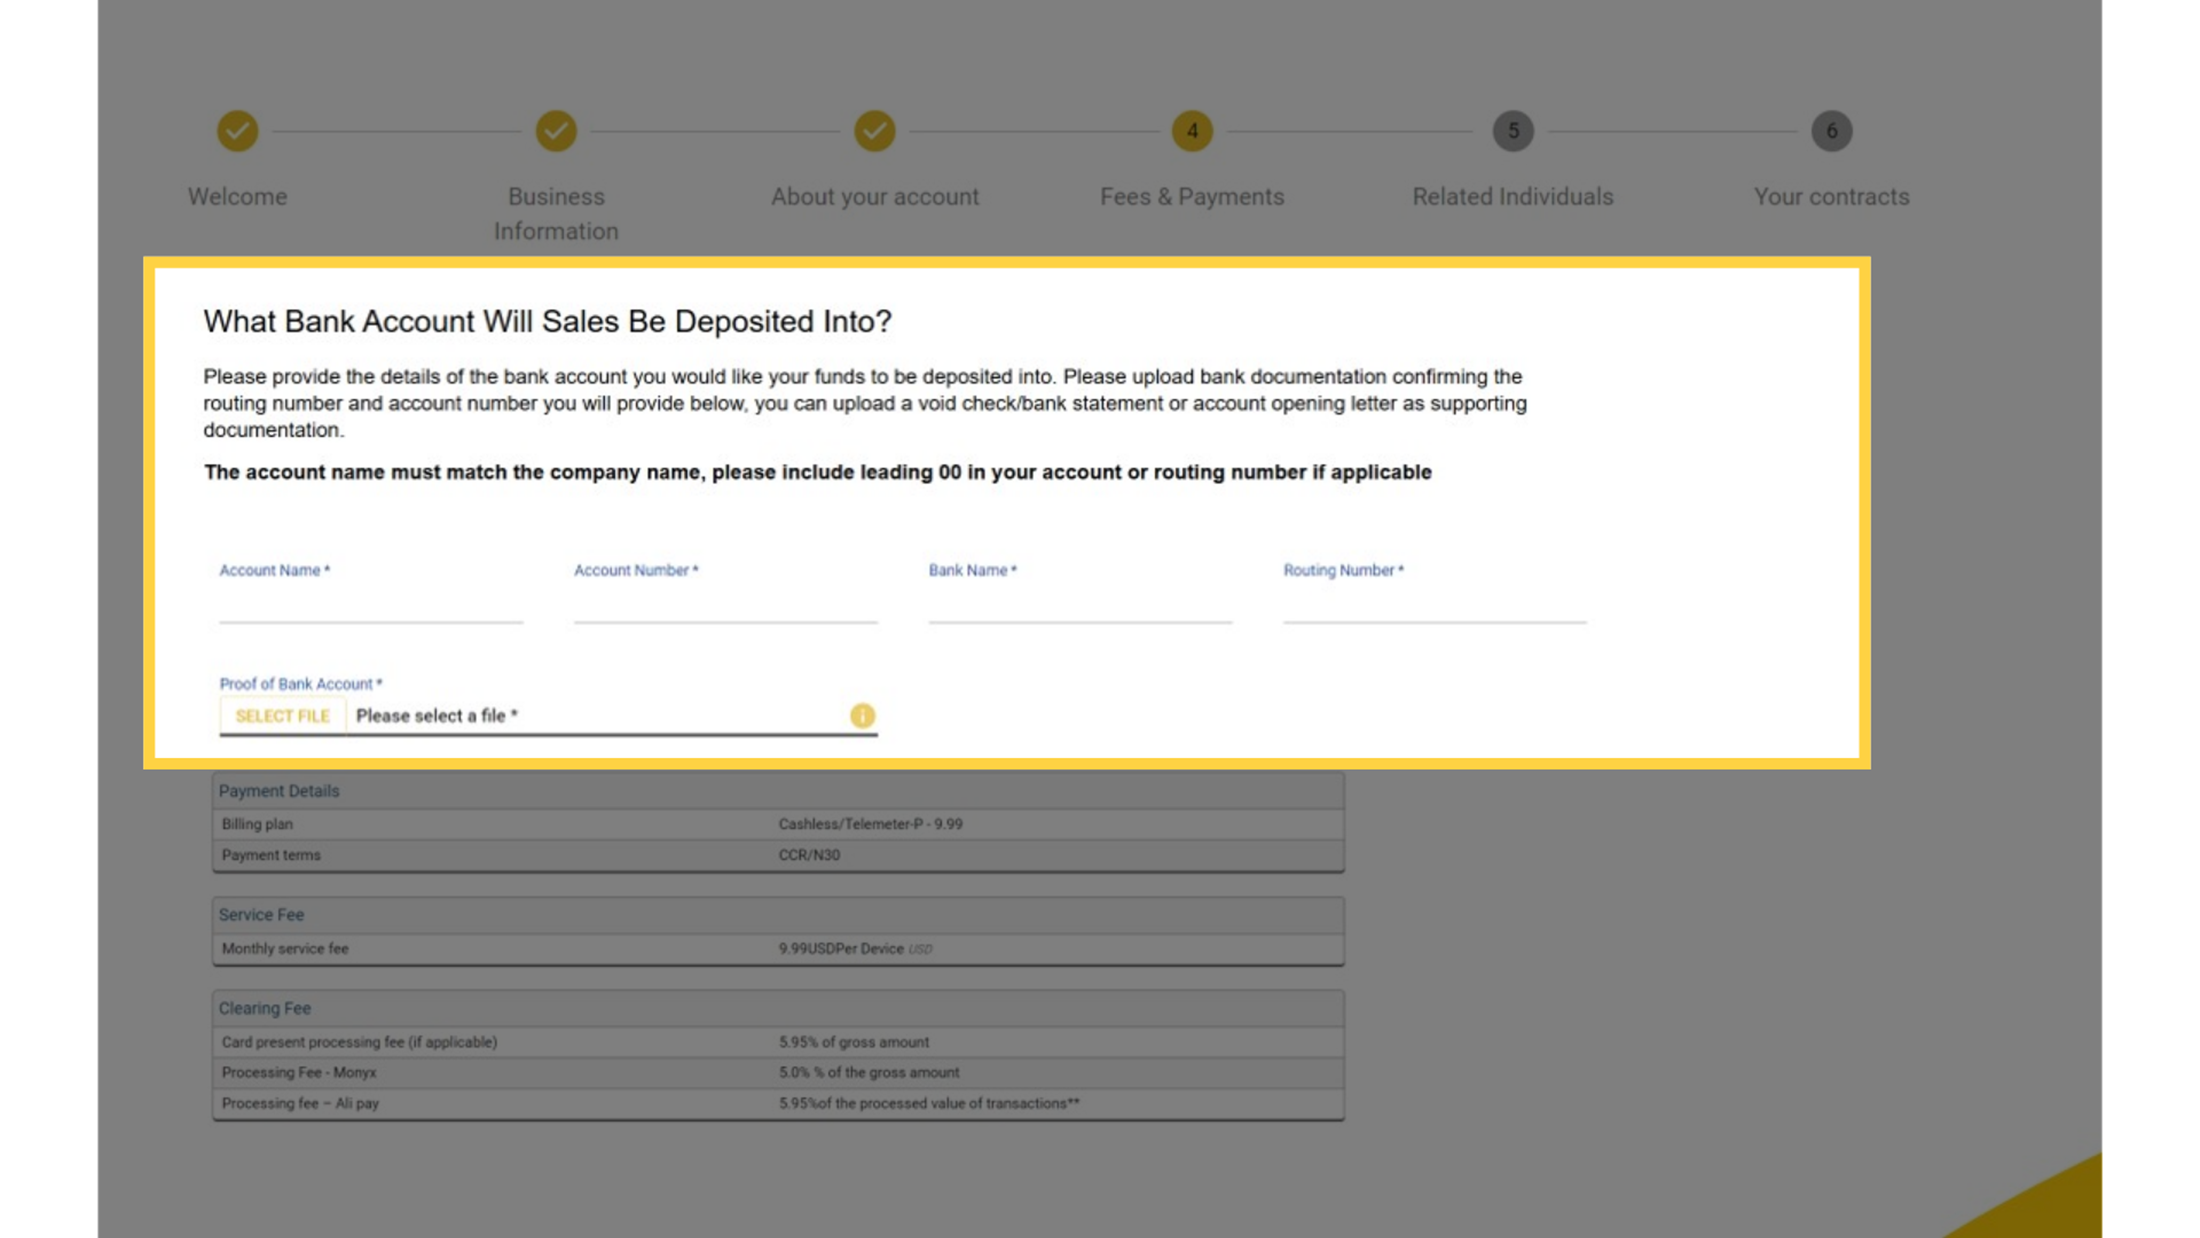
Bank Account Details
Image Attached| Field | What to enter |
|---|---|
| Account Name Required | Must match your organization name from Step 2 exactly. |
| Account Number Required | Your US bank full account number. |
| Bank Name Required | For example Truist, Bank of America, or PNC. |
| Routing Number Required | Your 9-digit bank routing number, with leading zeros if applicable. |
| Proof of Bank Required | A bank statement issued within the last 30 days, a voided check, or a bank letter confirming your account details. Must show account name, full account number, and full routing number. Do not submit a document showing only the last four digits of the account number. |
Fees & Payments
Image AttachedHere's your fee schedule at a glance: billing plan, payment terms, monthly service fee, and the processing fees that apply to card, Monyx, and Ali Pay transactions.
Related Individuals
Image AttachedAdd all Ultimate Beneficial Owners with 25% or more ownership, plus your CEO or senior official. Include each person's identity document details, then save to continue.
Your Contracts
Image AttachedThe final step combines four documents into your contract: your Fee Agreement Form, the MSA, the Clearing Agreement, and any other applicable service terms. Review each one, then get ready to sign.
For Authorized Signatories
Image AttachedIf you're not signing yourself, you'll need a Proof of Authority. No template on hand? Download ours right from this screen.
Any questions? Just email the onboarding team.
Signatures
Image AttachedSelect who will sign this application. If you're the signer, choose Yes if someone else needs to sign; choose No, and we'll send it to them directly.
Signatures' Details
Image AttachedAs you're signing now, we need your details your name, contact information, date of birth, address, and citizenship. Then upload your proof of authority.
Confirm Your Identity - Part 1
Image AttachedNext, we need to confirm your identity. Start by selecting United States of America as your issuing country and enter your SSN number.
Confirm Your Identity - Part 2
Image AttachedNow add a second form of ID a passport or driver's license. Enter the document number, then upload a photo or use your camera to capture the photo page.
Signature Screen
Image AttachedFinally, your signature. Choose how you'd like to sign, add it above the line, and click Sign to Submit when you're ready.
Thank you!
Did you find this article helpful?