How to Set Up a Printed Receipt for Nova Devices
Customize Nova device receipts in Retail Core with a logo, business details, and bottom notes and extend to fiscal compliance with EFSTA or digital delivery with Weezmo.
General
Make every receipt a branding opportunity. Customize Nova device receipts with your logo, business details, special offers, and digital options to reinforce your brand and comply with tax regulations.
Receipt Layout Overview
Your receipts are more than transaction records they're mini-marketing tools. Customize them with your logo, business details, special offers, and even digital receipt options to reinforce your brand, comply with tax regulations, and enhance the customer experience long after they've left your store.
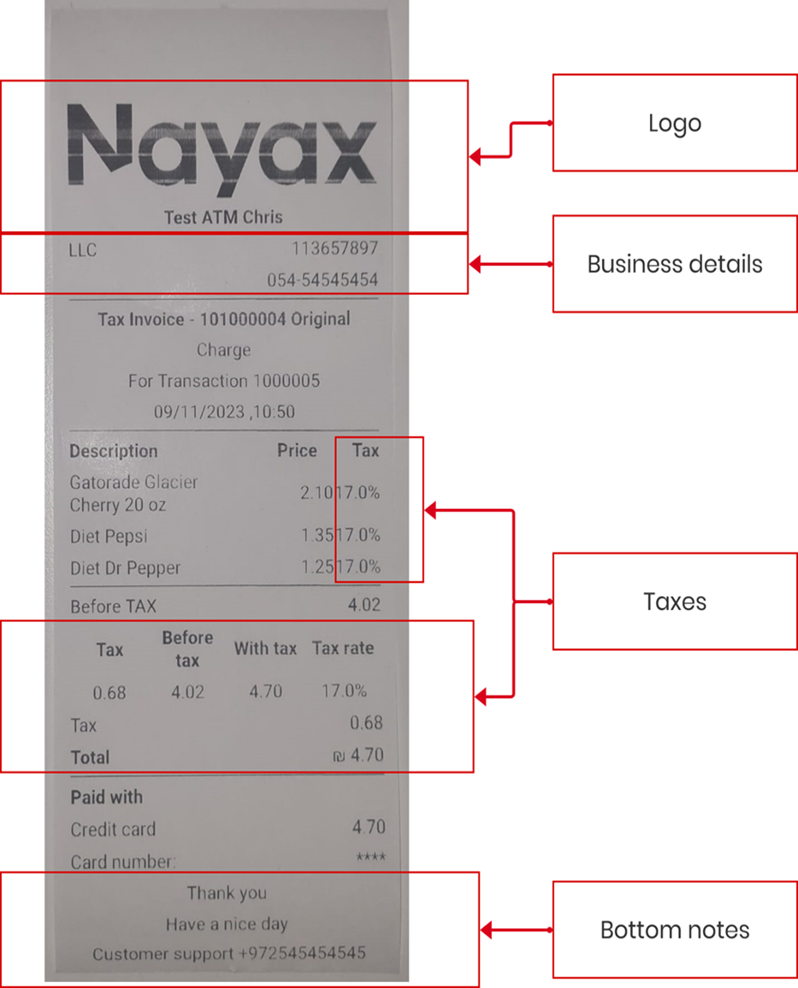
Your Nova Market receipt has four customizable printed zones, plus optional digital receipt delivery via Weezmo. Each zone maps to a specific setting in Retail Core. Use the diagram below to identify which field controls which part of the printed receipt.
Have a nice day
Customer support +971-XX-XXXXXXX
What each zone controls
Before You Start
- ✅ You have Administrator access to Retail Core (webui-srv.bnayax.com).
- ✅ Your Nova device is activated and online (see the Nova activation guide if not).
- ✅ Your company logo file is ready - square format, at least 500 x 500 px, white or transparent background, PNG preferred.
- ✅ You have your VAT / tax registration number and business phone number to hand.
- ✅ Products in your catalog already have a Tax Group assigned - tax figures on the receipt are driven by product tax settings, not the receipt itself.
- ✅ For EFSTA (Parts 5-6): You have EFSTA credentials from your EFSTA account. Required only in countries with fiscal receipt obligations.
- ✅ For Weezmo (Parts 7-8): Weezmo is enabled on your Nayax account. Contact your Nayax representative if you are not sure.
Add a Logo to the Receipt
Upload your company logo so it appears at the top of every printed receipt. The logo is managed under Administration in Retail Core.
-
1
Log in to Retail Core at webui-srv.bnayax.com with your administrator credentials.
-
2
In the side menu, navigate to Administration and locate the logo upload field.
-
3
Click the Upload button (or the image icon) next to the Logo field.
-
4
Select your logo file from your computer. Use a square image of at least 500 x 500 px with a white or transparent background (PNG recommended).
Tip: Thermal receipt printers print in black and white - use a high-contrast version of your logo with no gradients for the clearest result. -
5
Click Save to apply the logo to your receipt settings.
What you should see: A preview of the uploaded logo appears in the field. The logo will print on the next transaction receipt once the device syncs.
Add Business Details to the Receipt
Business details (company name, VAT number, phone) appear below the logo on every receipt. These fields are set under Company in Retail Core and are required in most regions for tax compliance.
-
1
Log in to Retail Core at webui-srv.bnayax.com with your administrator credentials.
-
2
In the side menu, navigate to Company and open your company profile.
-
3
Fill in the following fields:
-
4
Click Save to store the details.
What you should see: The fields update and a confirmation message appears. Business details will print on receipts from the next transaction onwards.
Tax / VAT on the Receipt
The tax section of the receipt is generated automatically from the product catalog - you do not configure tax amounts on the receipt itself. Understanding how tax flows through ensures your receipts are always accurate.
The receipt tax section shows:
Add Bottom Notes to the Receipt
Bottom notes appear as free text beneath the total on every receipt. They are managed under Administration in Retail Core. Use this section for thank-you messages, your support phone number, or a returns policy.
-
1
Log in to Retail Core at webui-srv.bnayax.com with your administrator credentials.
-
2
In the side menu, navigate to Administration and locate the Bottom Notes or Receipt Footer field.
-
3
Enter the text you want printed at the bottom of every receipt. Each line of text becomes a separate printed line.
Example content: "Thank you for your purchase", "Have a great day", "Customer support: +XX-XXX-XXXX". Keep it concise - thermal receipt paper width is limited. -
4
Click Save to store the bottom notes.
What you should see: The text is saved and will appear on all receipts from the next transaction. Run a test transaction to confirm the notes print as expected.
Set Up EFSTA Fiscalization on POS
EFSTA fiscalization is required in certain countries (Austria, Germany, and others) to ensure receipts meet local fiscal regulations. When enabled, each receipt is signed and registered with the EFSTA fiscal system.
-
1
Log in to Retail Core at webui-srv.bnayax.com with your administrator credentials.
-
2
In the side menu, navigate to Administration and open the EFSTA fiscalization settings.
-
3
Enter your EFSTA credentials and fiscal configuration details as provided by your EFSTA account.
-
4
Click Save to apply the fiscal settings.
What you should see: EFSTA fiscalization is enabled and the system is ready to register receipts. Proceed to Part 6 to configure and associate your POS terminals.
Configure and Associate a POS on EFSTA
After enabling EFSTA fiscalization (Part 5), associate each individual POS terminal with EFSTA so that every receipt from that device is correctly registered.
-
1
In Retail Core, navigate to the Nayax Retail section and open the POS configuration for the terminal you want to register with EFSTA.
-
2
Locate the EFSTA settings within the POS configuration and enable the association.
-
3
Enter the EFSTA POS identifier assigned to this terminal.
-
4
Click Save and repeat for each POS terminal that requires fiscal registration.
What you should see: The POS is associated with EFSTA. From the next transaction, receipts from this terminal will be fiscally signed and registered.
Activate Weezmo E-Receipts
Weezmo lets you send digital receipts to customers by email or SMS - extending the receipt from a paper slip into a branded digital touchpoint. E-receipts can include promotions and loyalty offers, turning every transaction into a marketing opportunity.
-
1
Log in to Retail Core at webui-srv.bnayax.com with your administrator credentials.
-
2
In the side menu, navigate to Administration and open the Weezmo settings.
-
3
Enable the Weezmo E-Receipts toggle and enter your Weezmo account credentials or API key as provided by Nayax.
-
4
Configure the email template and sender details for the digital receipt.
Tip: Add a promotional banner or loyalty message to the e-receipt template to drive repeat visits. This is the "mini-marketing tool" advantage of digital receipts. -
5
Click Save to activate Weezmo e-receipts on your terminals.
What you should see: Weezmo e-receipts are enabled. Customers will now be prompted at the terminal to receive a digital receipt by email after each transaction.
Activate Weezmo SMS Receipts
In addition to email, Weezmo can deliver digital receipts by SMS - ideal for customers who prefer a quick text confirmation over an email.
-
1
In Retail Core, navigate to Retail Core section and open the Weezmo SMS settings.
-
2
Enable the Weezmo SMS Receipts toggle.
-
3
Configure the SMS sender name and message template.
Tip: Keep the SMS message short - include the transaction amount and a link to the full digital receipt. SMS character limits apply. -
4
Click Save to activate SMS receipt delivery.
What you should see: SMS receipts are enabled. Customers who provide a mobile number at the terminal will receive an SMS receipt after each transaction.
Result
Your receipts are set up and working
Once your chosen parts are complete and saved in Retail Core, run a test transaction on your Nova device. The printed receipt should display your logo, company name and VAT number, a per-item tax breakdown, and your custom bottom notes. If you have activated Weezmo, the customer will be prompted to receive a digital receipt by email or SMS. If any section is missing, confirm the device is online and has synced with Retail Core since the settings were saved. For fiscal receipts, verify the EFSTA association is confirmed on the POS before going live.
Troubleshooting
FAQ
FAQ
Did you find this article helpful?