✔️Understanding Attributes and Configurations | Pulse
This guide explains the key settings and attributes you'll need for your Pulse configuration using your Nayax Core Management Suite.
Where to begin?
Click here to learn how to add attributes to the machine's page
Configure General Pulse Attributes at the Machine level
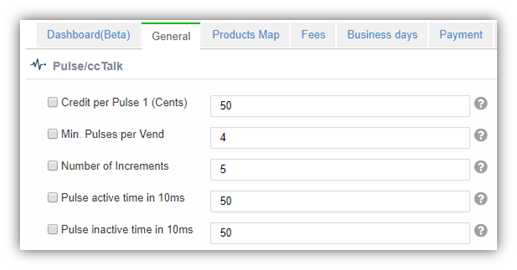
Image Attached• Click on Operations, then from the drop-down select Machines.
• Select the relevant machine from the hierarchy tree.
• Click on the General tab.
• Under the Pulse/ccTalk section, configure the attributes shown in the image attached (If you do not see the image, click on this box and the image will appear on the right-hand side)
• Click Save
Attribute-Naming Convention
|
Device
|
No. of Pulses lines available
|
Attributes Names
|
|
Amit |
2
|
Pulse attributes contain with 1 or 2
For example:
|
|
Touch Devices
|
6
|
Pulse attributes contain with 1-6
Example:
|
Pro tip: this attribute can be customized based on Single or Multi Price configuration needs.
General Mandatory Attributes
There are three available configuration pairs.
A. Time frame
- Pulse Active Time - This attribute determines how long the device will be sending pulses.
- Pulse Inactive Time - Determines how long the pulse must be inactive before sending the next pulse.
Select one pair from the available list of attributes:
- Pulse Active Time in ms, Pulse Inactive Time in ms (Amit - Option 1).
- Pulse Active Time in 10ms, Pulse Inactive Time in 10ms (Amit - Option 2).
- Pulse 1-6 Active Time in ms, Pulse 1-6 Inactive Time in ms (only for Touch Device).
Pro tip: Where both pairs are configured for the Amit device, then the Time in Ms overcomes the 10ms.
Important: this value is determined by your specific machine requirements. This is based on how long the pulse must be active. If you are unsure of this value, contact the machine manufacturer or your electric technician.
B. Number of Pulses per Vend
- The number of pulses that are being sent to the machine when the vend is approved. This will be determined by your model of machine.
- Not in use for price list.
C. Credit per Pulse
- The amount charged for each given pulse. Depending on the amount you want to charge your customers the formula is as follows: Vend Price = Credit per Pulse x Number of Pulses
Inhibit Settings
The machine uses the wire labeled 'Inhibit' to indicate that it cannot currently receive credit.
When an Inhibit is detected, your device will:
- Not accept payment cards
- Not provide credit to the machine
- Not send pulses
Inhibit is detected
The inhibit line hold voltage of 3.3 volt. The machine needs to pull down the voltage (connect it to ground) to change the inhibit.
Pulse Inhibit
Optional Inhibit Values:
- 0 - Inhibit disabled (Nayax ignores inhibit)
- 1 - Inhibit enabled and active when machine sent logic 0 (low voltage)
- 3 - Inhibit enabled and active when machine sent logic 1 (high voltage)
- 5 - Activate External MDB Credit (pulse on "Pulse IN1" will start free MDB transaction)
- 9 - Enable External Sure-Vend Sensor for MDB
- 13 - Activate External MDB Credit + External Sure-Vend Sensor
- 16 - Multi Inhibit Enabled and Active when logic '0' received from VMC (relevant for VPOS Touch and Onyx devices only)
- 32 - Multi Inhibit Enabled and Active when logic '1' received from VMC (relevant for VPOS Touch and Onyx devices only)
Inhibit Event Timeout (sec)
- Time in seconds after which an alert will be sent to the server when the device is Inhibited by the machine.
- Default: 90 seconds.
General Optional Attributes
From this point down in the scenario, all the attributes are optional.
Pulse Line Welcome Message
Customize the text displayed when the machine is idle (not available in Count Up mode).
Default message: "Choose Desired Machine"
Post Delay (in sec)
Set a waiting period (in seconds) after a transaction completes before the device accepts the next payment.
Pulse Invert
Pulse invert converts to the pulse signal.
|
Invert |
Inactive Signal |
Active Signal |
|
No |
High |
Low |
|
Yes |
Low |
High |
Pro tip: This function depends on your specific machine. If you are unsure the direction of pulse signals your machine needs, contact your machine manufacturer.
Pulse Pull-Up
Enable this setting if your pulse line has an external pull-up resistor.
Pro tip: Configure the Pulse Inactive Time properly to prevent the device from detecting its own pulse as an input signal.
Pulse Processing Message
Image AttachedWe have added the ability to replace the “processing” animation, so you can communicate important information to the customer on what to do/not to do during the purchase process.
For example:
When sending long pulses (taking a relatively long time) to the machine, to tell the customer to wait until pulses finish, to get the full service from the machine.
To prompt the customer that the bathroom gate is now open, and they should enter and not wait any longer.
The configuration is via attribute 166 - Pulse Processing Message
NULL: Maintain current behavior.
String: Activate the new behavior - presenting the string instead of the "processing" animation. Inserting "\n" into the string will indicate to go down to the next row.
@$- to clear the string.

Pulse IN Counter
This feature allows your device to detect pulses from other payment devices (like coin mechanisms) on the same pulse line.
This attribute controls how many pulses you want to send per vend. This number is determined by the minimum number of pulses needed by your machine to start a vend.
How to configure:
- 0 - Disabled (device ignores incoming pulses) Ex: if you want to isolate payment via a single payment input (just coin mechanism or just POS)
- Any number above 0 - Device reports cash usage to the server after detecting these many pulses.
Formula: Reported Price = Pulse IN Counter × Credit per Pulse 1
Coins Insert Timeout
LCD group > Remove LCD Message
Excludes specific LCD messages that speeds up the transaction process:
- 0 - All server response
- 1 - Successful server response - removes the last payment information screen
- 2 - Thank you
Remove Audio Message
Language/Audio group > Remove Audio Message
You can customize your customers experience and disable specific audio announcements like "Thank You," "Card Approved," or "Card Not Approved."
Door Open Functionality
Device Parameters > Door Open Functionality
Configure how the device responds when the machine door is opened or closed.
How it works:
- Door closed: When the machine door is closed, the pulse is connected to the ground, the device will send ‘door open’ alert, and the device will be disabling payment acceptance
- Door opened: When the machine door is opened, the pulse is not connected to the ground, and the device will send ‘door close’ alert.
Pulse Fiscalization (Tax Compliance)
Image AttachedImportant: check with your local Nayax representative for the necessary steps to enable this function to your Nayax contract. This option requires an extra monthly charge.
If your region requires fiscal monitoring, you can connect an external fiscal device to track transactions on pulse machines.
We differentiate between two types of payment methods:
- Fiscalized payments: Credit cards, Apple Pay, Google Pay, and other payment apps
- Non-fiscalized payments: Prepaid cards, Monyx, QR codes
Using the Nayax Core platform, we offer a choice of two modes of operation. Use Attribute 601 – "Pulse Fiscal"

Fiscalization Modes
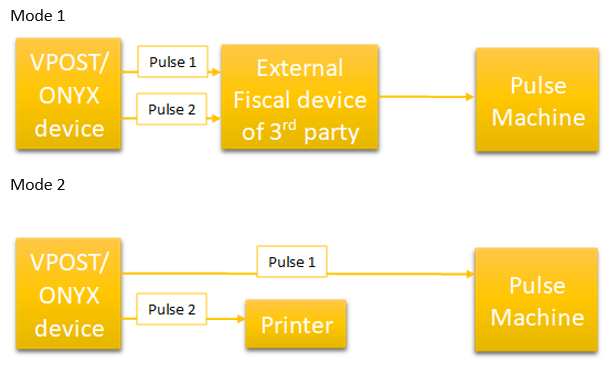
Image AttachedMode 1 - Dual Pulse Line Setup: Required when regulations mandate all payments go through a fiscal device.
- Pulse Line 1: Fiscalized payment methods
- Pulse Line 2: Non-fiscalized payment methods
Connect both pulse line 1 and pulse line 2 to automatically send fiscalized payment methods.
Mode 2 - Receipt Printing Setup: Use when receipts are required for fiscalized payments.
- Pulse Line 1: Activates the pulse machine (used by all payment methods)
- Pulse Line 2: Connects to printer for fiscalized payment receipts only
Connect pulse line 1 to activate the pulse machine also connect pulse line 2 to the printer.
Note: Non-fiscalized payments only use Pulse Line 1 in Mode 2.
Thank you!
Did you find this article helpful?