Inventory Dashboard in Nayax Core | Overview
Monitor and manage machine stock levels, log visits, and generate picklists from the Nayax Core Inventory Dashboard to streamline fleet operations.
Prerequisites: Before You Start
How to Use the Inventory Dashboard in Nayax Core
Monitor stock levels, track sales, and manage machine visits across your entire fleet from a single view without navigating between machine pages.
Before You Start
- ✅ You have an active Operator account on Nayax Core.
- ✅ Your machines are already configured under Operations > Machines.
- ✅ You know your Area, Route, or Location name as it appears in the system.
- ✅ Your machines have a product map set up with PAR and On Hand levels if you want to see colour-coded stock status.
Access the Inventory Dashboard
-
1
Log in to Nayax Core at my.nayax.com.
-
2
In the top navigation, go to Operations > Inventory Dashboard.
The Operations menu opens with the Inventory Dashboard highlighted -
3
In the Area / Route / Location field at the top left, type your company or route name. Select your company from the dropdown.
-
4
Click Search. Your machines load in the dashboard table.
✅What you should see: A table listing all machines on your account, labelled the same as in Operations > Machines.
Read the Dashboard Columns
Each row in the dashboard represents one machine. The table columns give you a snapshot of each machine's current state.
Inventory Dashboard table showing all columns with example machine data
| Column | What it shows |
|---|---|
| Machine Type / ID | The machine name and identifier as labelled in your account. Use this to identify which machine you are looking at. |
| Pick / Source | The sales data source for this machine is either MDB (live transactions, updates in real time) or DEX (updates on a scheduled basis). Change this in Operations > Machines under Sales Source. |
| Vends / Sales | Number of items vended and total revenue generated. Also shows the number of days since the last visit and the current cashbox level. Data accuracy depends on the machine reporting cash sales correctly. |
| Stock Level | Estimated stock remaining, calculated from vendouts configured in the machine's product map. Alerts can be set to notify you when an item runs low. |
| Machine Inventory | A colour-coded view of inventory levels based on your PAR and On Hand values:
● Green Relatively full ● Yellow Moderately full ● Red Getting low, action recommended |
Use the Action Menu
The Action Menu lets you manage any machine directly from the dashboard - without navigating away to another page.
-
1
Right-click on the machine row you want to manage.
⚠️Note: Make sure you click directly on the machine row. If the menu does not appear, see the Troubleshooting section below. -
2
The action menu appears. Select the option you need.
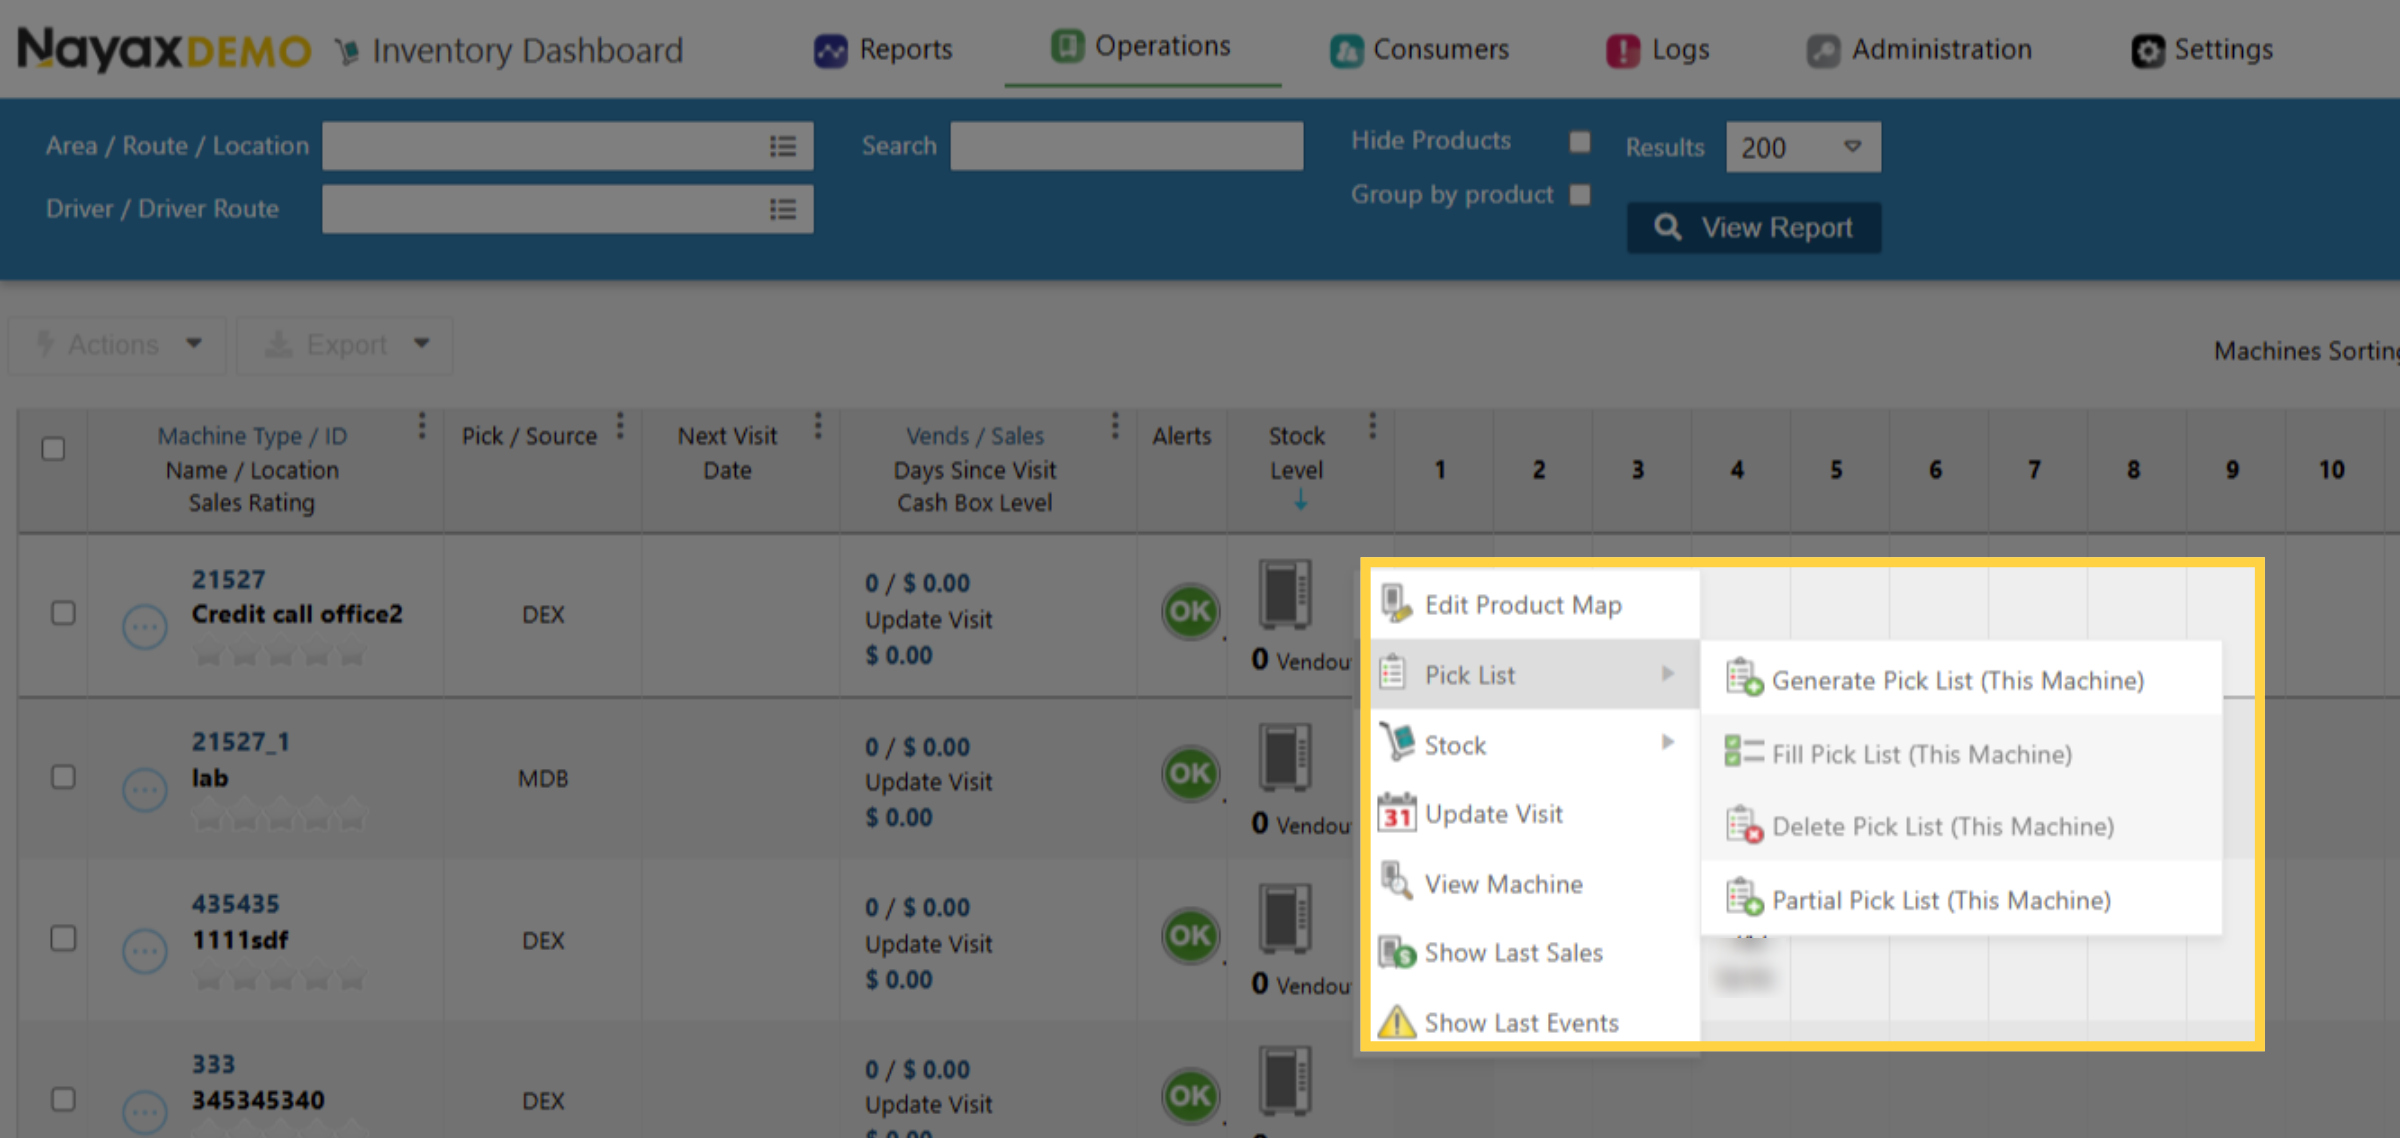
Right-click action menu showing all options
(Edit Product Map, Pick List, Stock, Update Visit, View Machine, Show Last Sales, Show Last Events)
Action Menu Options
- Edit Product MapOpens the product map for this machine in a pop-up window. Add products, update PAR levels, update On Hand quantities, and apply changes - all without leaving the dashboard. This is the same product map as in Operations > Machines. Click Apply Changes when done.
- Pick ListGenerates a picklist for this specific machine. Choose between a full picklist (all products) or a partial picklist (products you select). See Part 4 for full picklist instructions.
- StockAdjust the stock levels for this machine. You can fill the machine 100%, empty it completely, or adjust individual product quantities - all with a single click or manual entry.
- Update VisitLog a visit to this machine retroactively. Select the date and time you were on site, then choose the actions performed: cash collection, fill from picklist, fill machine to 100%, or any combination. This creates a timestamped record without requiring a return visit.
- View MachineOpens the machine's full configuration page in a pop-up window - the same view as Operations > Machines. Useful for quickly reviewing machine settings without leaving the dashboard.
- Show Last SalesDisplays the most recent sales for this machine in a pop-up window - the same data as Operations > Machines. Review sales and stock in one place without switching pages.
- Show Last EventsOpens the event log for this machine, showing alerts and recent activity. This is equivalent to Operations > Machines > Info > Last Alerts.
- Update Device VersionUpdates the firmware on the card reader. Used for troubleshooting and addressing known card reader issues.
⚠️Important: Always confirm the firmware version with Nayax Technical Support before updating. Some firmware versions are Beta builds and are not officially released - installing them may cause damage to the device.
- Add to Schedule DeprecatedThis option is no longer active. Visit scheduling has been replaced by Update Visit, which lets you log actions on-site or from the website at any time.
Generate a Picklist
Image AttachedThere are two ways to generate a picklist. Use whichever fits your workflow.
Method A - From the Inventory Dashboard (multiple machines)
-
1
Go to Operations > Inventory Dashboard and search your machines by Area / Route / Location.
-
2
Tick the checkbox in the first row to select all machines, or tick individual machines as needed.
-
3
Click Actions > Generate Picklist.
-
4
Choose your picklist options and click Generate Picklist.
💡Single machine shortcut: Right-click on a machine row > Pick List > Generate Picklist (This Machine) to skip the selection step.
Method B - From the Machine's Product Map
-
1
Go to Operations > Machines and search for the machine.
-
2
Click the Product Map tab.
-
3
Click Stock > Generate Picklist.
Partial Picklist
A partial picklist lets you select only specific products, which is useful when you only need to top up certain items rather than the whole machine.
-
1
When generating a picklist, choose Partial Picklist from the options.
-
2
Tick the checkboxes next to the products you want to include in the picklist.
-
3
Click Generate Picklist. Only the selected products appear in the output.
Result
✅ Your Inventory Dashboard is ready to use
You can now view real-time or DEX-based stock levels for every machine on your account, identify which machines need restocking using colour-coded indicators, manage visits and product maps directly from the dashboard, and generate picklists to streamline route fulfilment, all without navigating away from a single page.
Thank you!
Did you find this article helpful?