How to Upload a Custom Image To your Device | Operations
Occasionally, devices may display a black screen due to incorrect configuration of the Idle Custom Image feature. To prevent this add a custom set of self-checks that help users avoid common mistakes.
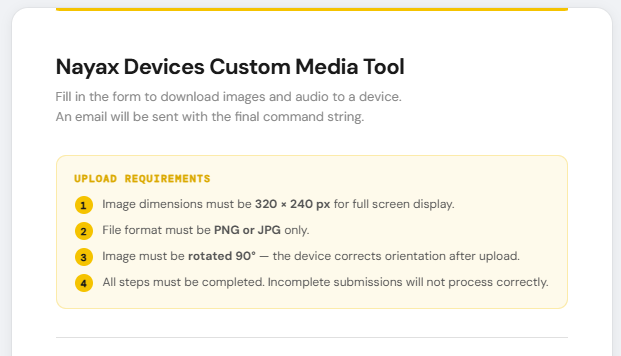
Prior to proceeding in Nayax Core, please fill in Device Images Tool Form
- Before uploading an image, complete the Device Images Tool Form.
- After submission, an email will be sent with the final string for your image.
You cannot proceed until the form is completed. Click here to access the Devices Custom Media Tool.
Prerequisites
Image Attached- Make sure you’ve filled out the Device Images Tool Form and received your final image string by email. You cannot proceed until this step is done.
- Access to Nayax Core
- Your custom image file, prepared to these specs:
- Size: 320 × 240 pixels
- Format: PNG or JPG
- Orientation: Rotated 90 degrees (the device corrects the rotation automatically)
- The Machine File Transfer and VPOS Touch attributes must be enabled on your machine. If they are missing, see: How to Add Attributes to a Machine | Operations
Video Guide
00:00: Learn how to upload a custom idle screen image to your device using the Device
00:04: Images Tool and Nayax Core.
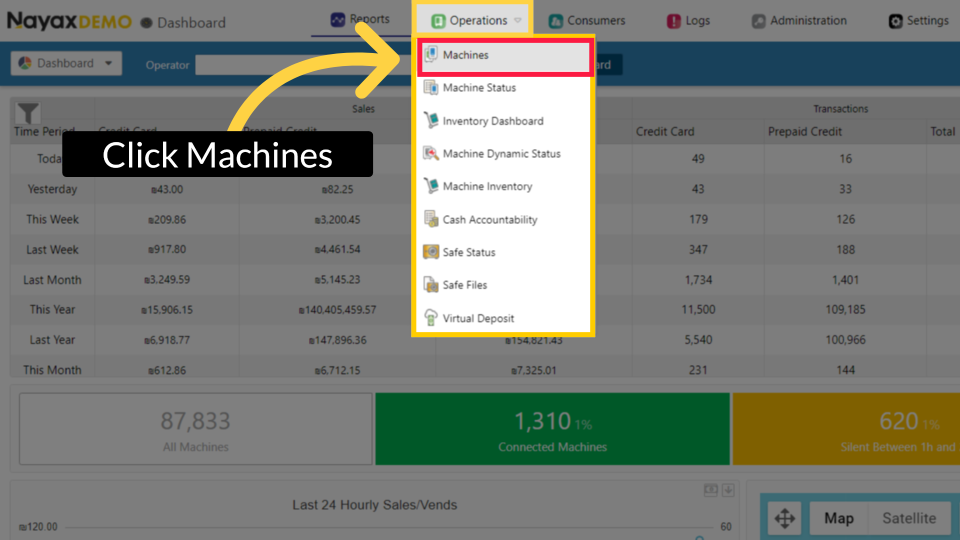
00:07: From the drop-down menu, click on Machines as highlighted.
00:10: Type the Operator's name and any other fields to locate the machine, then click
00:12: Search.
00:16: Locate and click on the machine from the hierarchy.
00:19: On the main General page, scroll down and click to expand the Machine File Transfer
00:23: section.
00:25: Paste the command string from your email into the FTP Parameters field, then click
00:29: on the checkbox next to the fie to enable it.
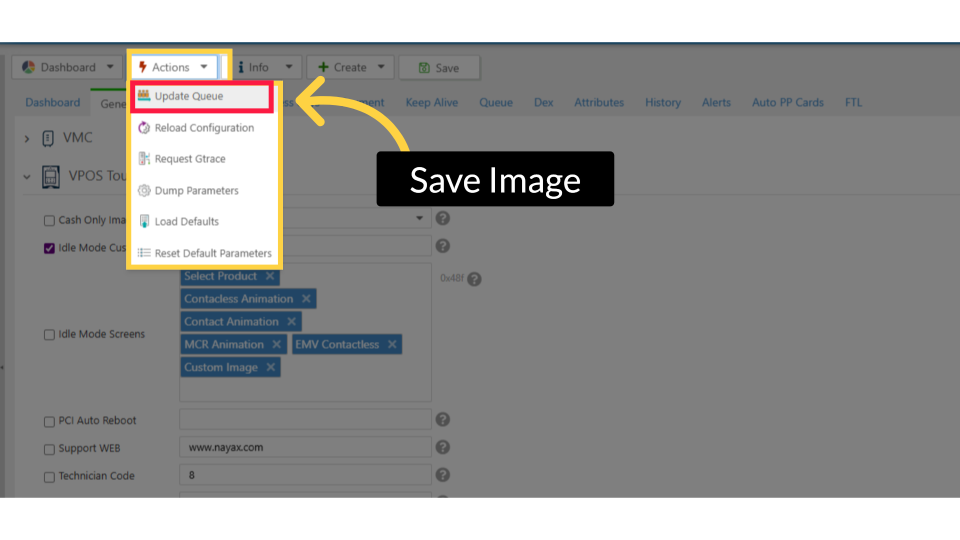
00:33: Click Actions Update Queue, then click Save. Important:
00:36: The device will begin downloading the image file.
00:38: Wait for the download to complete before continuing.
00:42: Once the download is complete, the general page will open;
00:44: scroll to the VPOS Touch section and click to expand.
00:49: In the Idle Mode Custom Image field, enter the file name from your email, followed
00:53: by two semicolons (;;). Then click on the checkbox next to the field to enable
00:58: it.
00:59: In the Idle Mode Screens dropdown, select Custom Image, then
01:02: click the checkbox next to the field to enable it.
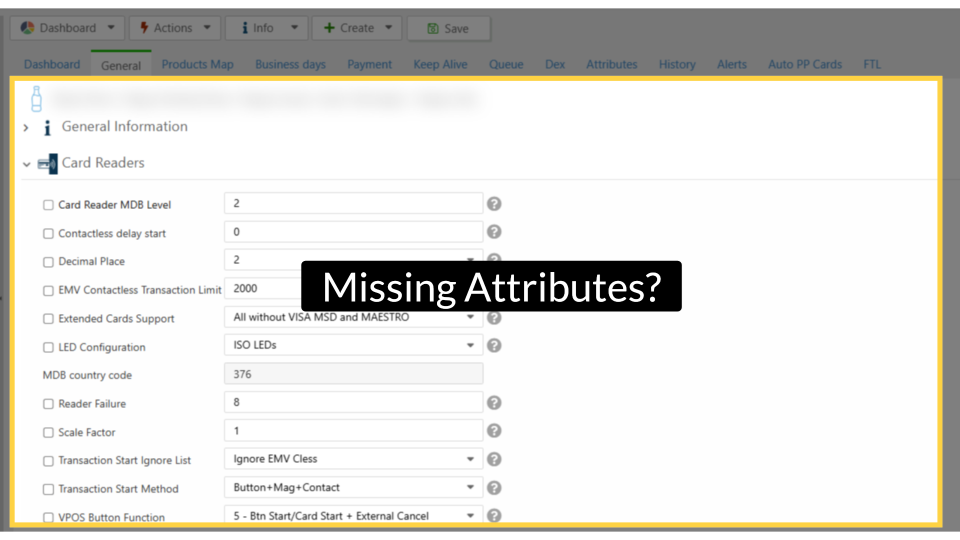
01:06: The attributes displayed may differ from those shown on your machine page due to
01:09: variations in device configurations and settings.
01:12: If any attributes are missing from your machine, click on the learn more link in
01:17: this video to learn how to add attributes to a machine in Nayax U.
01:22: Click the tooltip icons for explanations and field options.
01:26: Click Actions Update Queue, then click Save. Important:
01:29: The device will begin downloading the image file.
01:31: Wait for the download to complete before continuing.
01:35: A confirmation that your updates will appear as a 'Completed Successfully' message.
01:39: Your device will display the custom image on the idle screen after it picks up the
01:44: configuration update.
00:00: This guide will explain step by step on how to upload a custom image to Unix device. 00:05: On the dashboard of your NYX core management Suite click on the operations 00:09: tab 00:10: Select the machines tab from the drop-down menu. 00:13: Type in the field your operators name or machine ID in the search field. 00:17: Click the search button. 00:19: In the hierarchy sidebar locate your machine that you wish to upload the custom 00:23: image for. 00:25: Select the general tab 00:27: Select the machine file transfer attribute option. 00:30: Insert the Custom Image string that was sent to your email after filling out the form. 00:34: Tick the box next to FTP parameters attribute as highlighted in red in 00:38: the visual. 00:39: Go to actions on the top of the screen. 00:41: To save your progress click the update queue tab as indicated in red. 00:45: Once this has been collected by the device. It will begin a download on the screen. 00:48: You must wait for this download to finish completely before applying the image. 00:53: Once the download has been completed on the same page go to vpos touch attribute 00:57: section. 00:58: In the drop-down menu of the idle mode screens attribute select custom image. 01:02: In the idle mode Custom Image enter the name of your image file followed by 01:06: two semicolons. 01:08: Please make sure to include two semicolons after you have added your file name in the idle 01:12: mode Custom Image attribute. 01:14: Take the boxes next to the idle mode Custom Image and idle mode screens attributes 01:18: as highlighted in red in the visual. 01:20: Go to actions on the top of the screen. 01:22: To save your progress click the update queue tab as indicated in red. 01:26: Thank you for watching.
Click Machines
Image AttachedOn the dashboard of your Nayax Core platform, click on the Operations tab, then click on Machines from the drop-down menu.
Fill in Operator Details
Image Attached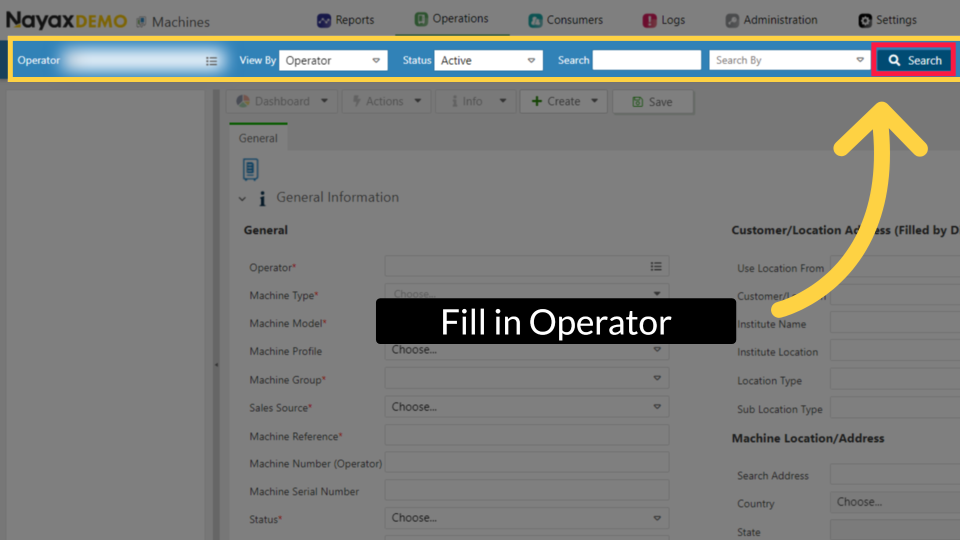
Locate Machine in Hierarchy
Image Attached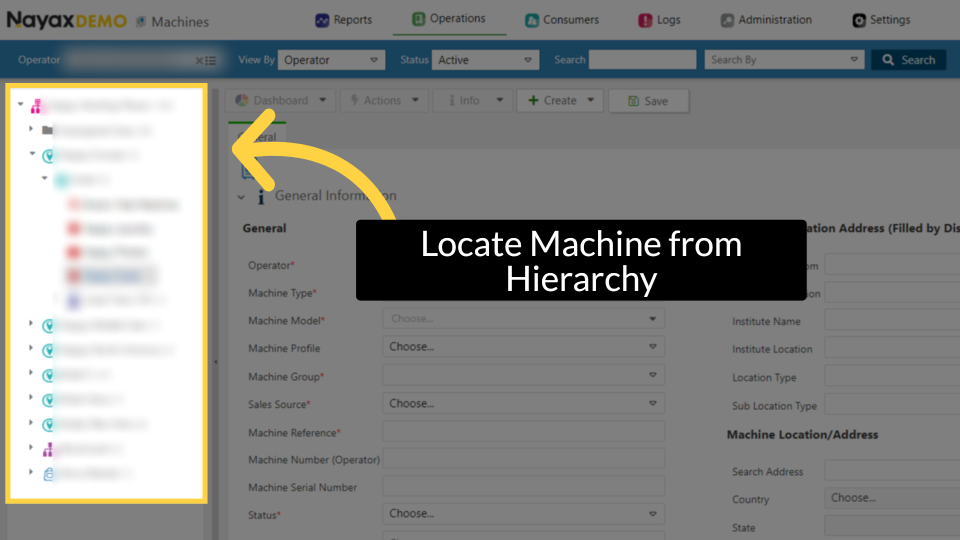
Machine File Transfer
Image Attached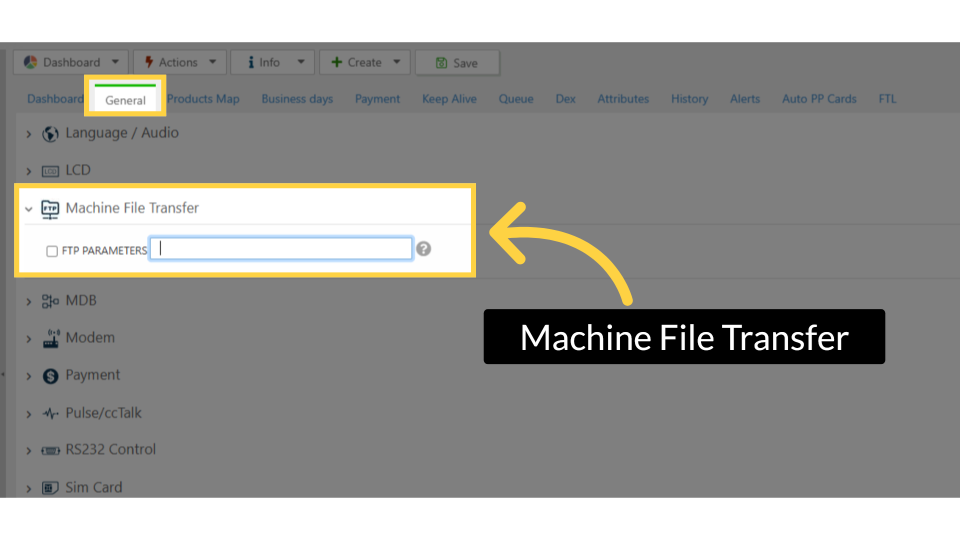
Paste Command String
Image Attached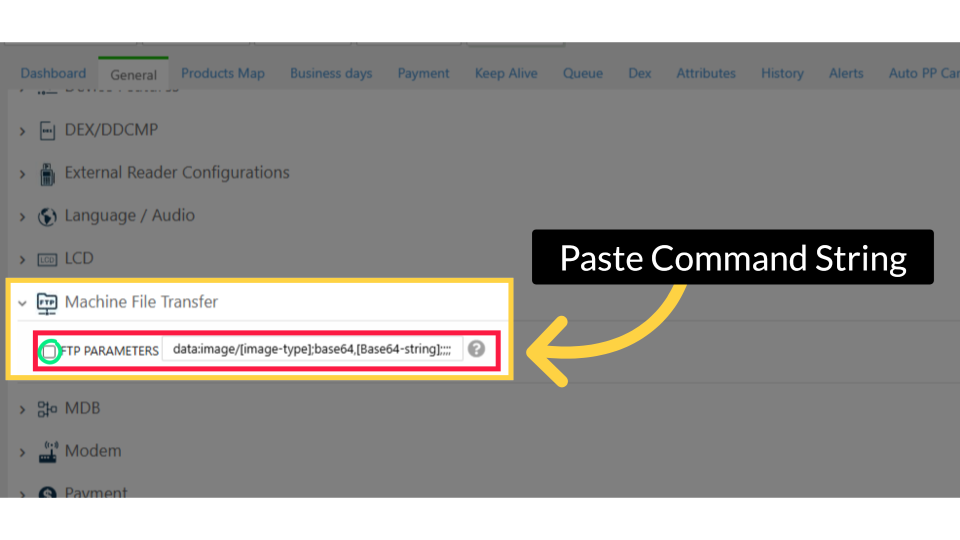
Save Image
Image AttachedClick Actions Update Queue, then click Save. Important: The device will begin downloading the image file. Wait for the download to complete before continuing.
Apply Custom Image Click VPOS Touch
Image Attached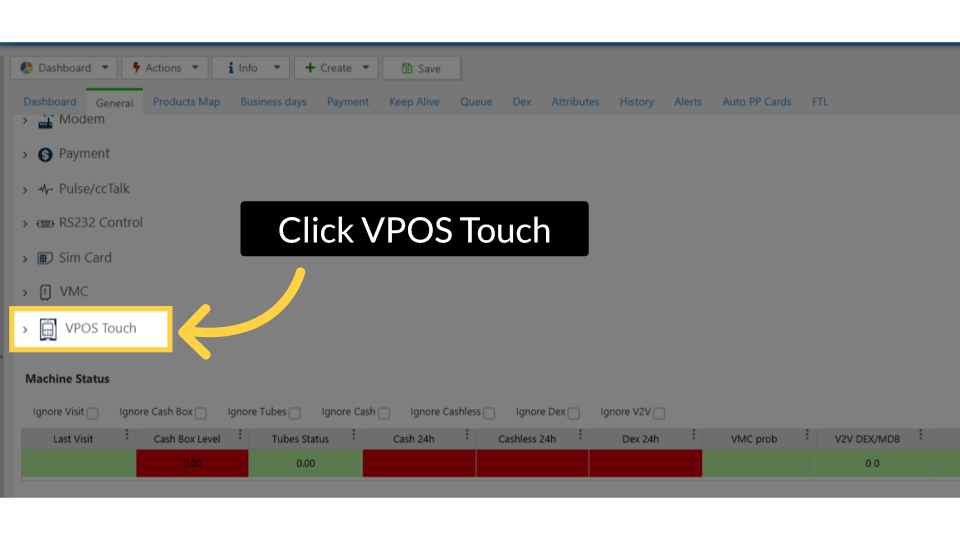
Apply the Custom Image
Image Attached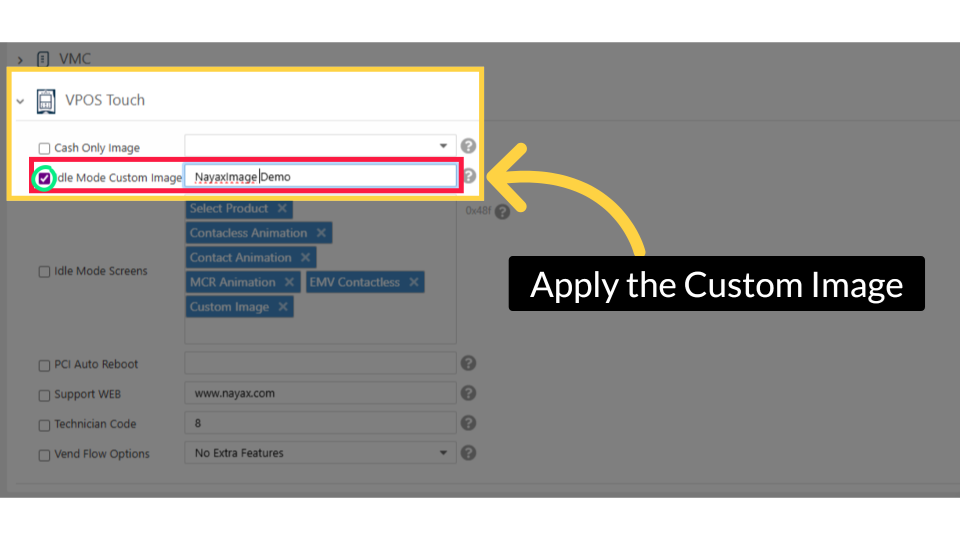
Idle Mode Screen
Image Attached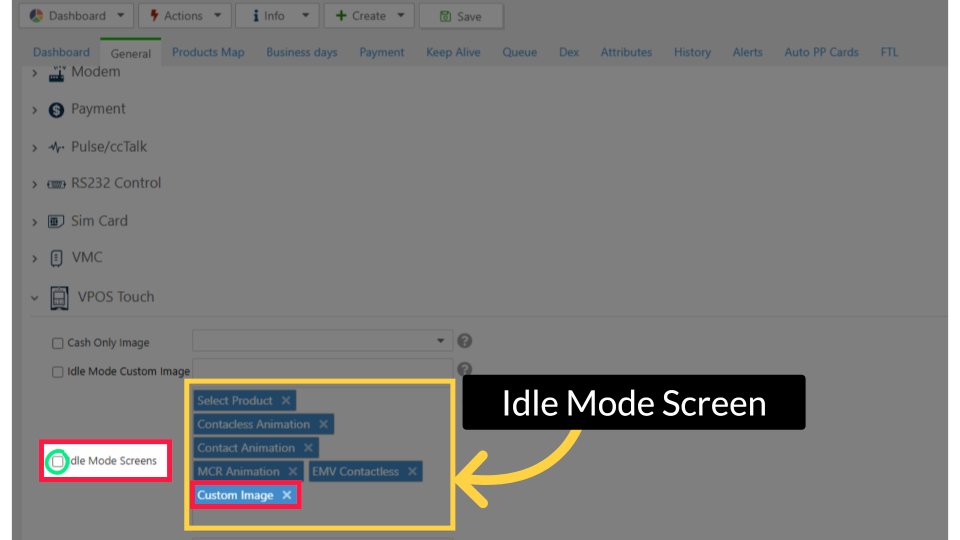
Missing Attributes?
Image AttachedThe attributes displayed may differ from those shown on your machine page due to variations in device configurations and settings.
If any attributes are missing from your machine, please refer to the guide on How to Add Attributes to Machines.
Tool Tip
Image Attached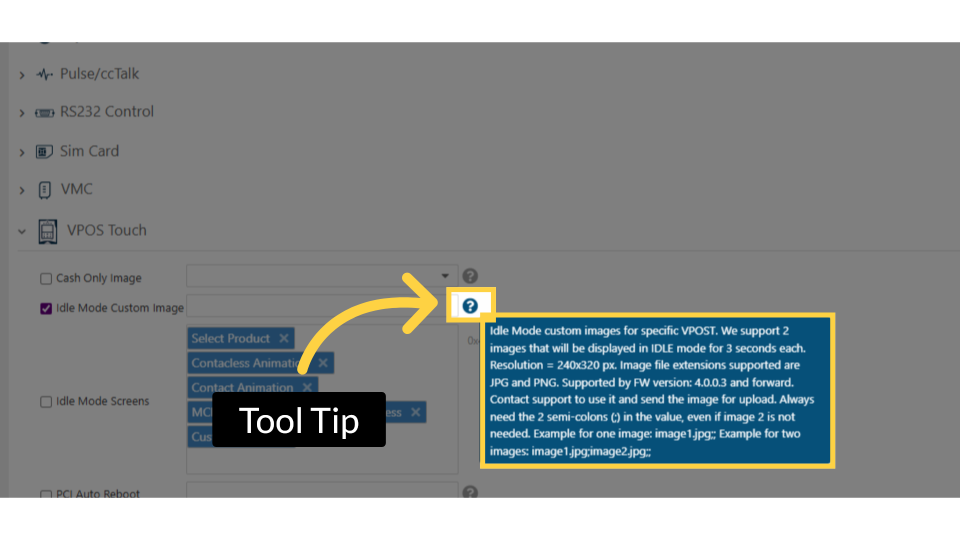
Send to Device
Image Attached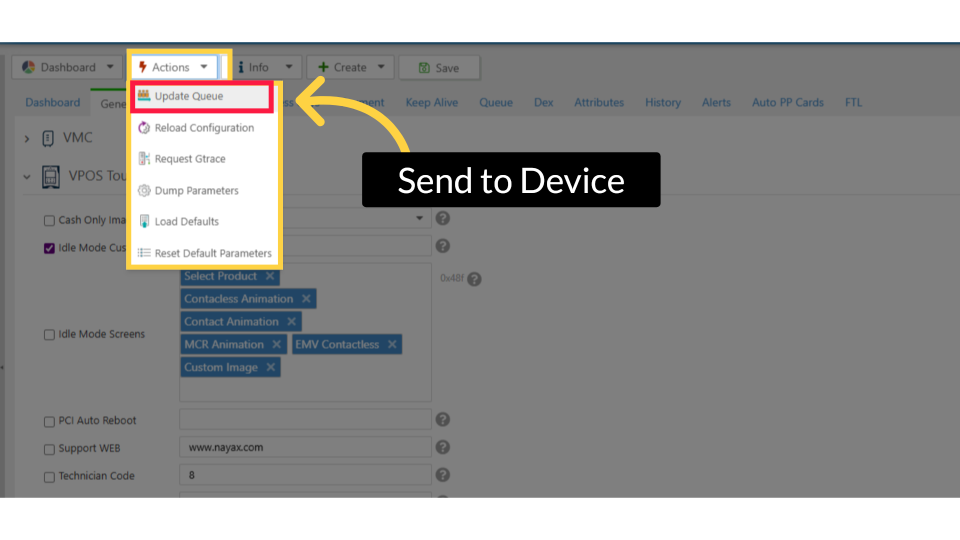
Completed Successfully
Image Attached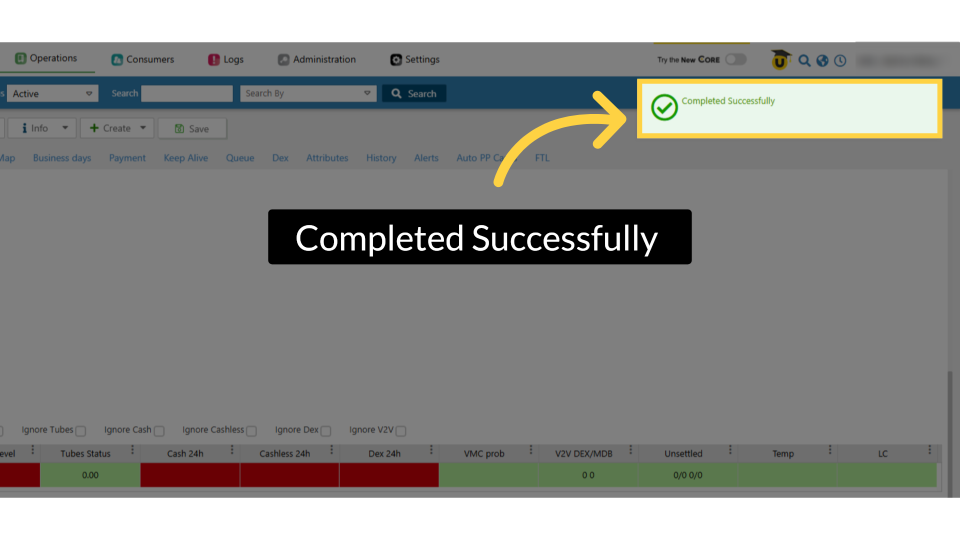
Thank you!
Did you find this article helpful?