00:00: This guide will walk you through configuring linear mode on the Pulse Wizard feature for your device using Nayax Core.
00:07: On the dashboard of your MoMa app, search for and tap on the Machine you wish to set the pulse for.
00:12: In the Machine Overview, slide the tabs menu to locate the Settings tab.
00:17: Tap the Settings tab.
00:19: From the Settings screen, select Pulse Wizard from the options as highlighted.
00:30: Please fill out the fields in the pricing section. Be aware that the first four fields are mandatory and must not be left empty.
00:37: Next, in the timer settings, select "Yes" if your machine has an external increment button. If not, select "No."
00:45: Fill in the active and inactive time. Inactive time defines the interval between pulses.
00:50: The Cash Report Options section is optional; however, it helps configure the sending of cash reports, including cash transactions.
00:58: The advanced settings allow you to configure the inhibit feature for your Pulse settings.
01:04: The advanced settings allow you to configure the inhibit feature for your Pulse settings.
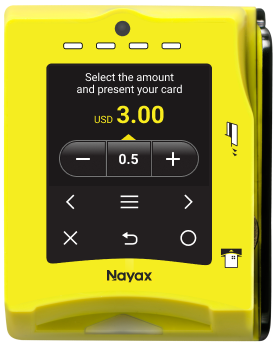
01:09: Use the VPOST device image to preview how the messages will appear on your device. Set your message prompts and tap Apply to continue.
01:17: When you are ready to save your configured pulse settings, tap the yellow save button to apply the changes.
01:24: A pop-up confirmation will appear for you to confirm that your parameters will be updated to apply your single price Pulse settings immediately. You can choose to click the 'Update' button to update immediately or click the 'Later' button to schedule the update for a later time.
01:40: A confirmation that your Pulse configuration has been updated will appear. Close the message, and your machine is now set up for Pulse.