How to Create a Bulk Remote Price Change (RPC) | Operations
Learn how to configure a bulk remote price change in Nayax Core, enabling you to update multiple product prices quickly and efficiently.
Prerequisites for your device
To ensure the Bulk RPC feature functions flawlessly on your device/machine, please verify the following:
- DEX Compatibility: Confirm that your device/machine is compatible with and supports DEX.
- Firmware Update: Ensure your device/machine is running the latest firmware version.
- Product Map Setup: Make sure your product maps are fully set up within Nayax Core.
Completing these steps will help you avoid any disruptions and ensure smooth operation.
Video Guide
00:00: Learn how to configure a bulk remote price change in Nayax Core, enabling you to
00:04: update multiple product prices quickly and efficiently.
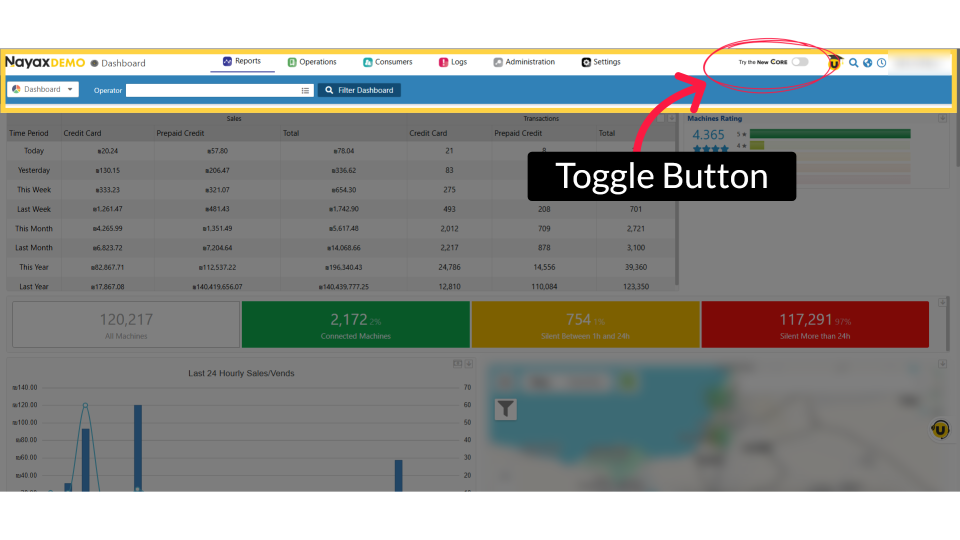
00:08: This feature is available exclusively on New Core. To access the New Nayax
00:13: Core platform, click the 'Try New Core' toggle button as highlighted.
00:18: On the dashboard of your New Nayax Core platform, click on the Operations tab,
00:22: then click on Machines from the drop-down menu.
00:25: Click on hierarchy, icon to search for your specific machine or operator.
00:30: Enter your operator's name or Machine ID in the search field. Once located, select it.
00:36: On the Machines page, you can search for machines by using the filter icon and the
00:40: filter options highlighted in red.
00:43: Click the checkbox next to each machine you want to enable for the new remote price.
00:48: Click the three dots to open the menu and view available bulk pricing actions.
00:53: Click on Remote Price Change in the menu bar.
00:56: The Remote Price Change window displays products from the machines
00:59: you selected. You can use the search bar to find a specific product, or select the
01:04: checkbox next to each product you want to update.
01:07: Click Next once you've selected your products to continue.
01:10: The remote Price Change screen will open, displaying the selected products.
01:15: Click the drop‑down arrow to expand
01:17: the screen. Expanding is necessary for two reasons: To enter any missing PC codes
01:23: To set different prices at the machine or bin level. Note:
01:26: The PC value can be adjusted as needed.
01:29: Type in the price edit under Retail price as highlighted.
01:33: If you see the yellow triangle error icon, it indicates that some required fields
01:38: are empty.
01:38: You must fill out these fields before
01:40: you can continue.
01:42: You can apply changes to all machines or exclude specific ones by using the minus
01:47: button, as highlighted.
01:49: Select when you’d like the remote price change to take effect. To apply the change
01:53: immediately, select Now. If you prefer to schedule it for later, choose the desired
01:58: date and time instead.
02:00: If you choose to schedule the update for a non‑peak time that works best for your
02:04: device, you can select a specific date and time.
02:07: To complete the remote price change,
02:09: click Update Bin.
02:11: A pop‑up will appear confirming that the changes were updated successfully.
02:16: After the price update is successfully completed, you can view the status of your
02:20: remote price change, as highlighted in red.
00:00: This guide will walk you through the steps to perform a bulk remote price change using Nyx. 00:05: To access new core, please. Click on the flash icon on the top right hand of the page. 00:10: On the dashboard of your NYX core management Suite click on the operations 00:14: tab 00:15: Select the machines tab from the drop-down menu. 00:18: Click on the icon on the top left in order to search for your specific machine 00:22: or operator. 00:24: Type in your operators name or machine ID in the search field 00:28: In the hierarchy sidebar locate your machine or operator. 00:32: Keep in mind you can filter the relevant machines using the options highlighted 00:36: in red on the machines page. 00:38: Take the box or boxes next to the relevant machines that you wish to bulk remote price 00:42: change. 00:43: A new menu will appear where you should click on the three dots to reveal additional 00:47: feature options. 00:49: Click on remote price change in the menu bar. 00:52: The remote price change pop-up will be displayed right after this list includes 00:56: the products from the previously selected machines. 00:59: You can search for your product as indicated in red or you can individually 01:03: tick the boxes next to the products you wish to change the price as indicated 01:07: in yellow. 01:09: You also have the option to filter your products by clicking on the drop-down menu. 01:14: Click next Once you have selected your products. 01:17: A new screen will be displayed presenting the selected products. 01:21: You can adjust the retail price in the section highlighted in yellow. 01:25: Click on the drop-down Arrow to expand the screen expansion is needed for 01:29: two reasons to fill in missing PC codes or to set different prices 01:33: at the machine or bin level. 01:35: Fill in the price change under retail price as indicated in red 01:39: You can apply changes to all machines or exclude specific ones by using 01:43: the minus button as indicated in red. 01:46: Please note the PC value can be adjusted as needed. 01:50: If you see the yellow triangle error icon, this indicates that there are required 01:54: fields that are empty. These fields need to be filled out before being 01:58: able to continue. 02:00: Click on when you would like to the remote price change to take place decide now or schedule 02:04: in advance if you wish to schedule later, you can choose the date and 02:08: time. 02:09: To finalize the remote price change click update. 02:12: A pop-up will be displayed confirming the changes were made successfully. 02:16: You can check the status of your remote price change after the price update is successfully 02:20: completed as highlighted in red. 02:23: Thank you for watching.
Exclusively on New Core
Image AttachedThis feature is available exclusively on New Core. To access the New Nayax Core platform, click the 'Try New Core' toggle button as highlighted.
Click on Machines
Image Attached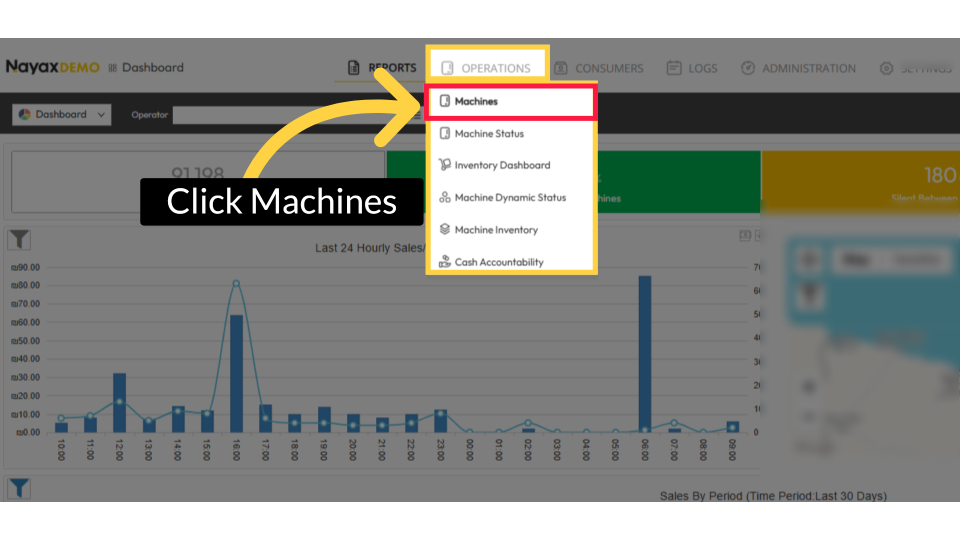
Click on Hierarchy Icon
Image Attached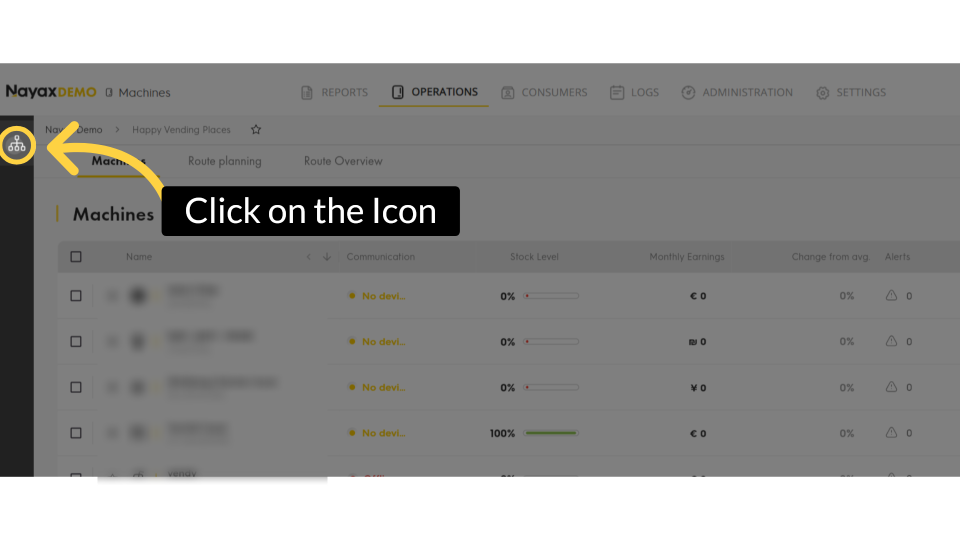
Type in Operator Name or Machine ID
Image Attached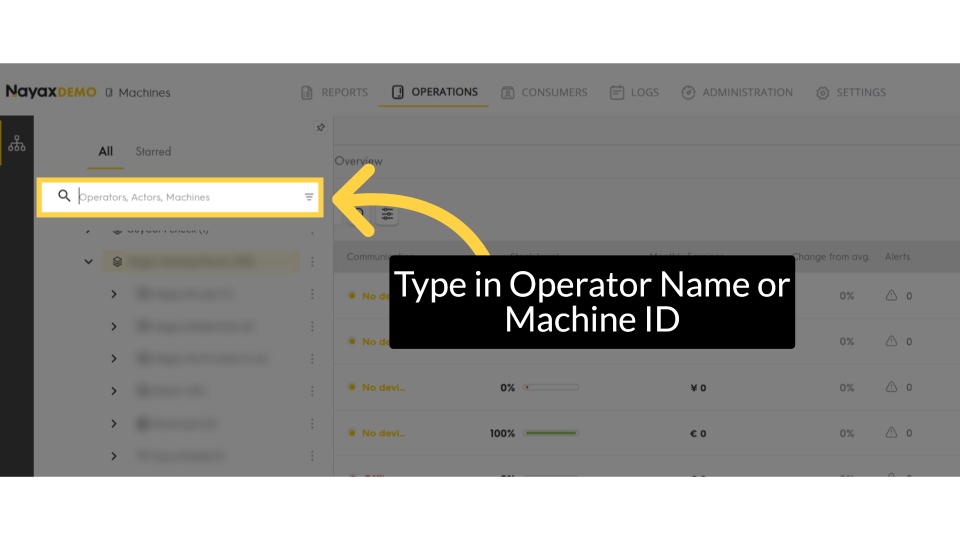
Filter Specific Machines
Image Attached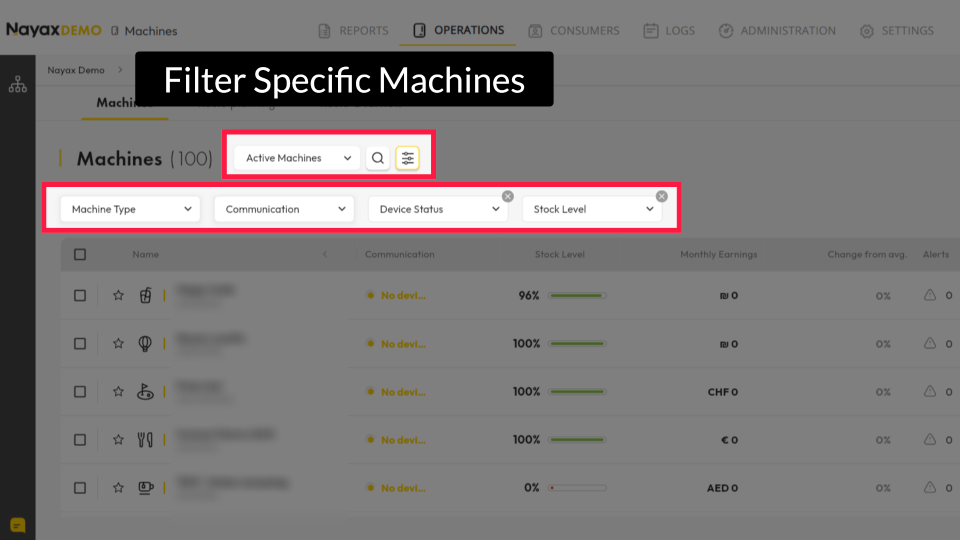
Enable Machines
Image Attached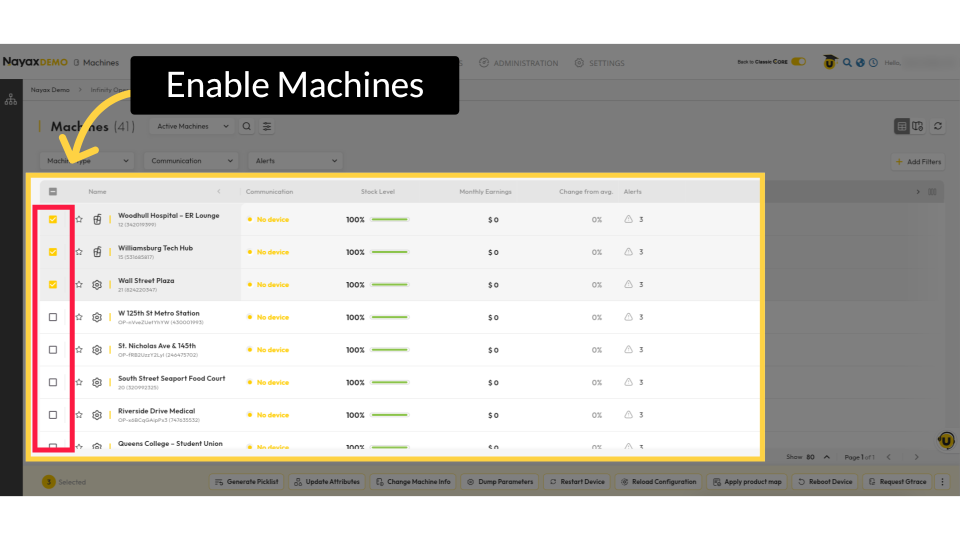
Click on the Three Dots
Image Attached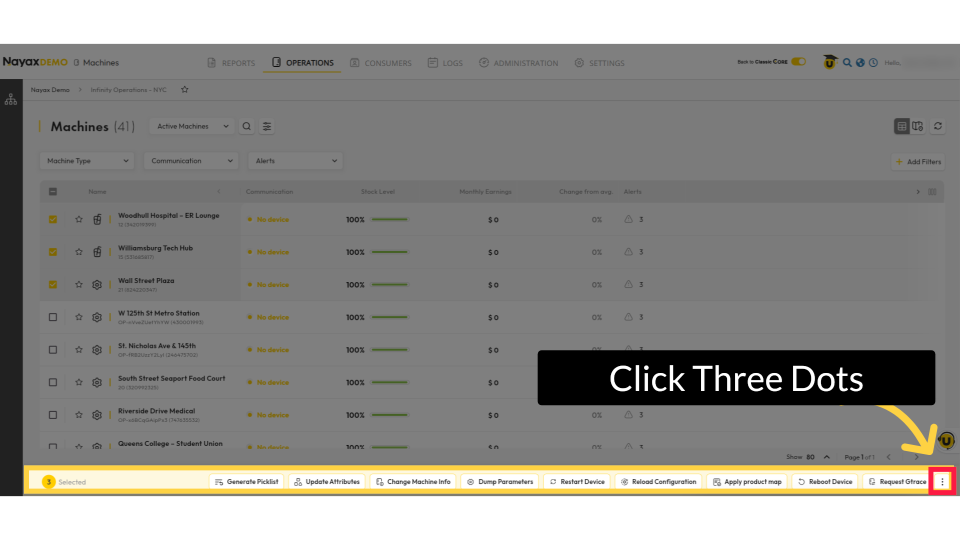
Select Remote Price Change
Image Attached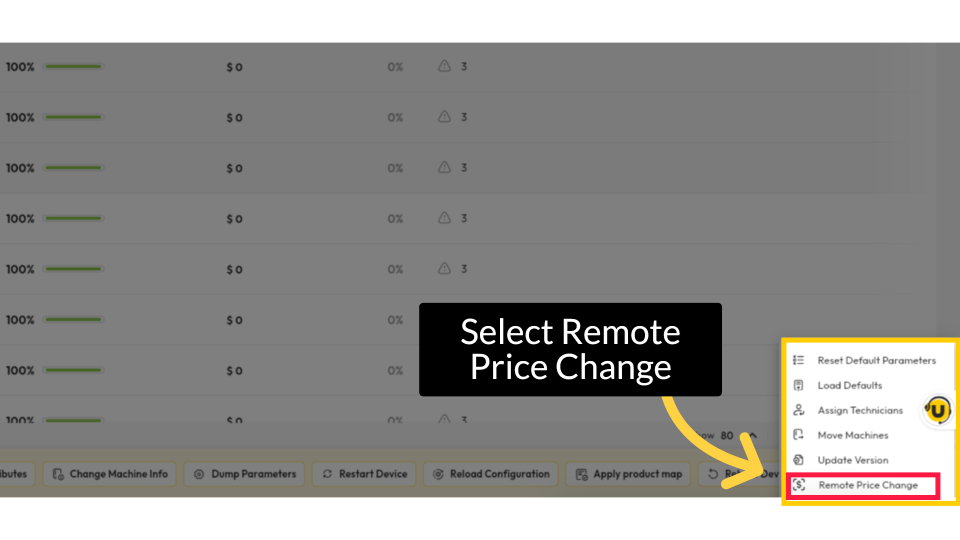
Select Products to Update
Image Attached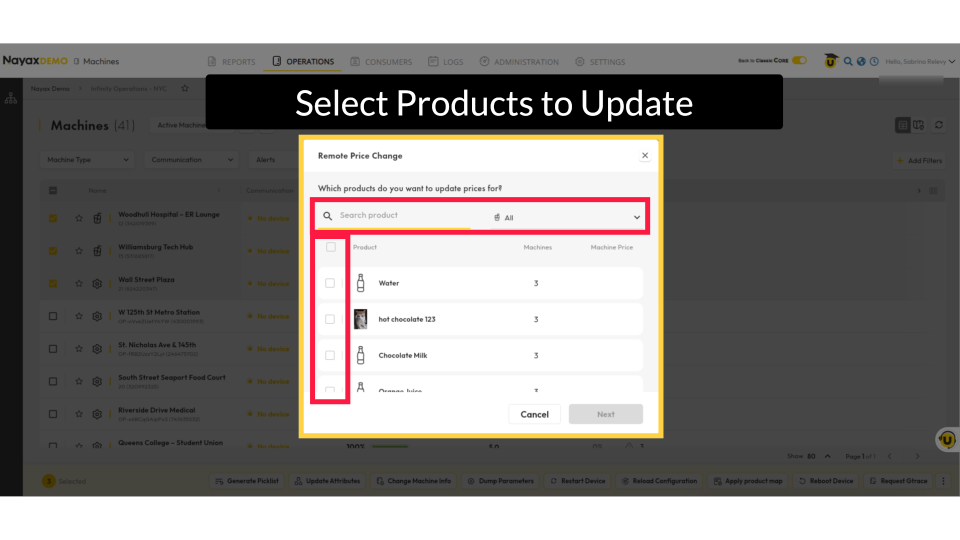
Click Next
Image Attached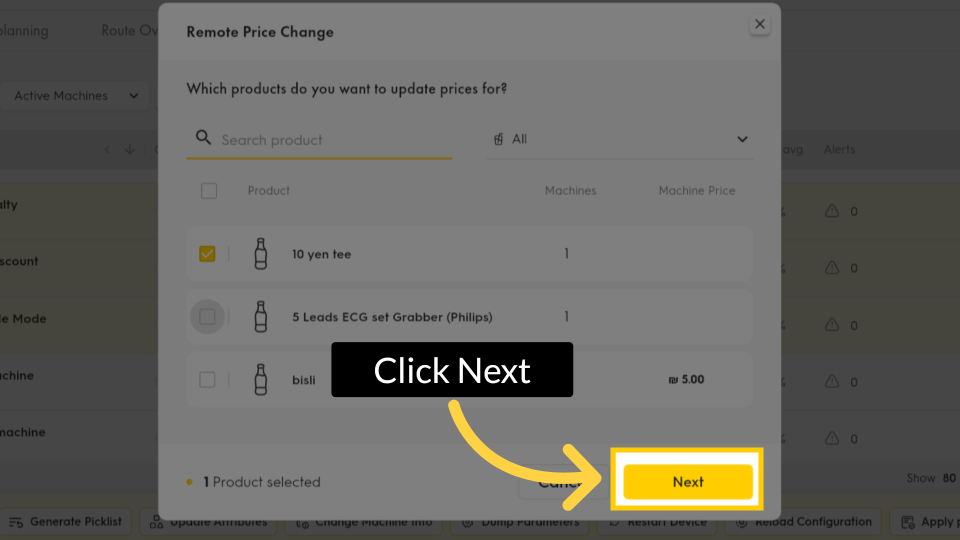
Remote Price Change
Image Attached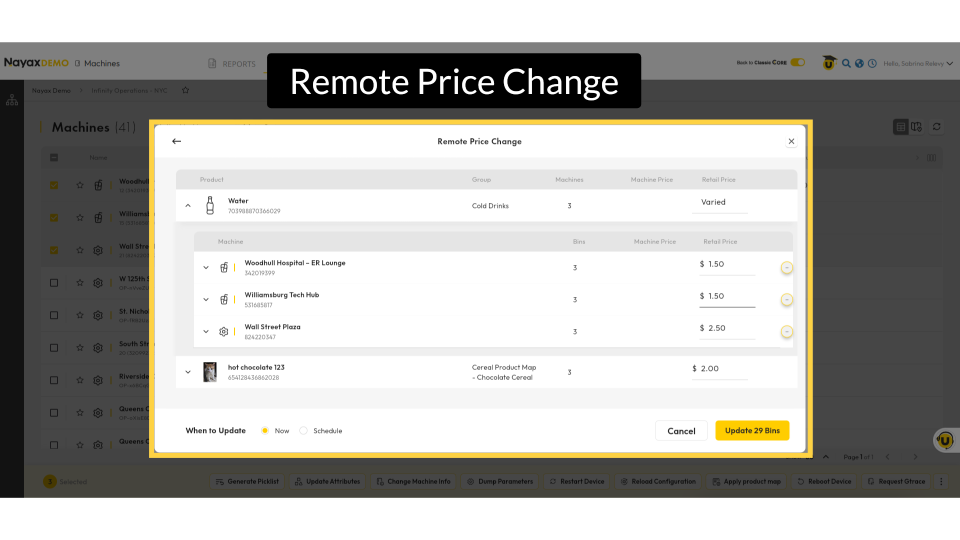
Edits
Image Attached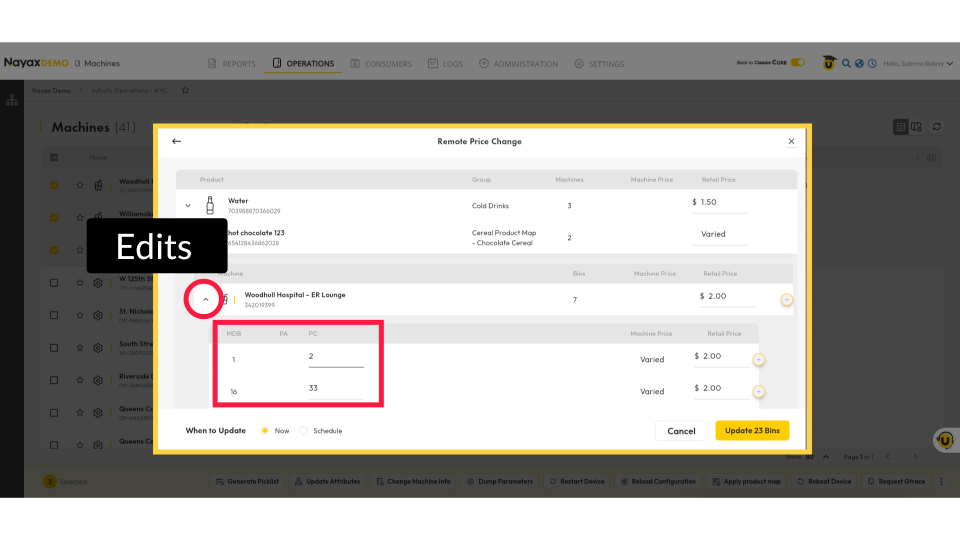
Edit Price
Image Attached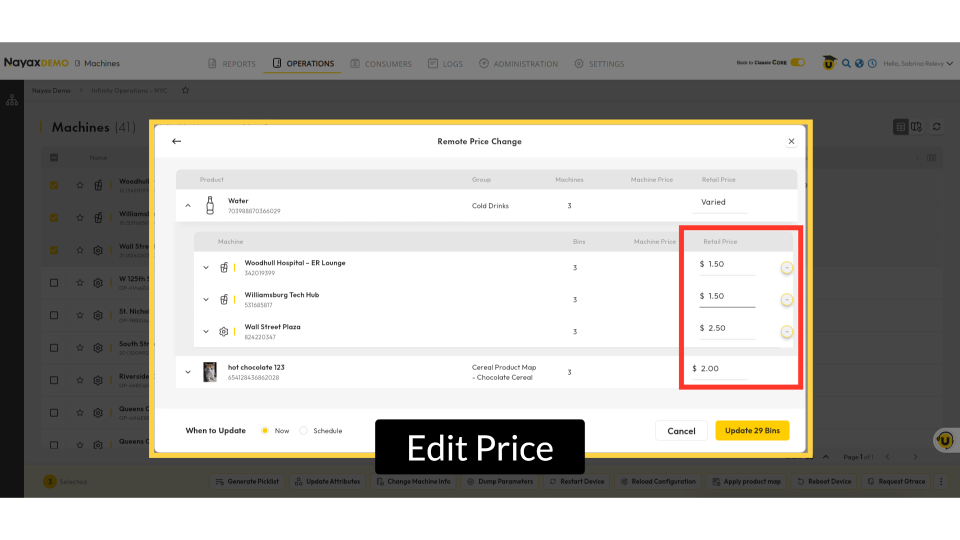
Mandatory Fields
Image Attached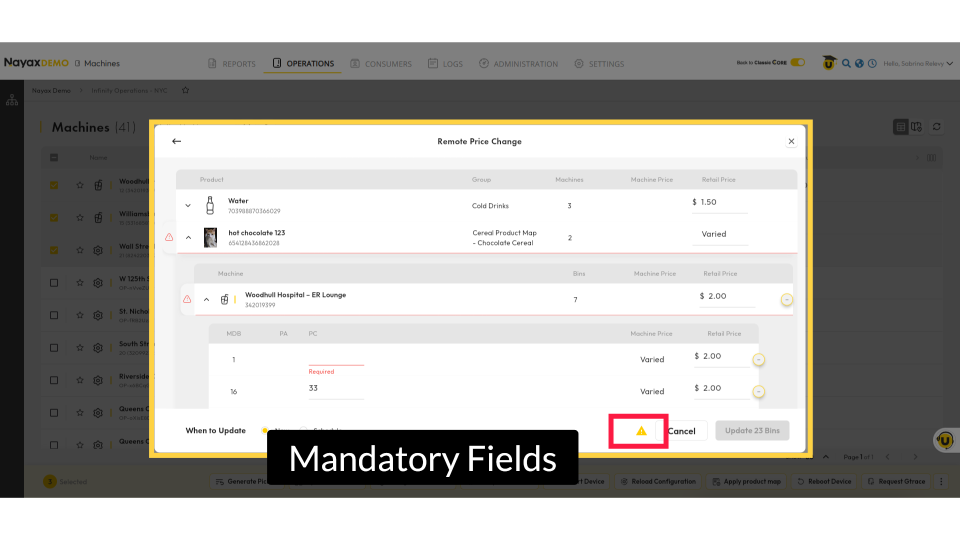
Apply Changes to All Machines or Exclude Specific Ones
Image Attached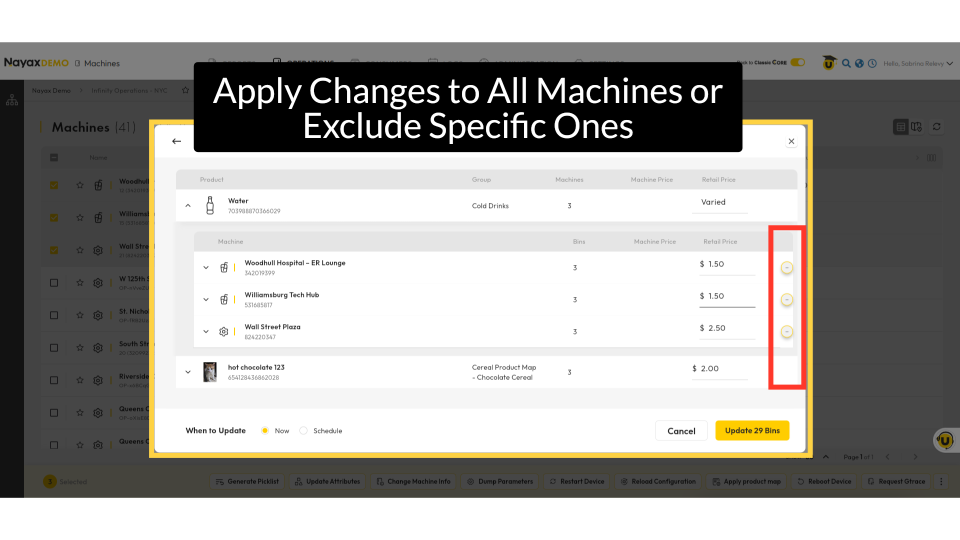
Update Now or Schedule Later
Image Attached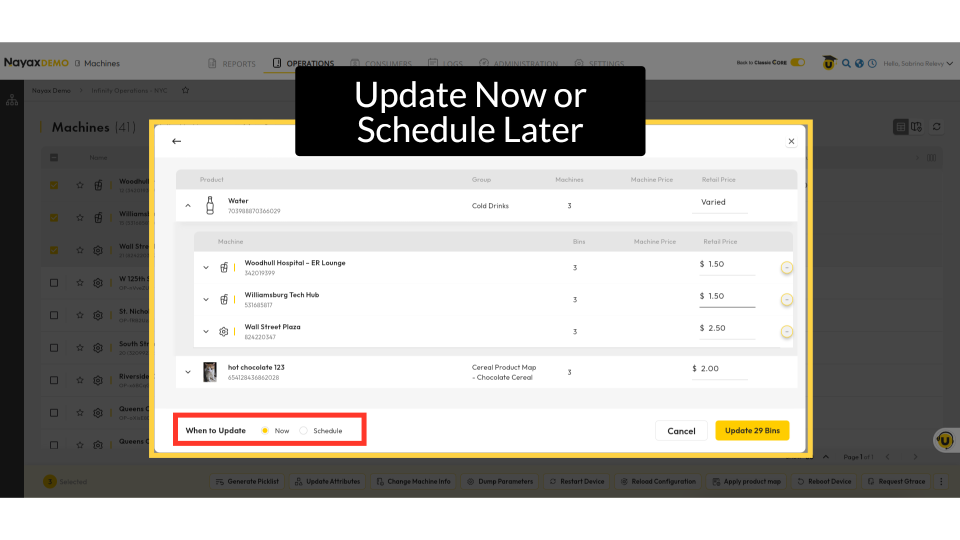
Schedule Update
Image Attached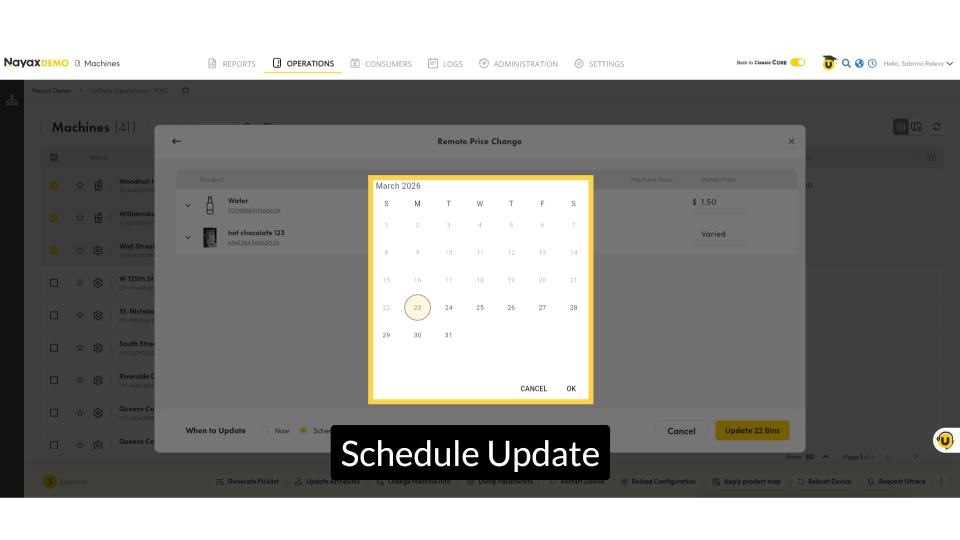
Click Update
Image Attached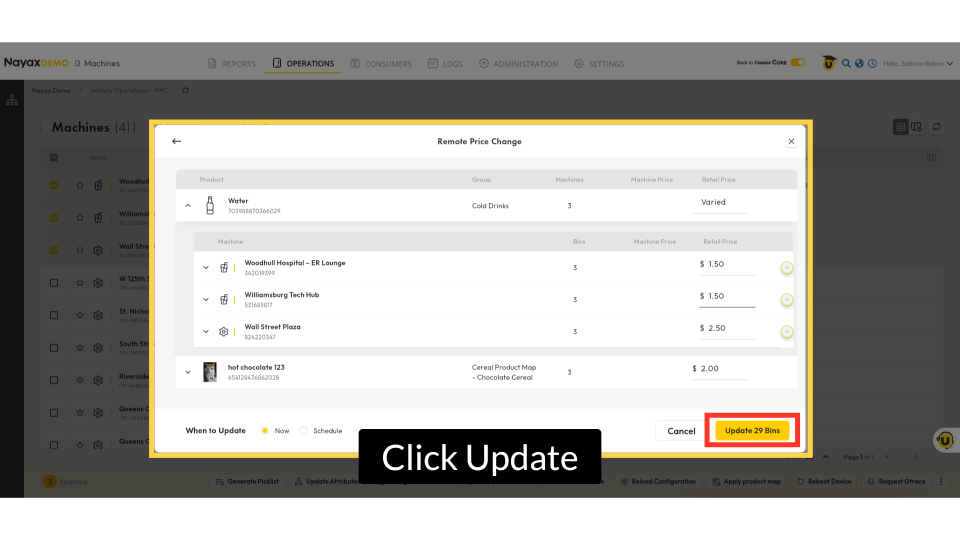
Updated Successfully
Image Attached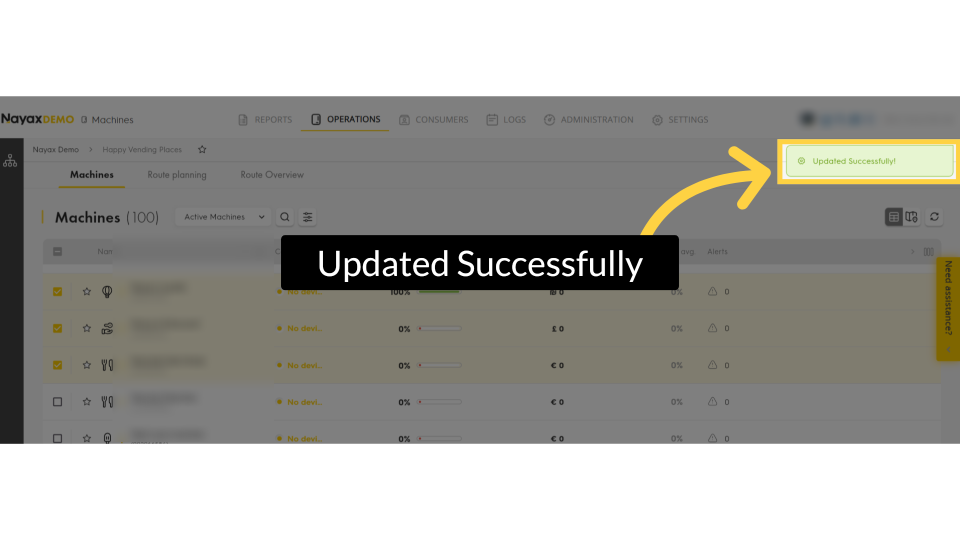
Status Updates
Image Attached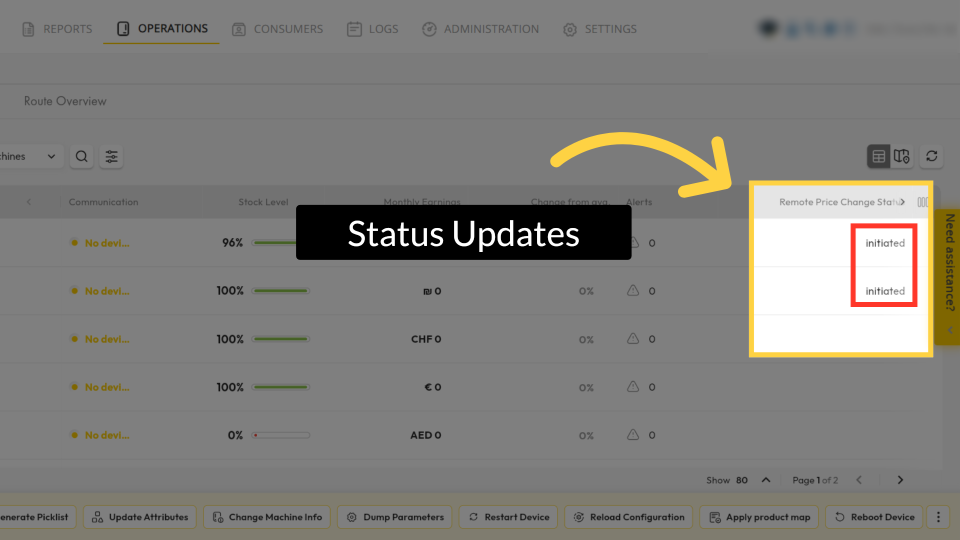
Thank you!
Did you find this article helpful?